Welcome to the Human Resources training guide. This comprehensive guide explores
the various features of the HR module, including capturing timesheets, interpreting
awards, storing training qualifications and certificates, handling leave
requests,
and much more.
1. Contacts Module
The Contacts module is your Kynection address book, storing both internal and external contacts, as well as company information. Open Contacts and navigate to Groups.
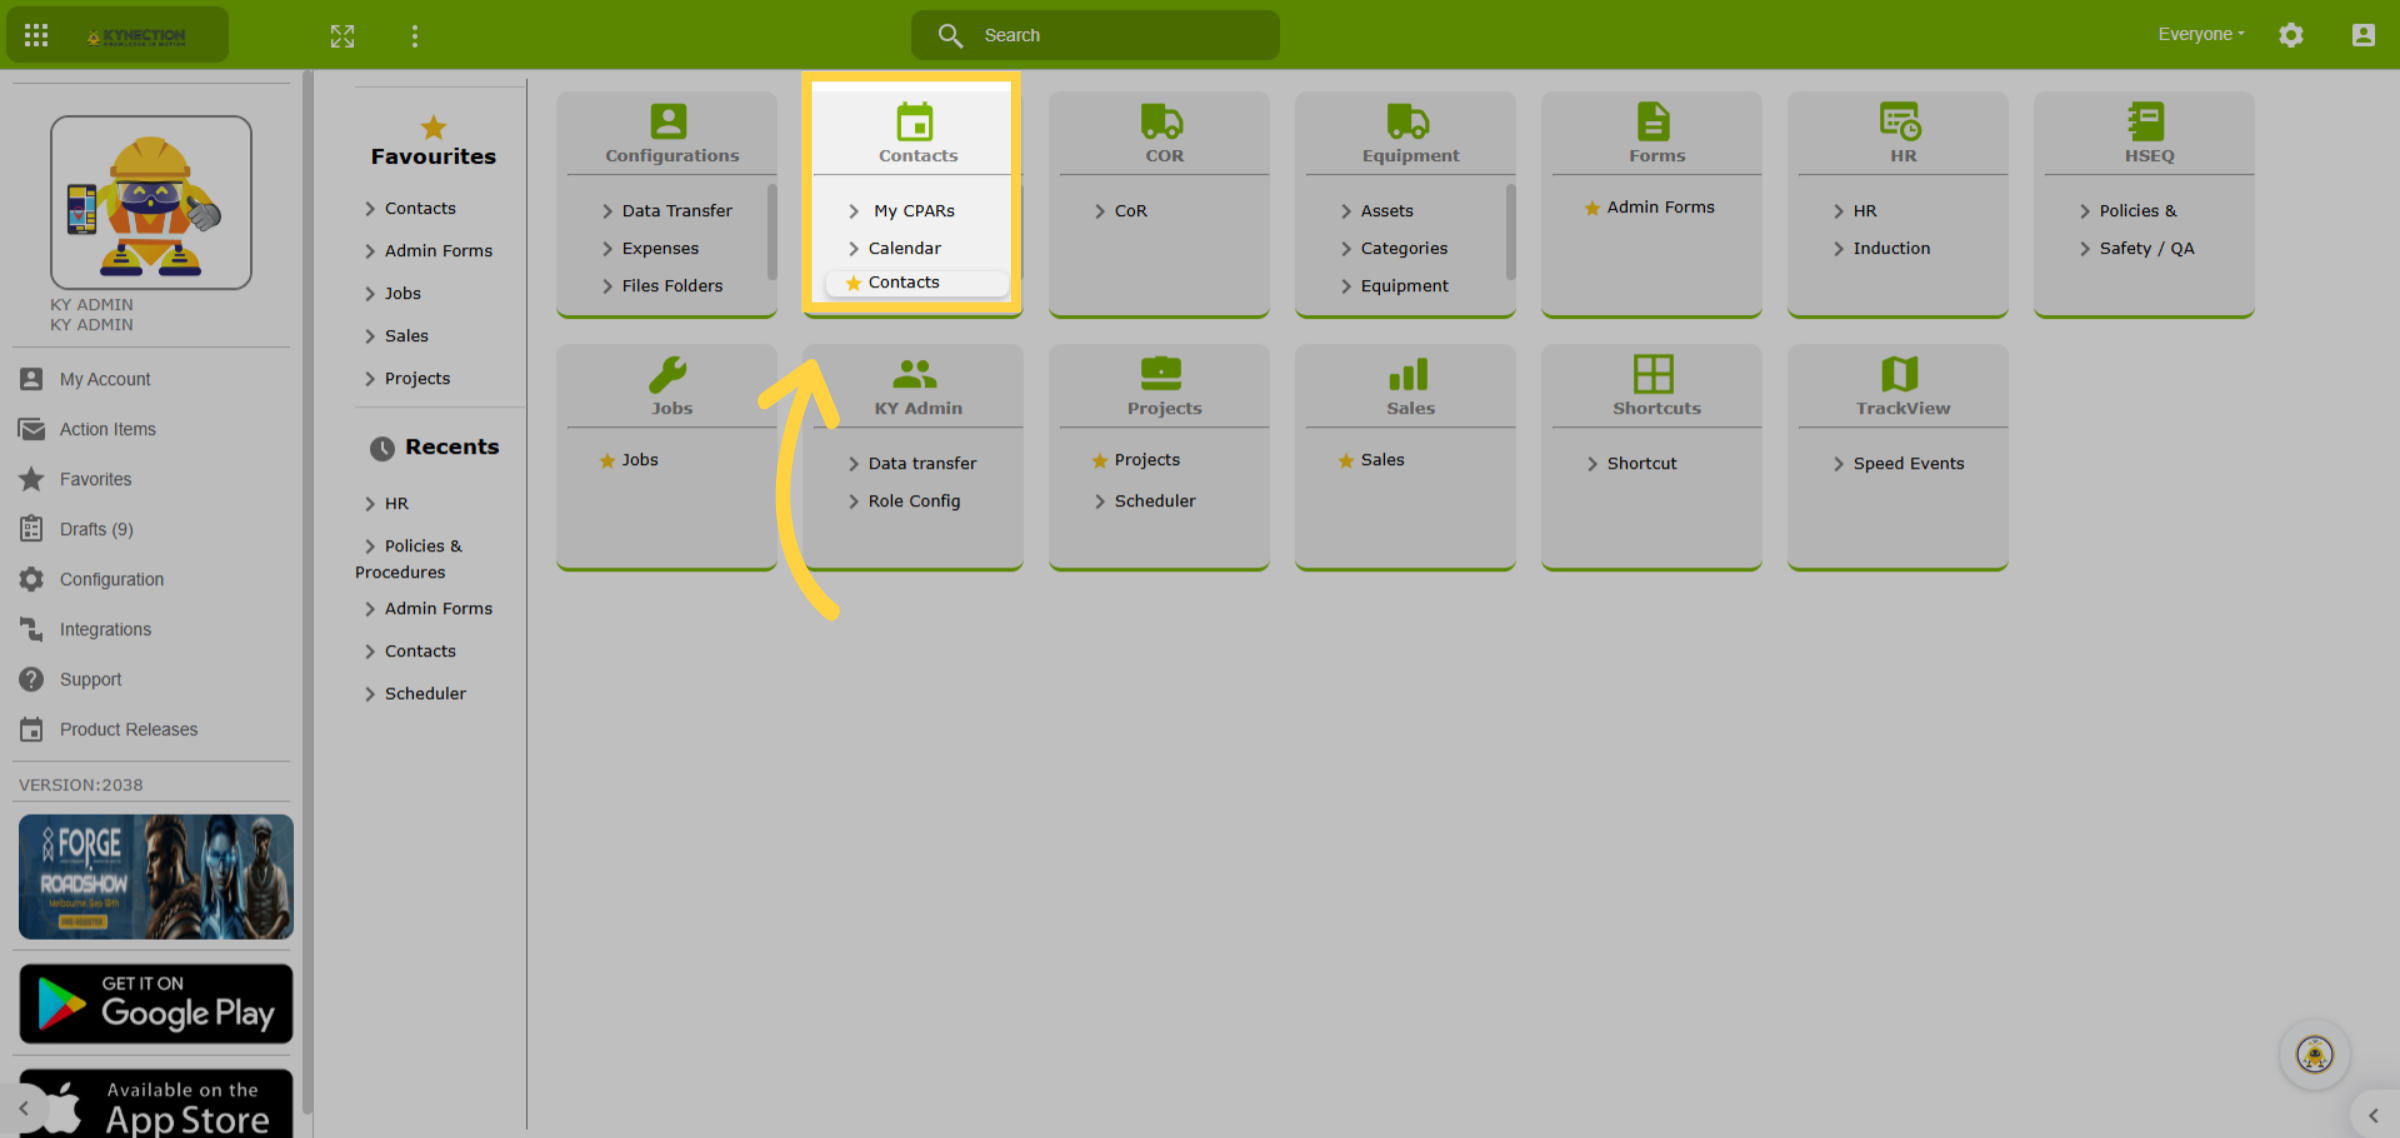
2. Groups
Groups serve as a vital tool for categorising both contacts and companies. Groups play a crucial role in data retrieval across various functionalities, such as the Employee groups utilised within HR processes.
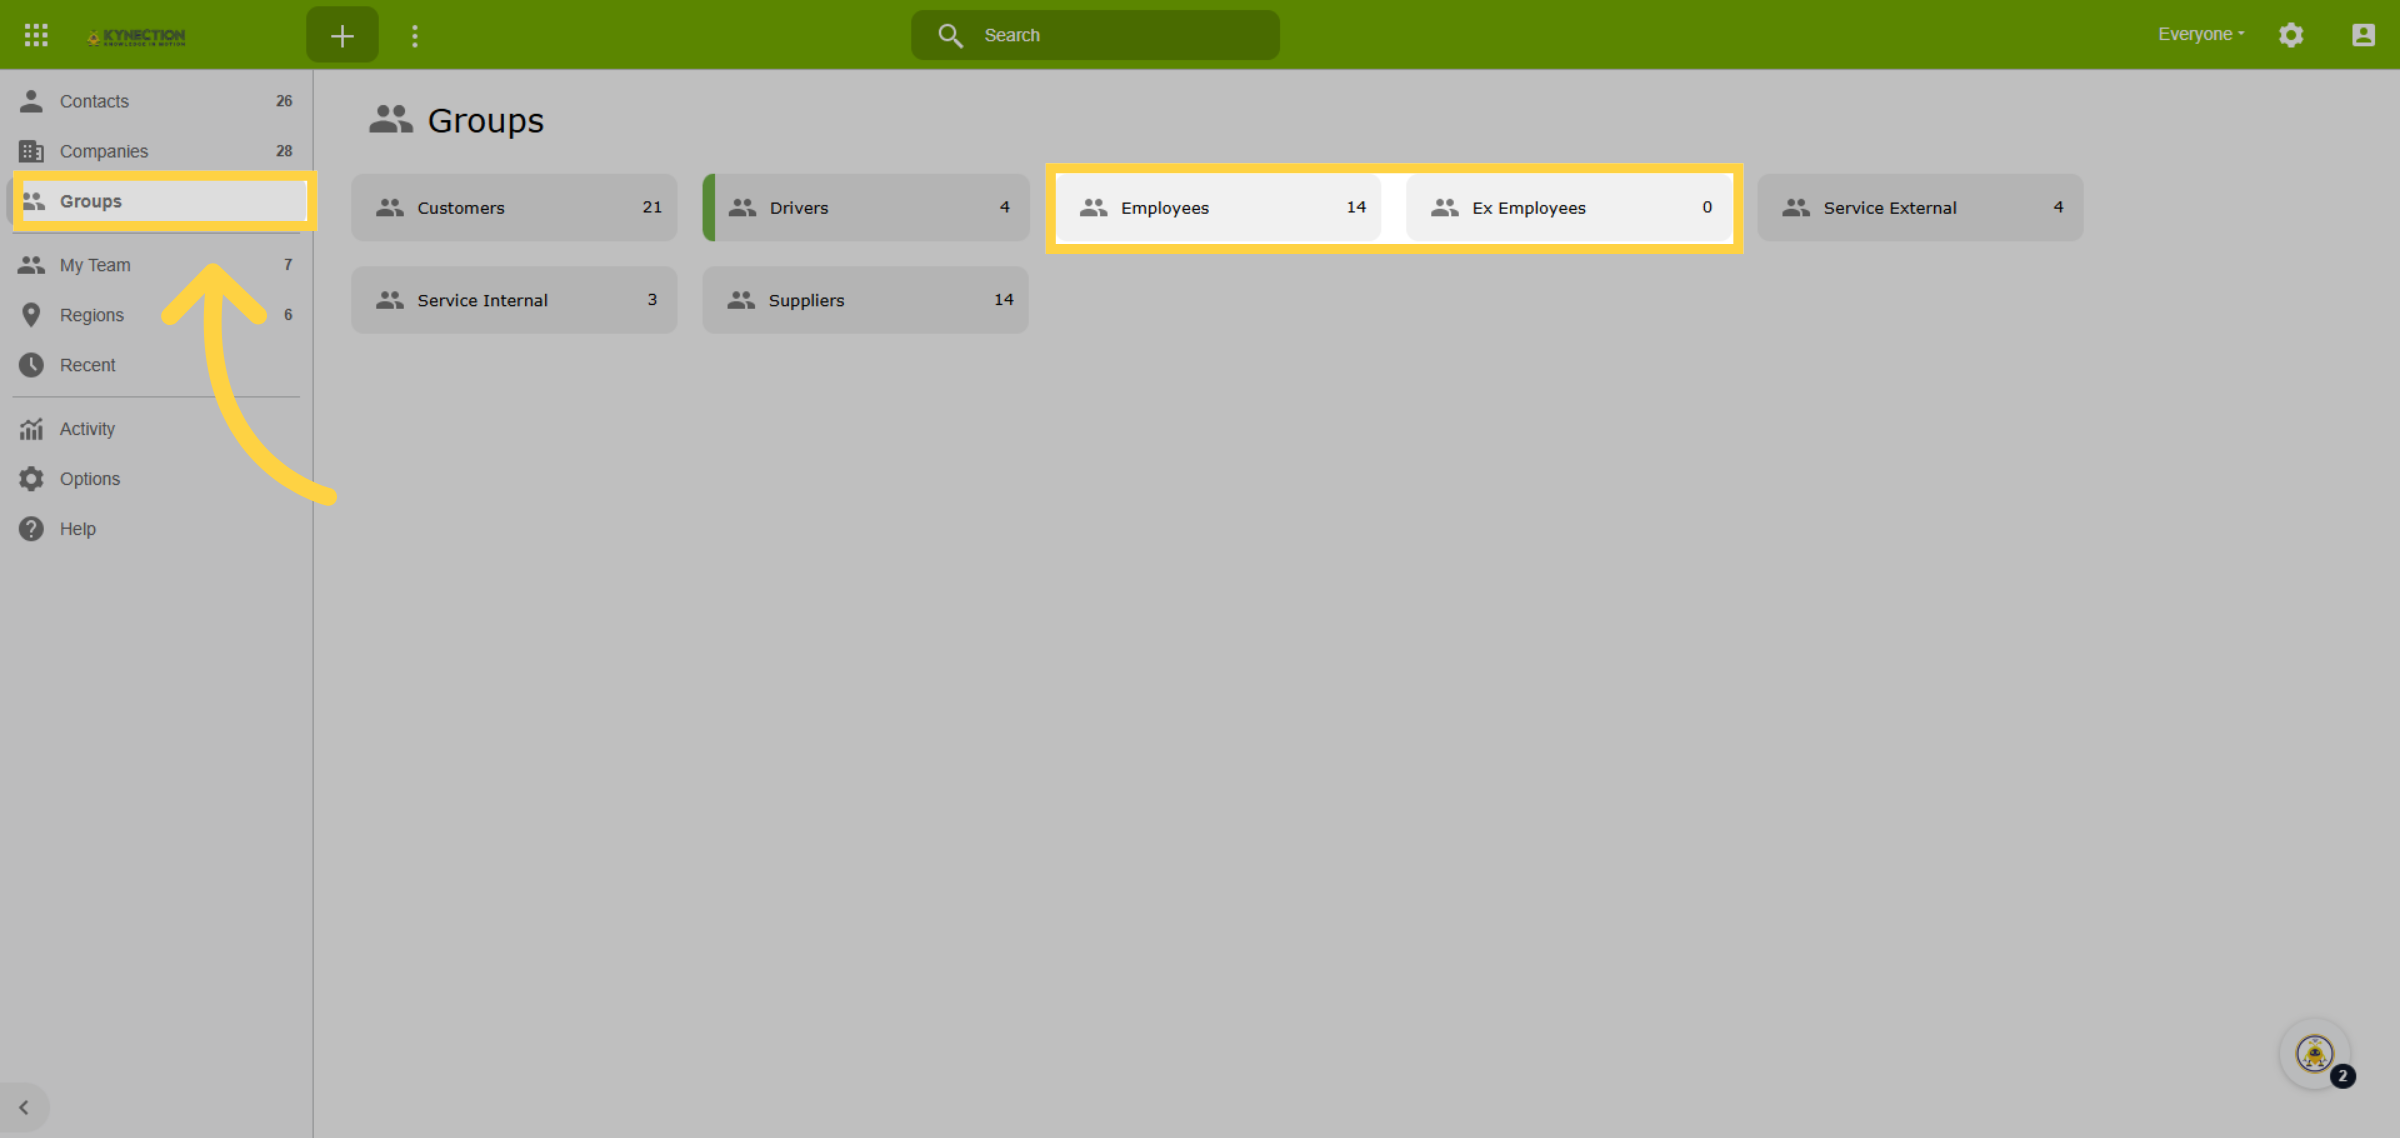
3. Add New Group
Add a new group by selecting the plus icon from the toolbar and then selecting Group. If only a subset of your employees use timesheets, create a dedicated group to enable timesheet configuration for those individuals.
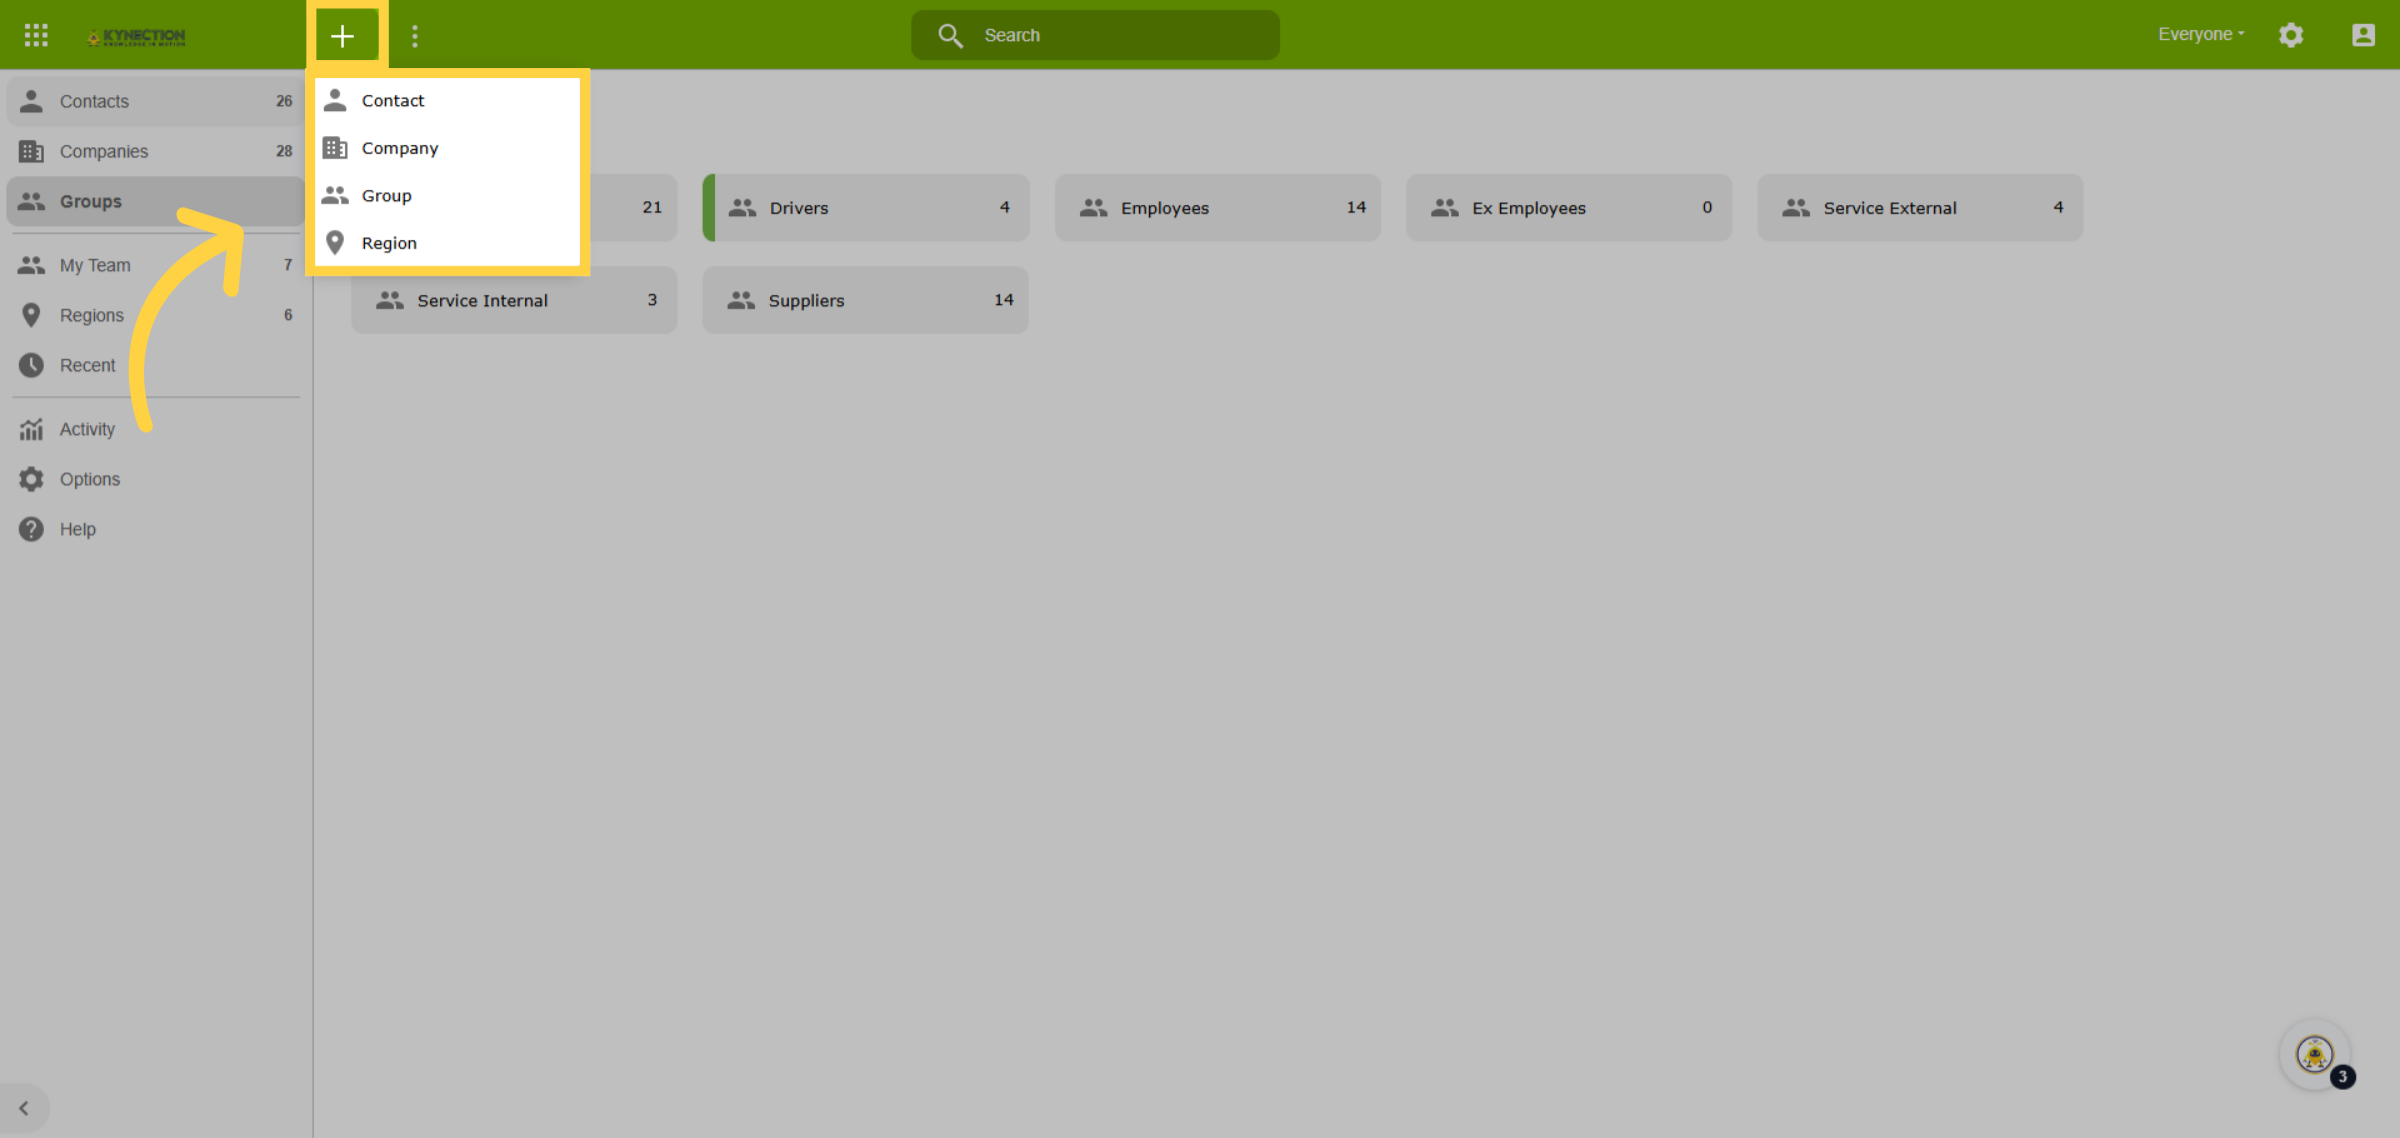
4. Contacts
Open a contact, and use the pen icon from the toolbar to edit.
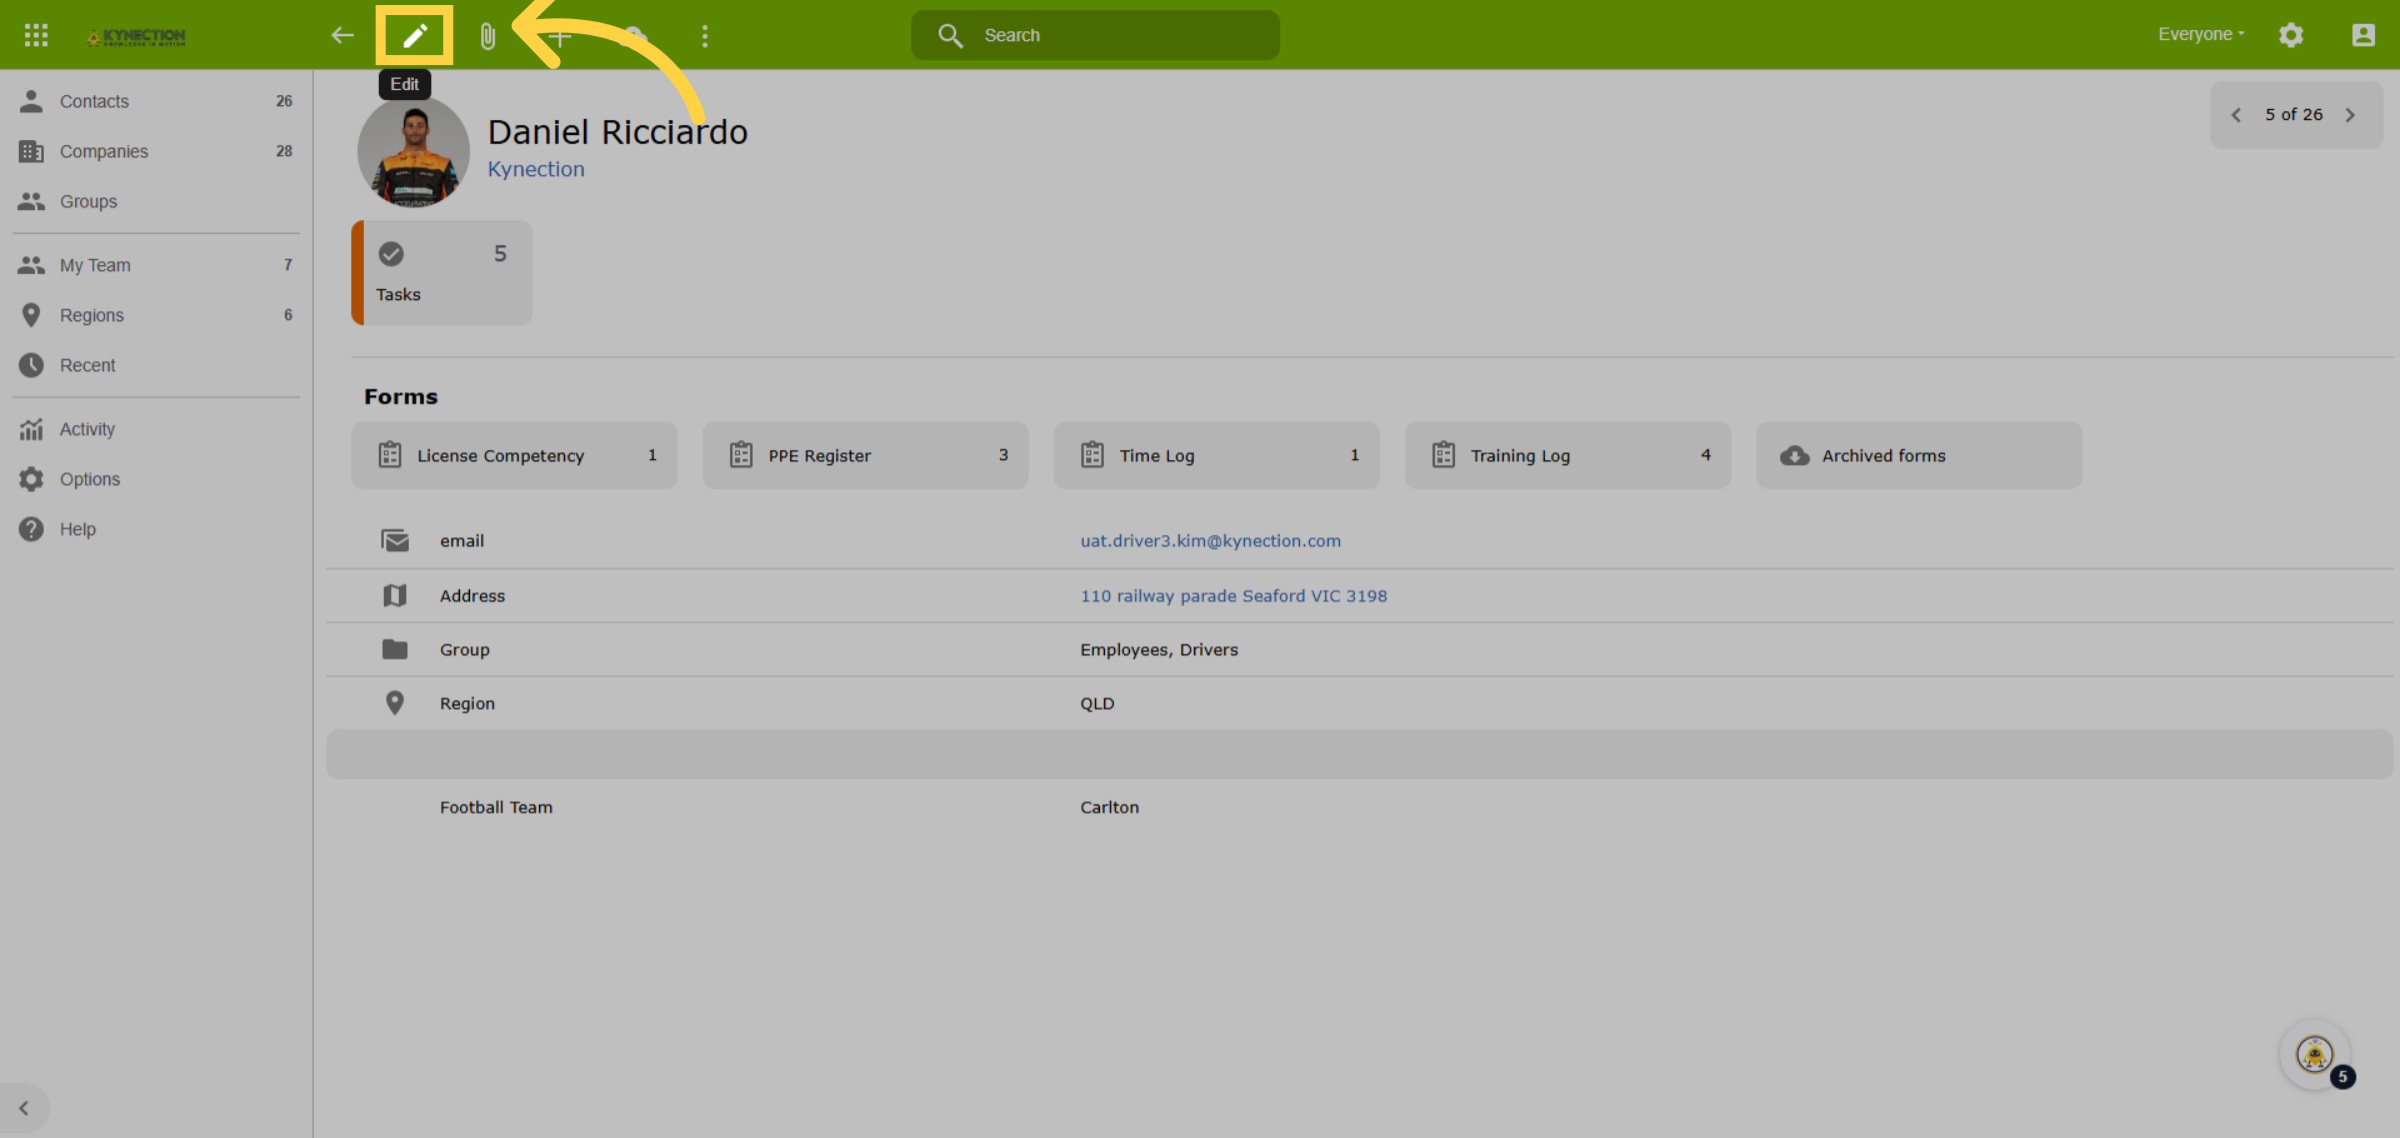
5. Group Field
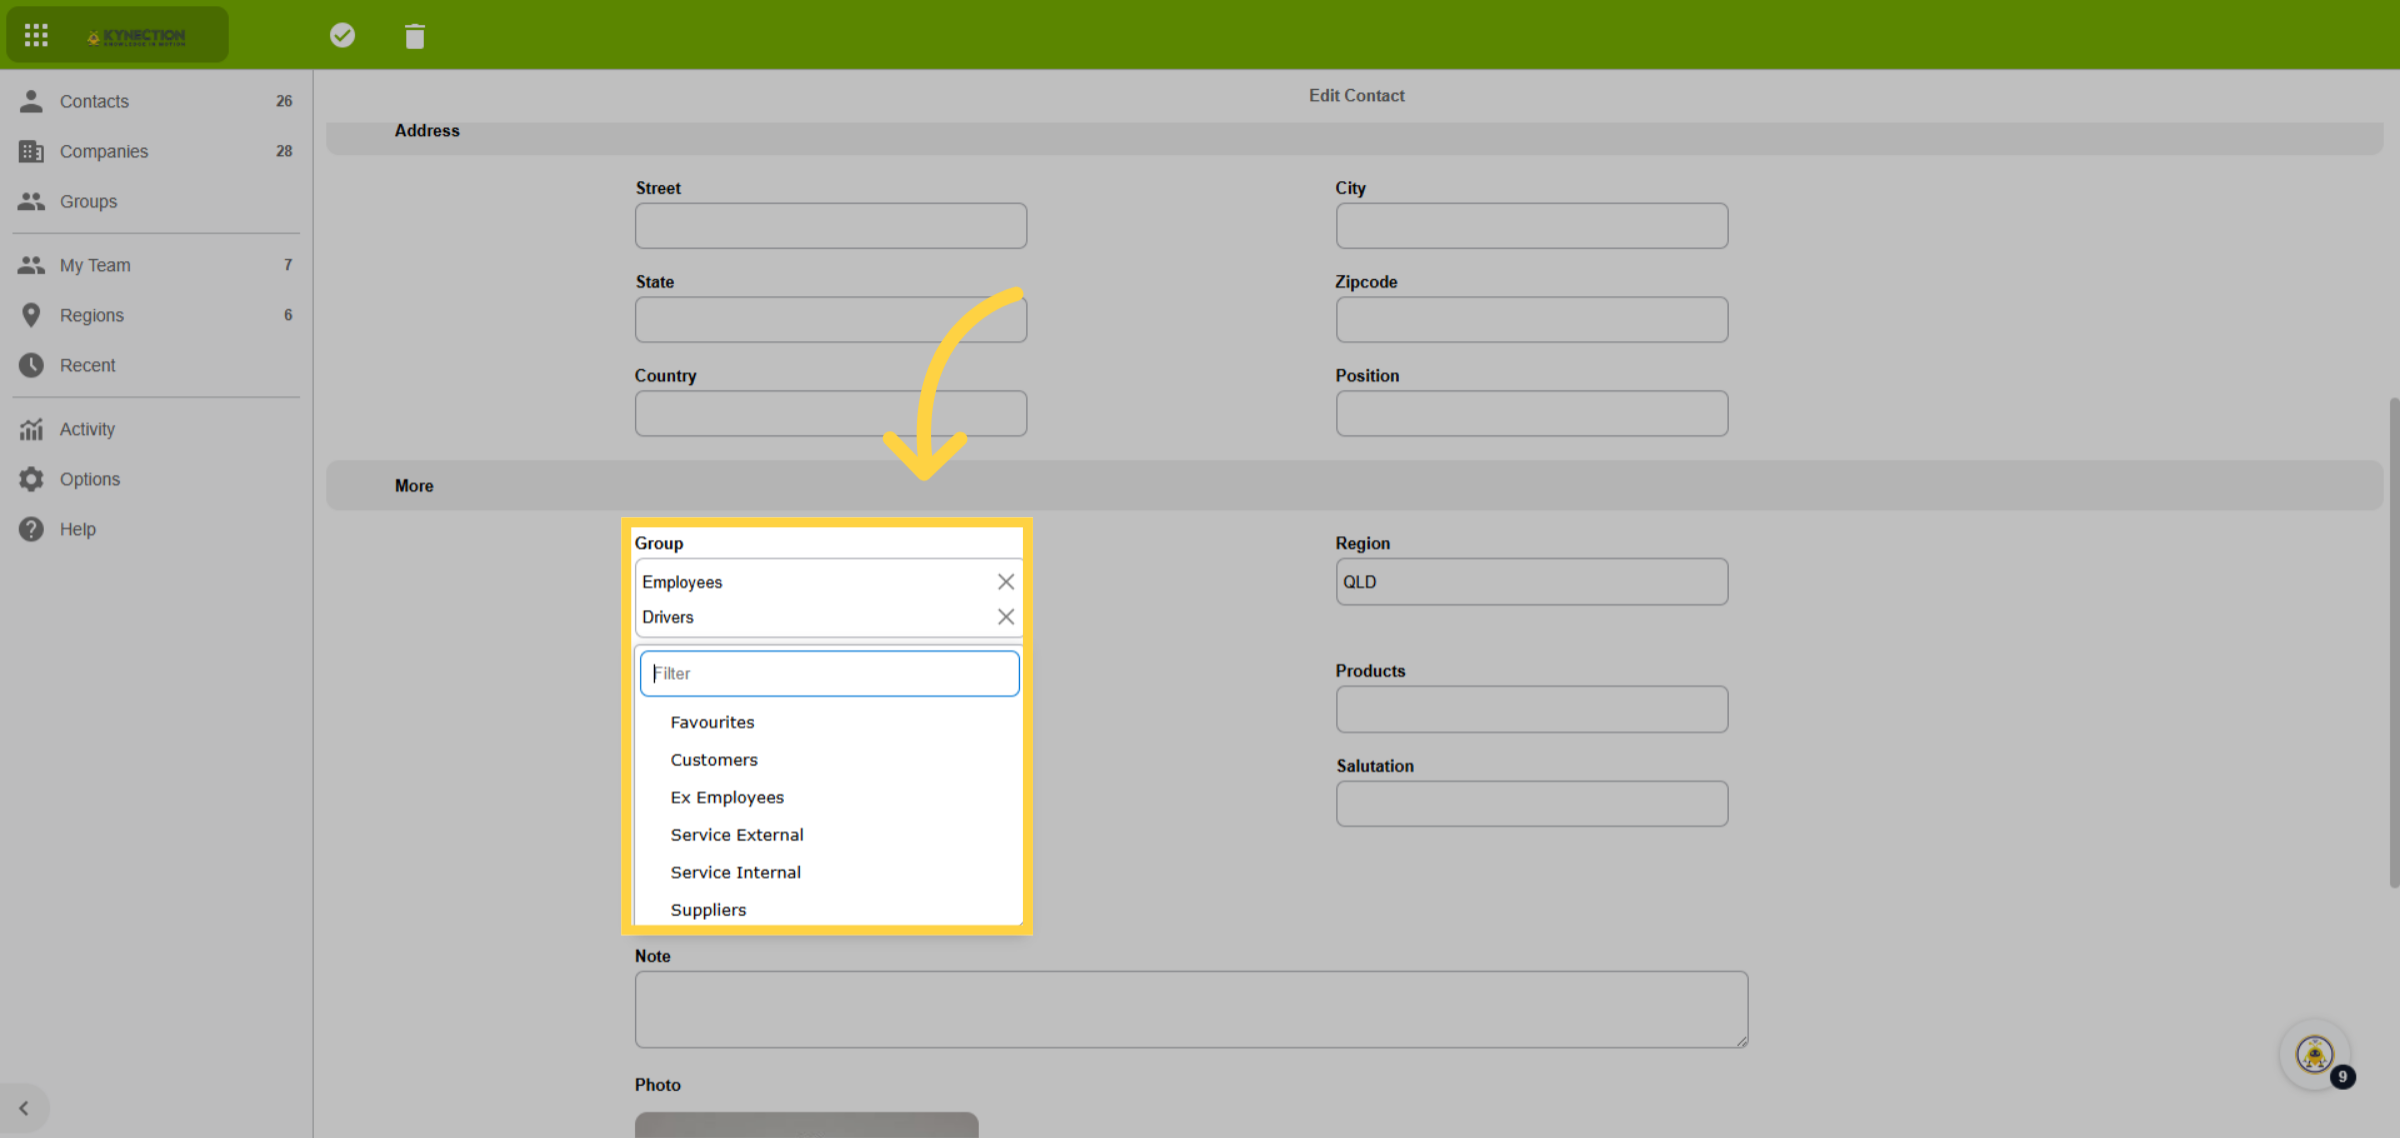
Scroll down to the section titled More and locate the Groups field. Select the relevant groups then save and return using the tick icon from the toolbar.
6. People Overview
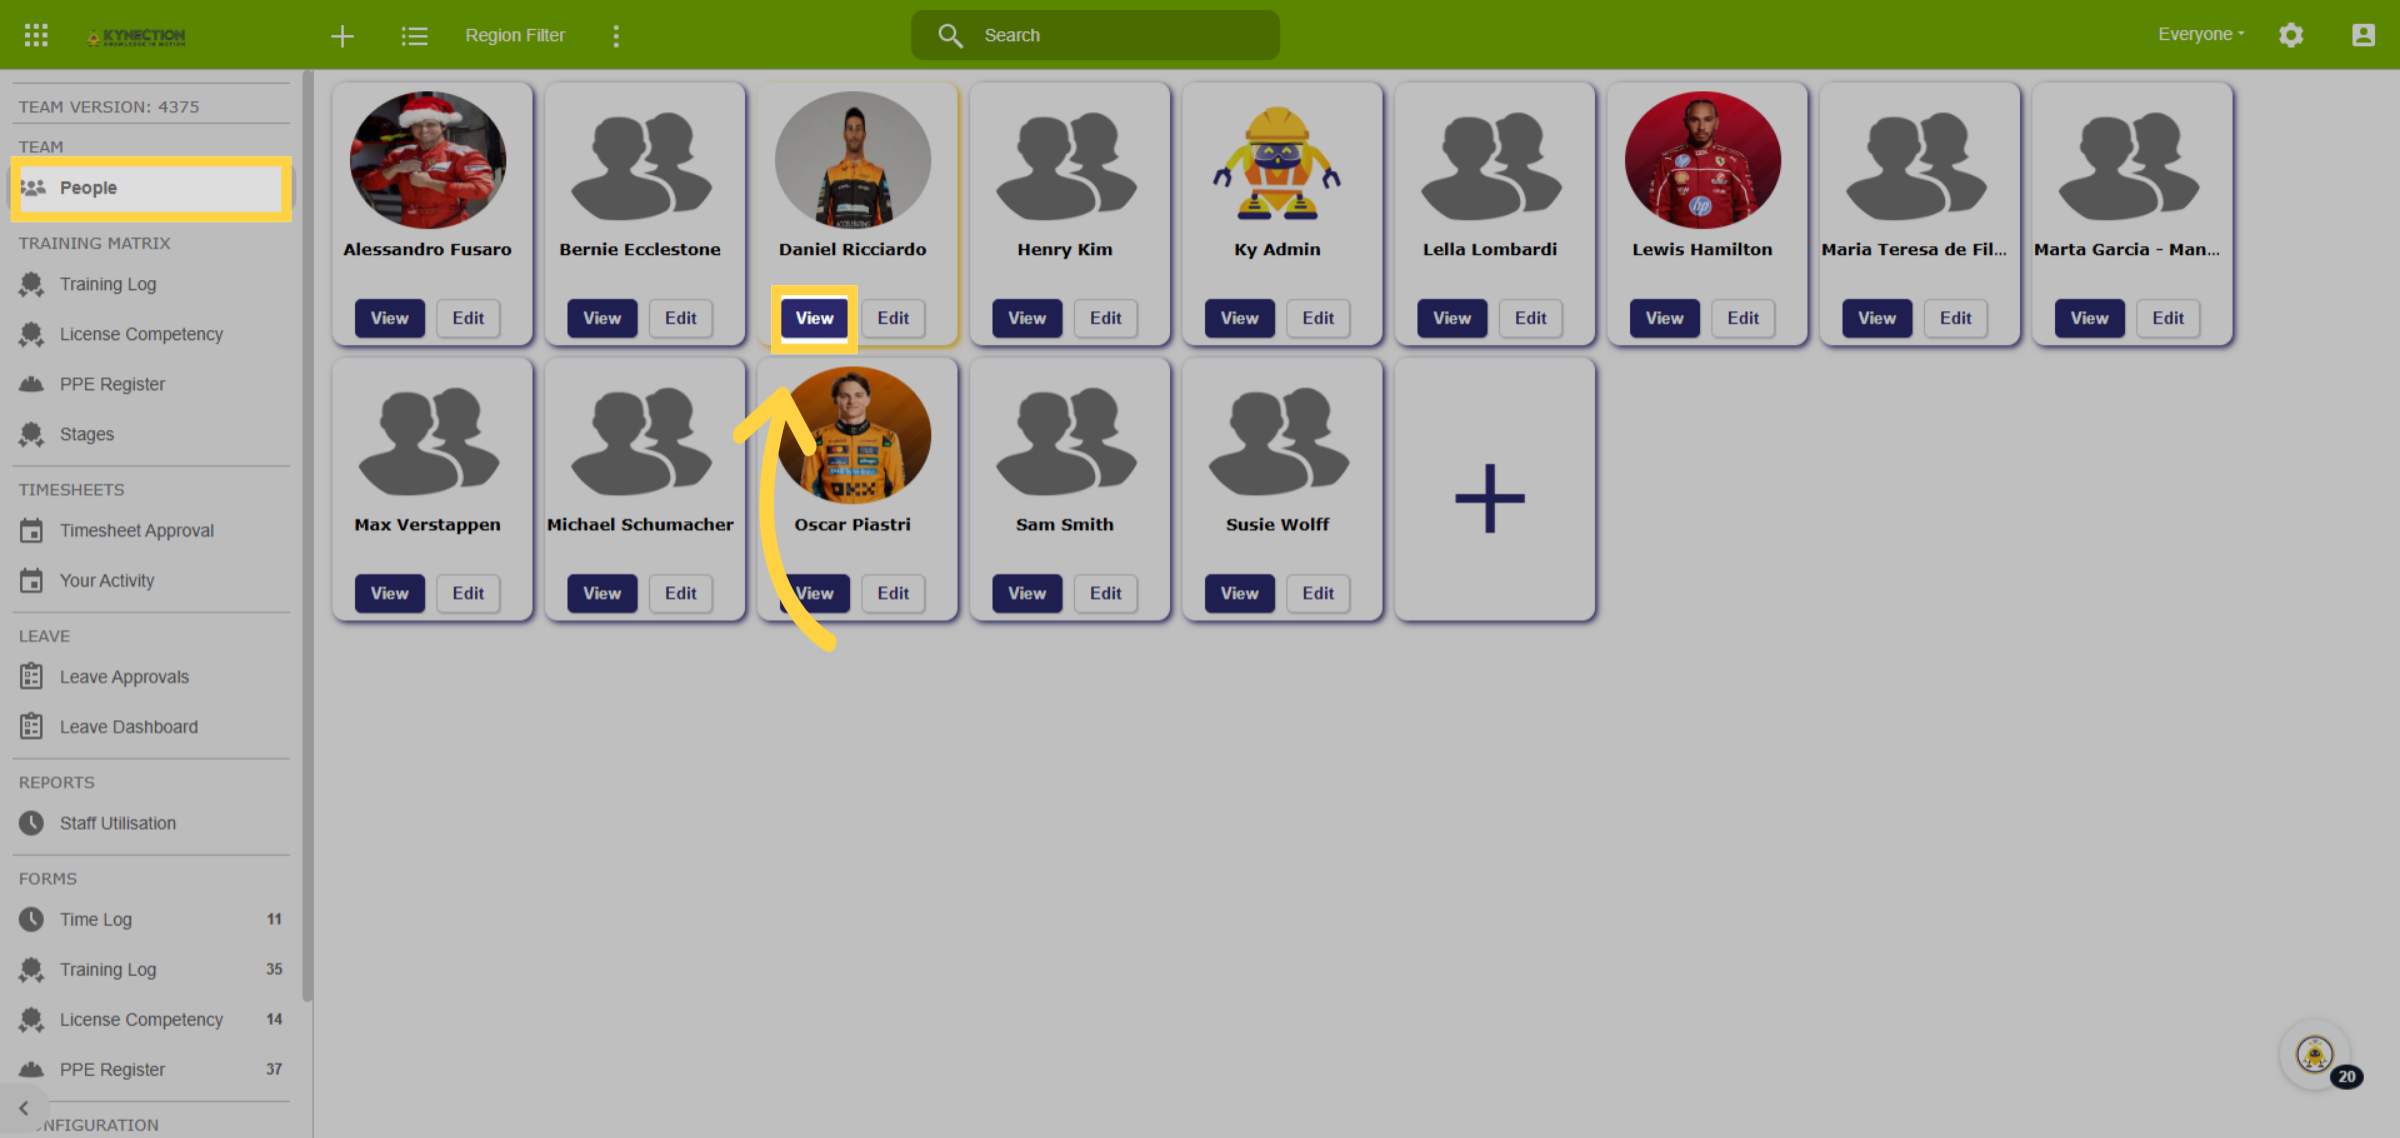
From the Home Dashboard, select HR. In the People section, you'll find a comprehensive list of all employees. For illustration, let's use Arnold as an example. Click on View.
7. View Details
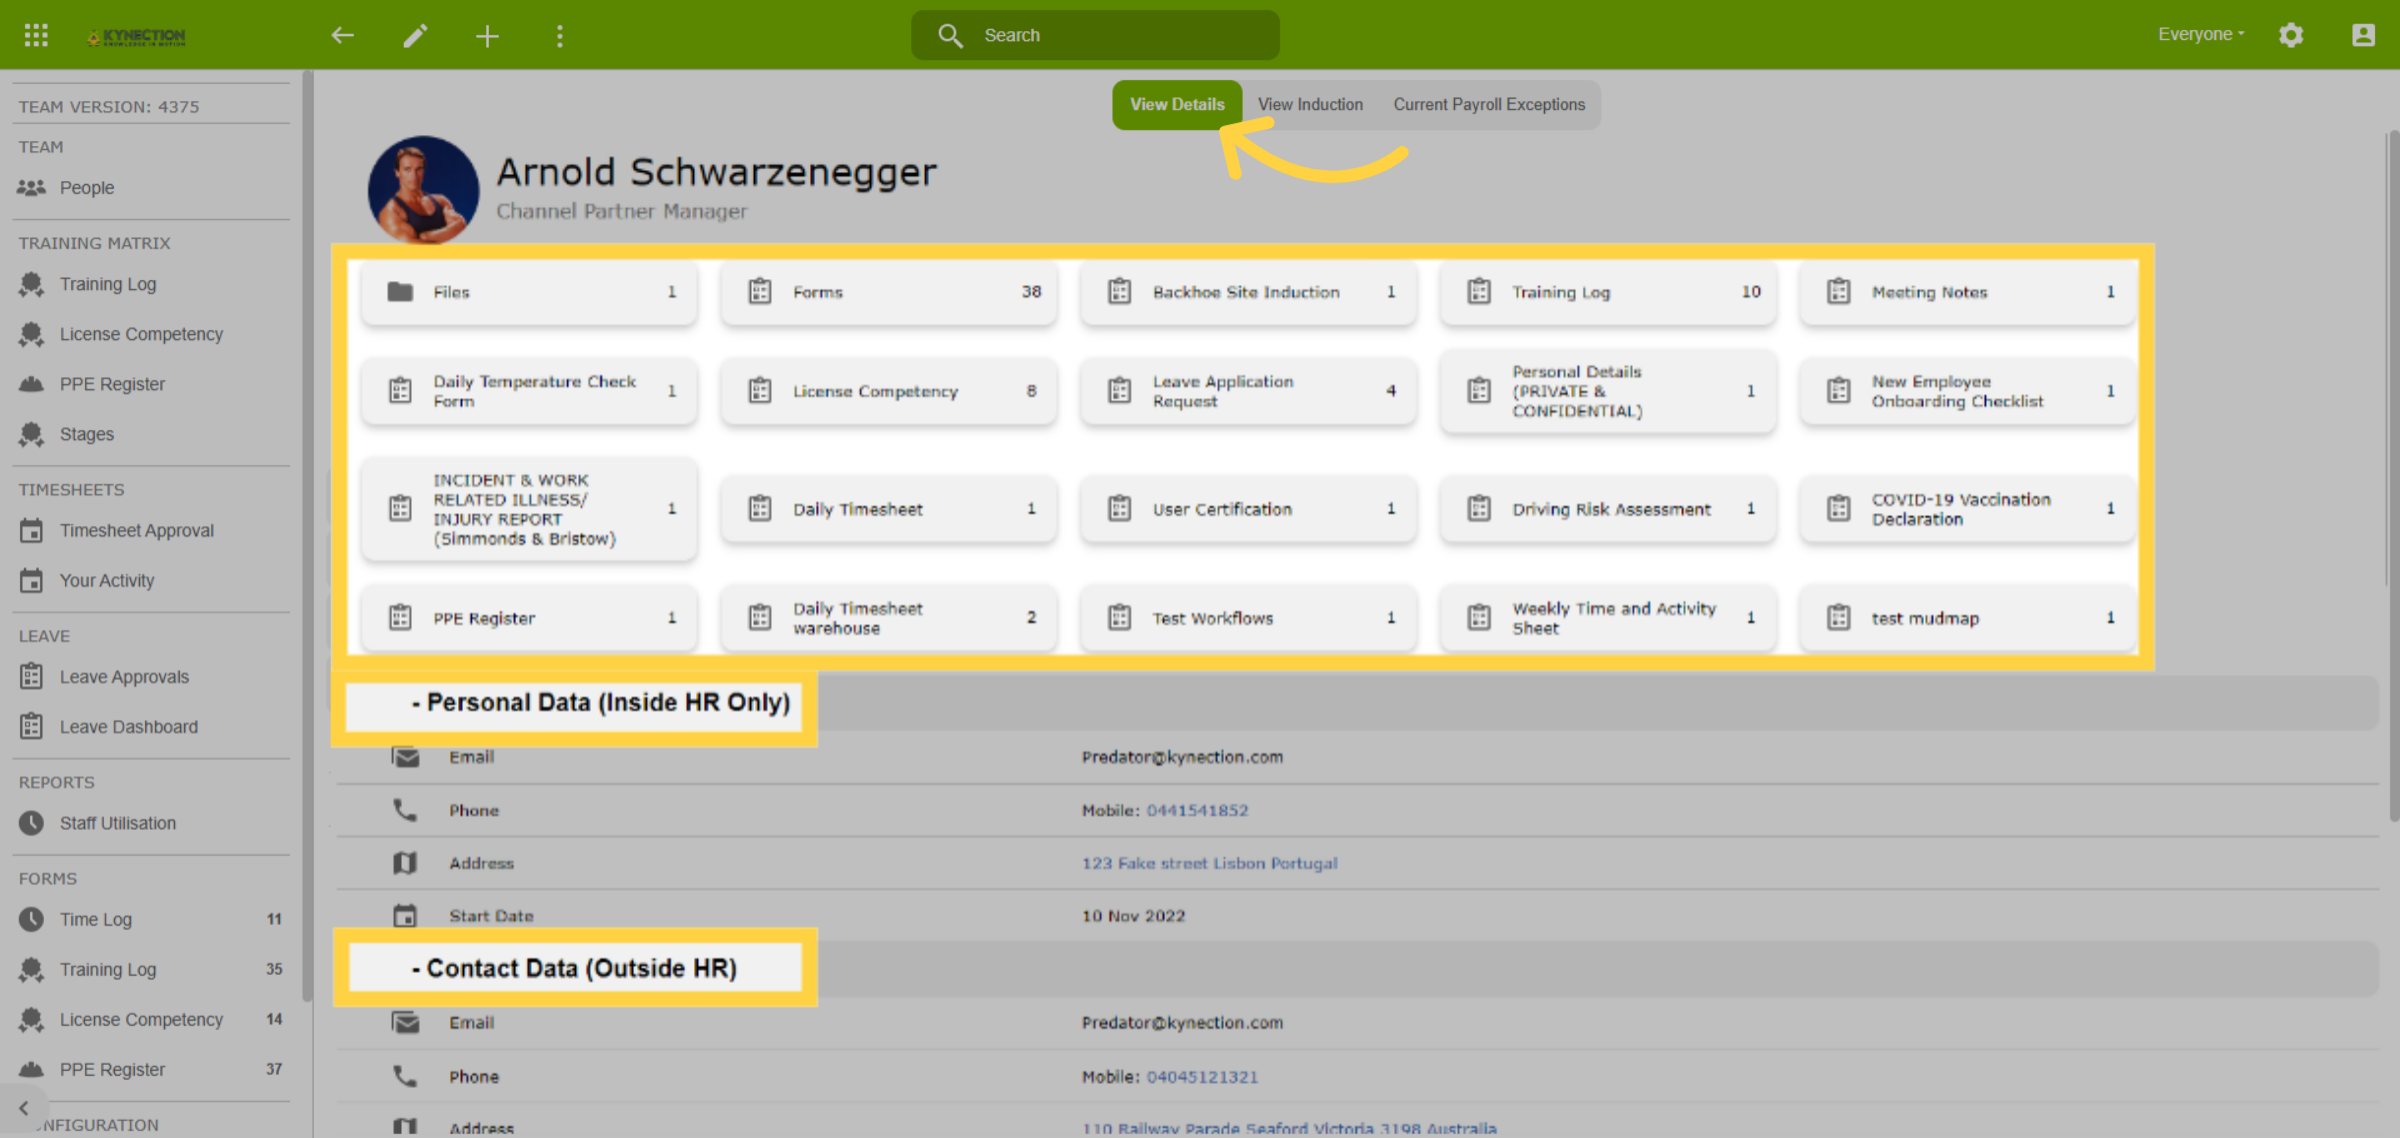
In the employee's profile, access a variety of information, including completed forms, personal details, and contact information.
8. Additional Employee Information
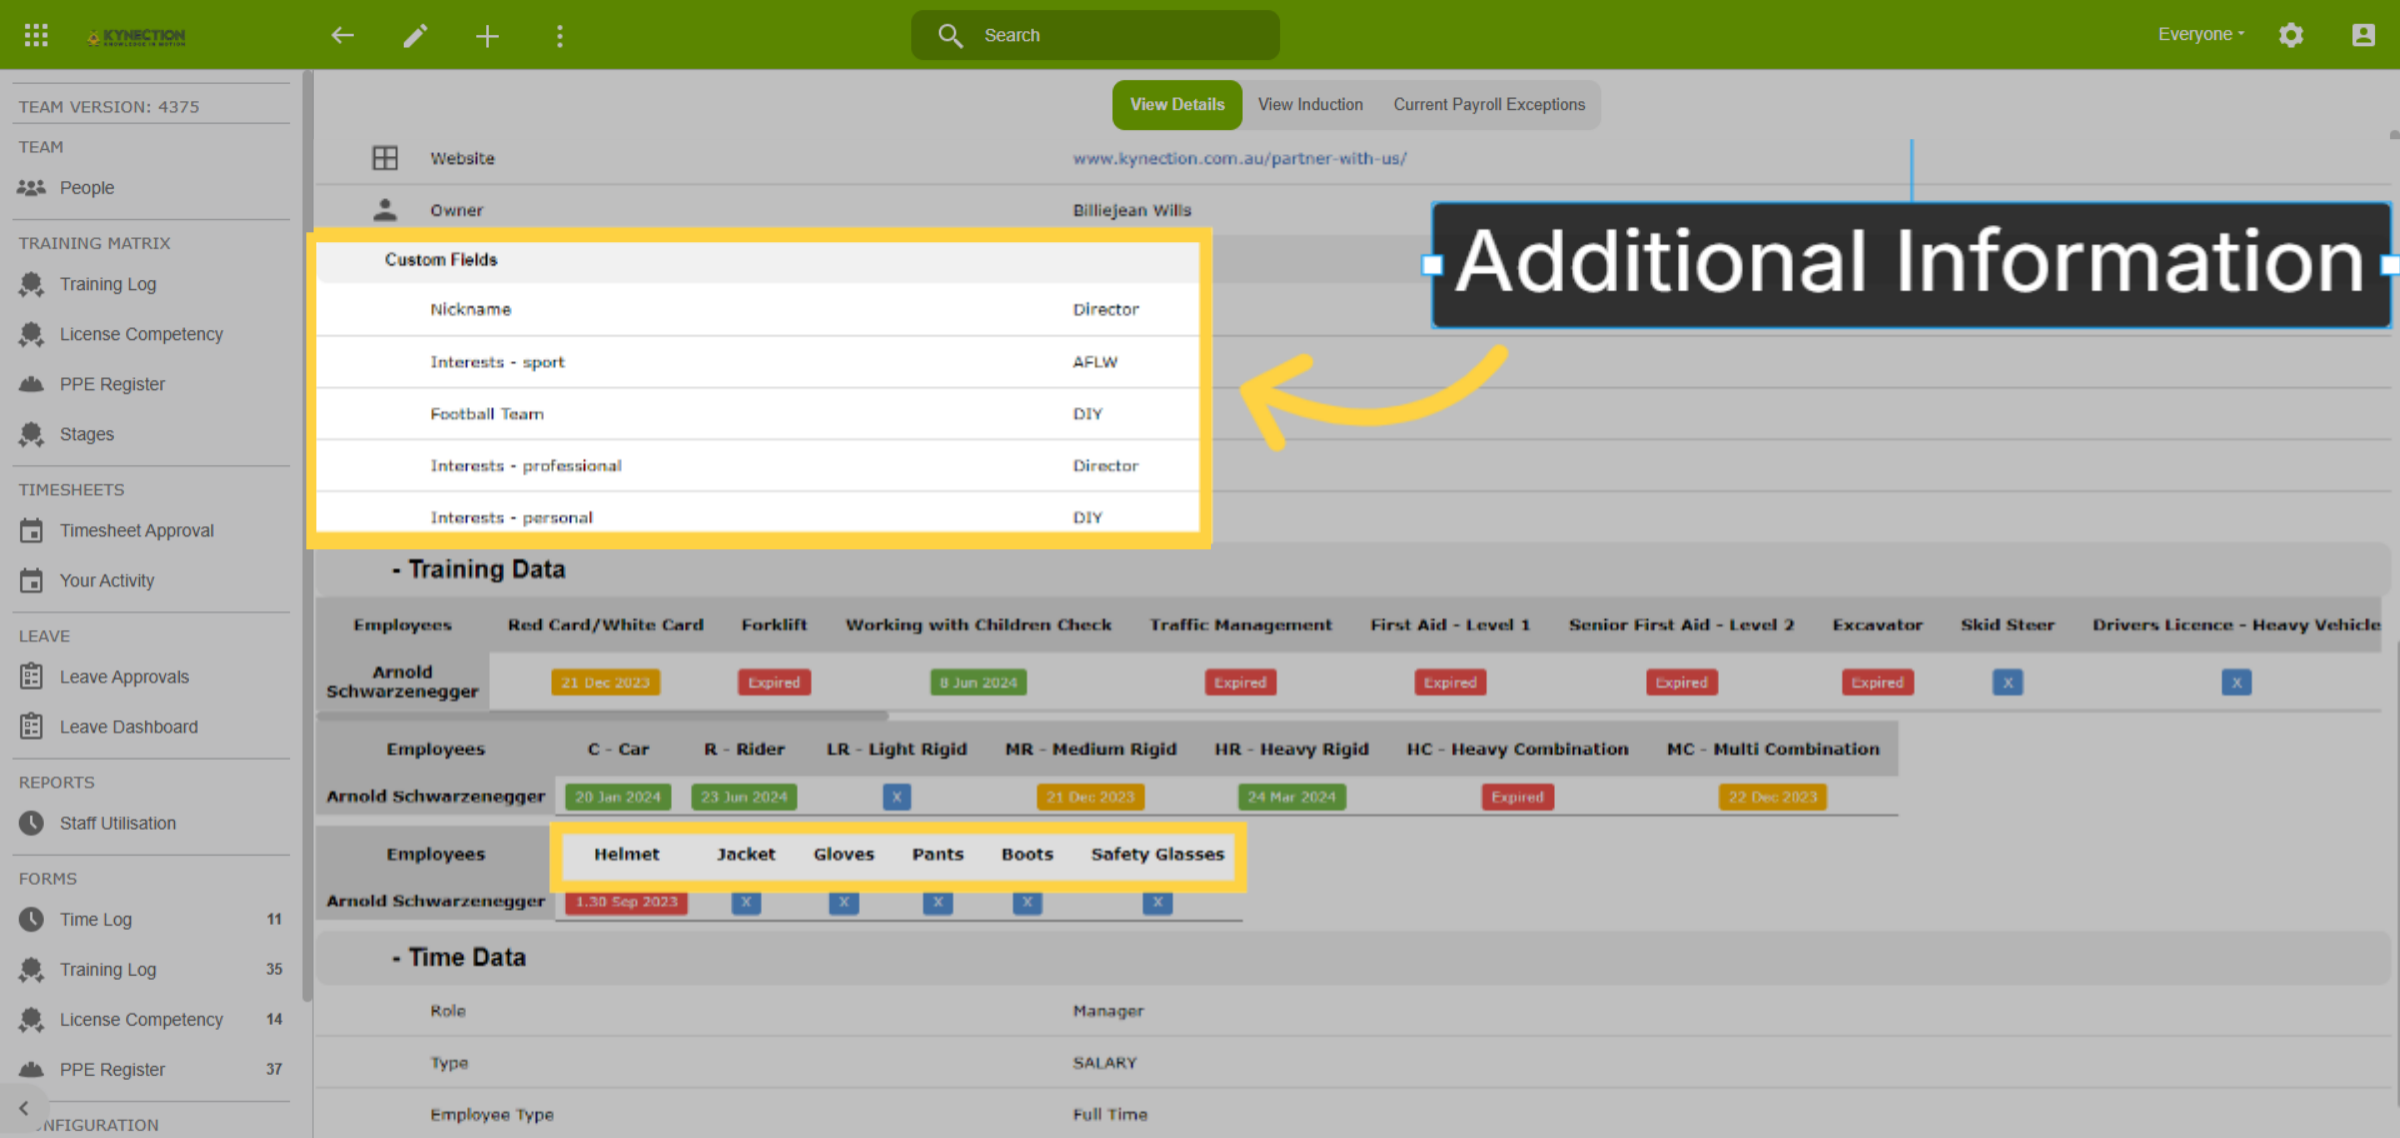
As you scroll down, additional information is available, including all training data, PPE provided, and the option to add custom fields, such as their favourite sporting team.
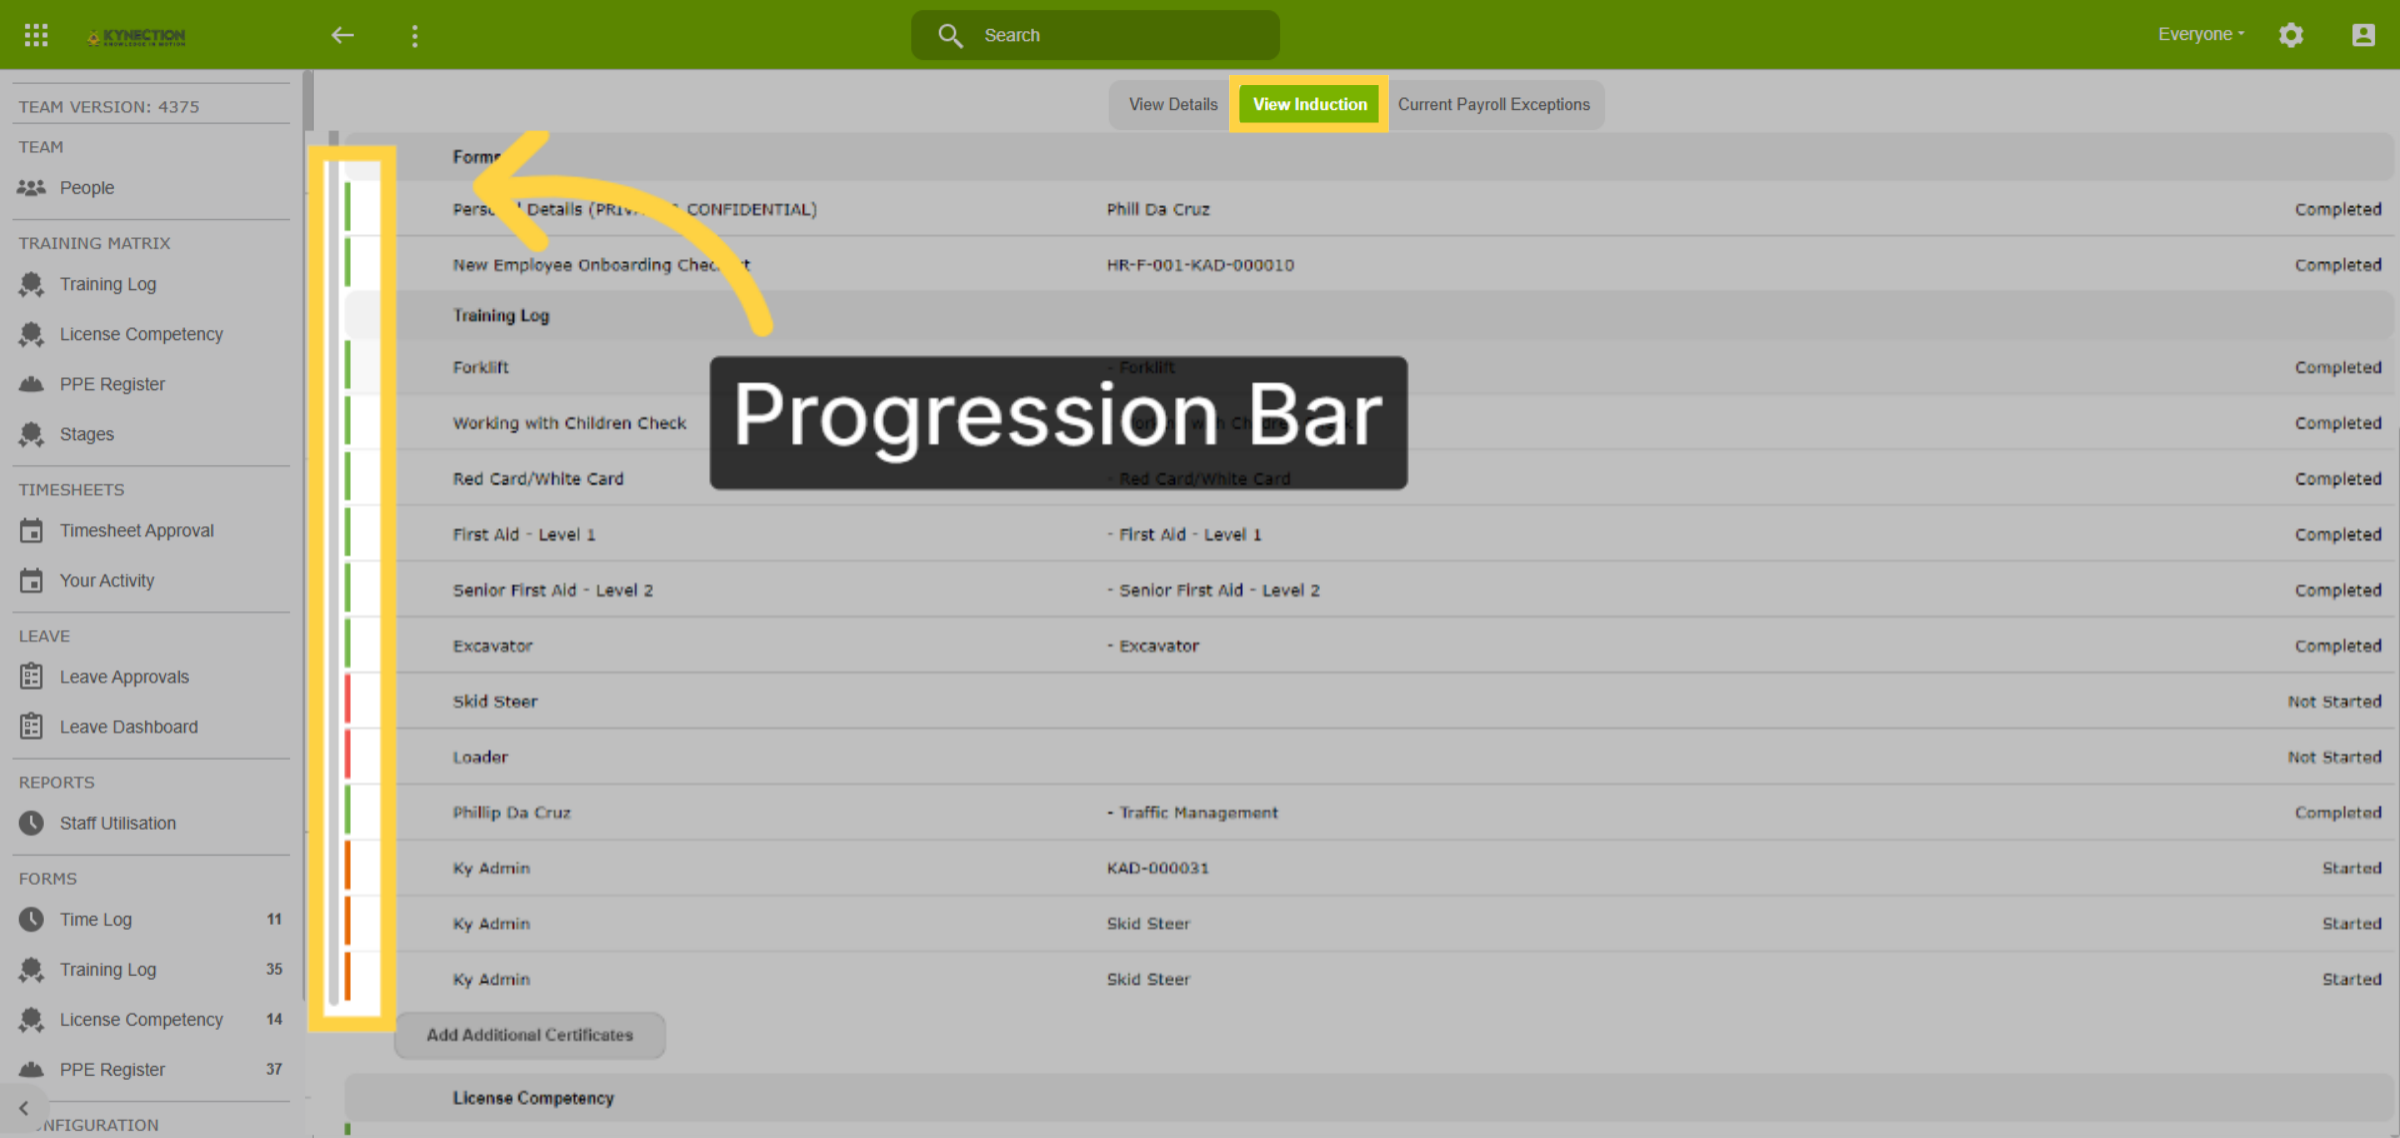
9. Progression Bar
Select the View Induction tab.In the Induction tab, all onboarding documentation is stored. A traffic light colour-code system monitors induction progress: red for not started, yellow for in progress, and green for completed. This provides immediate visibility into compliance status.
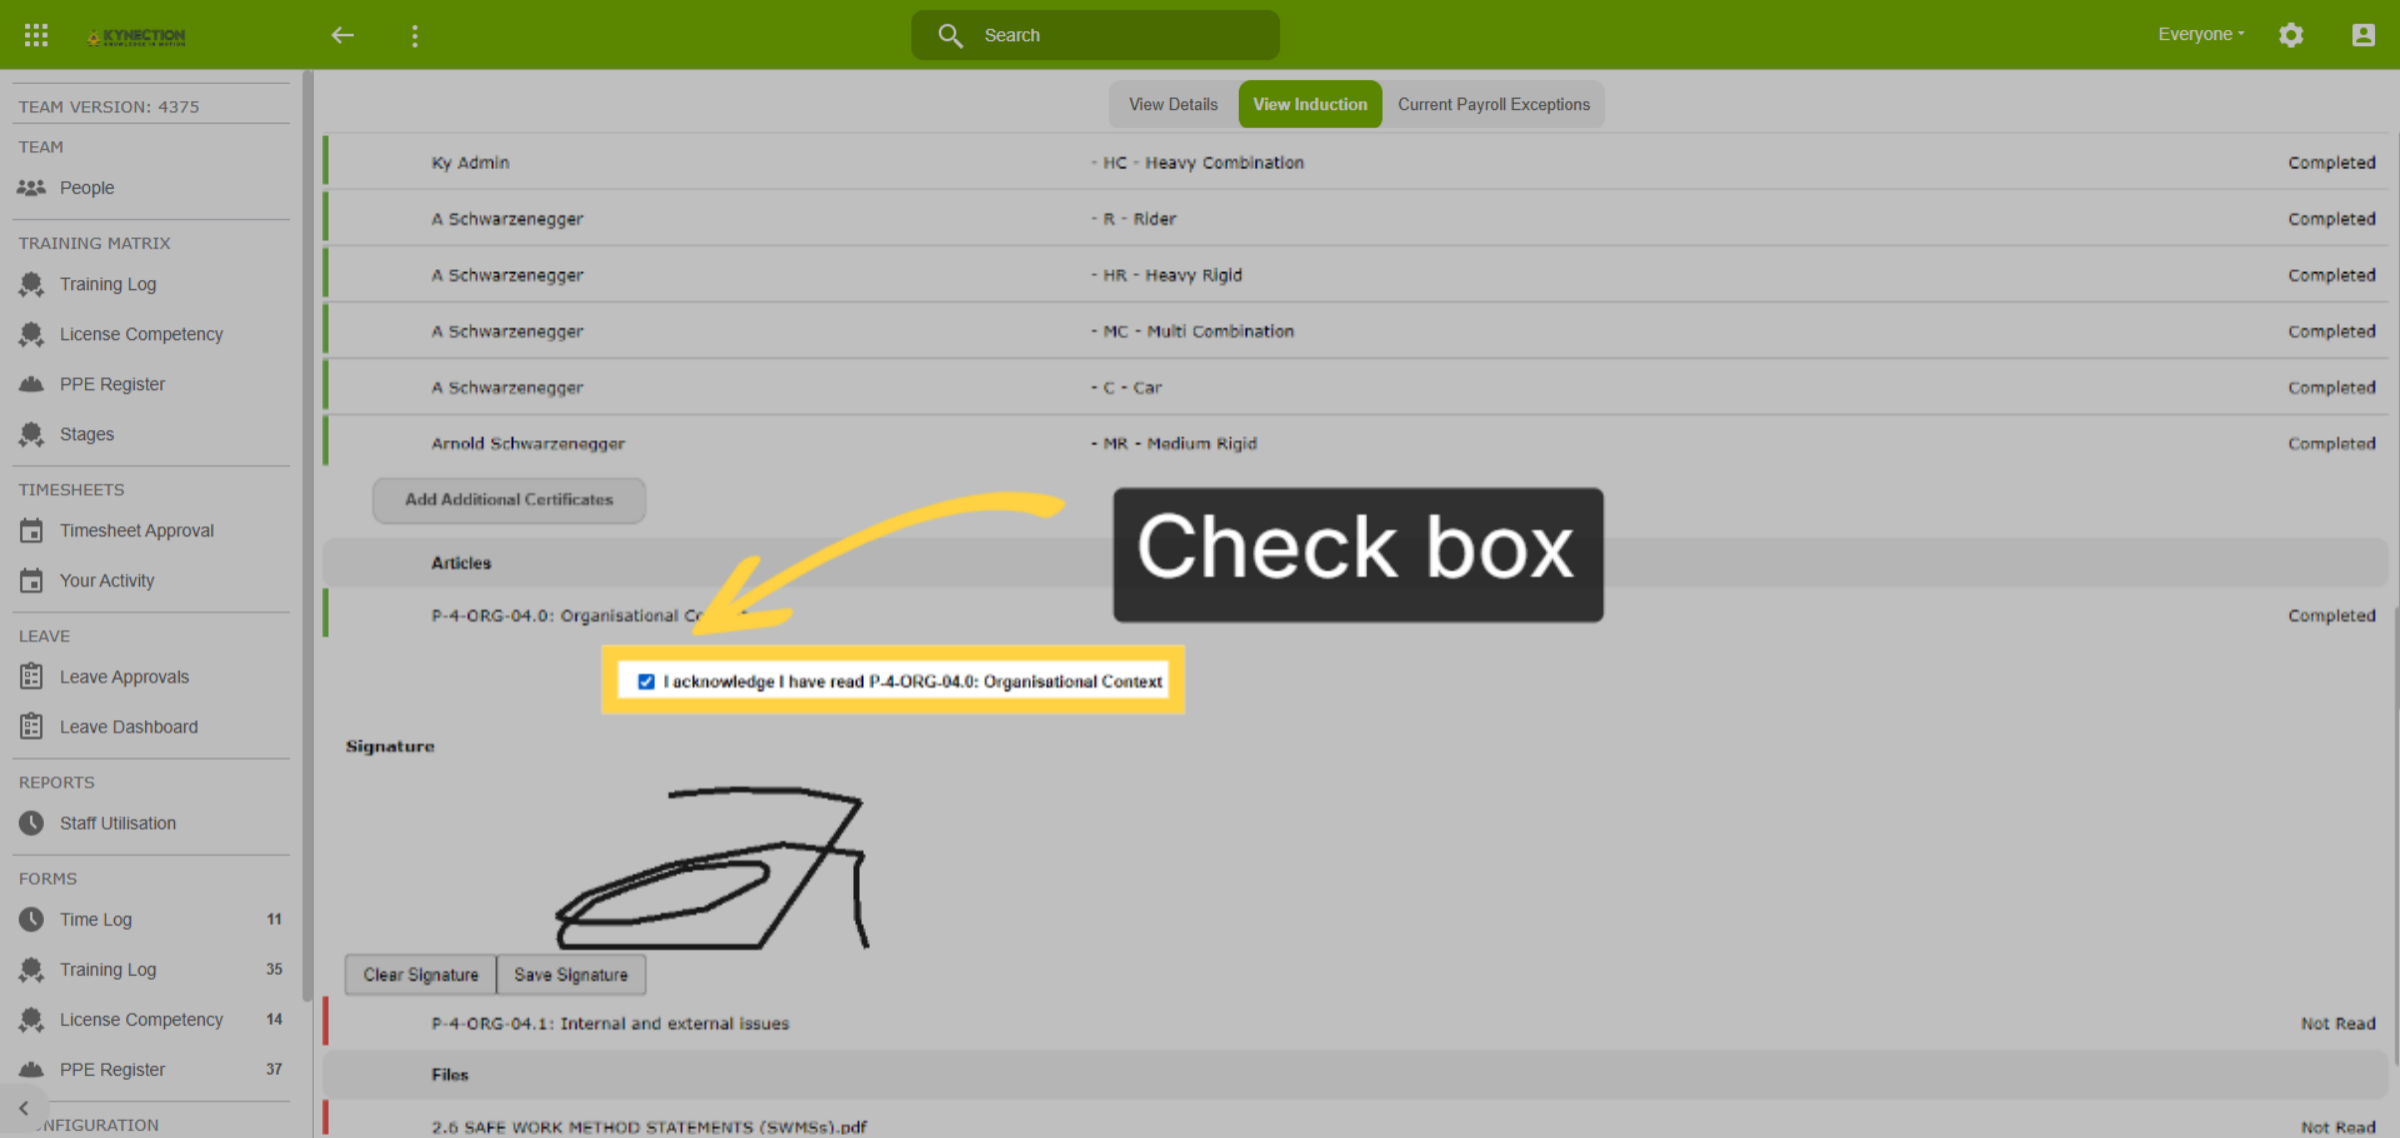
10. Policy Acknowledgement
Scrolling down, find a section containing all policies read and signed. This streamlined approach ensures all staff acknowledge new or updated policies efficiently, reducing administrative burden.
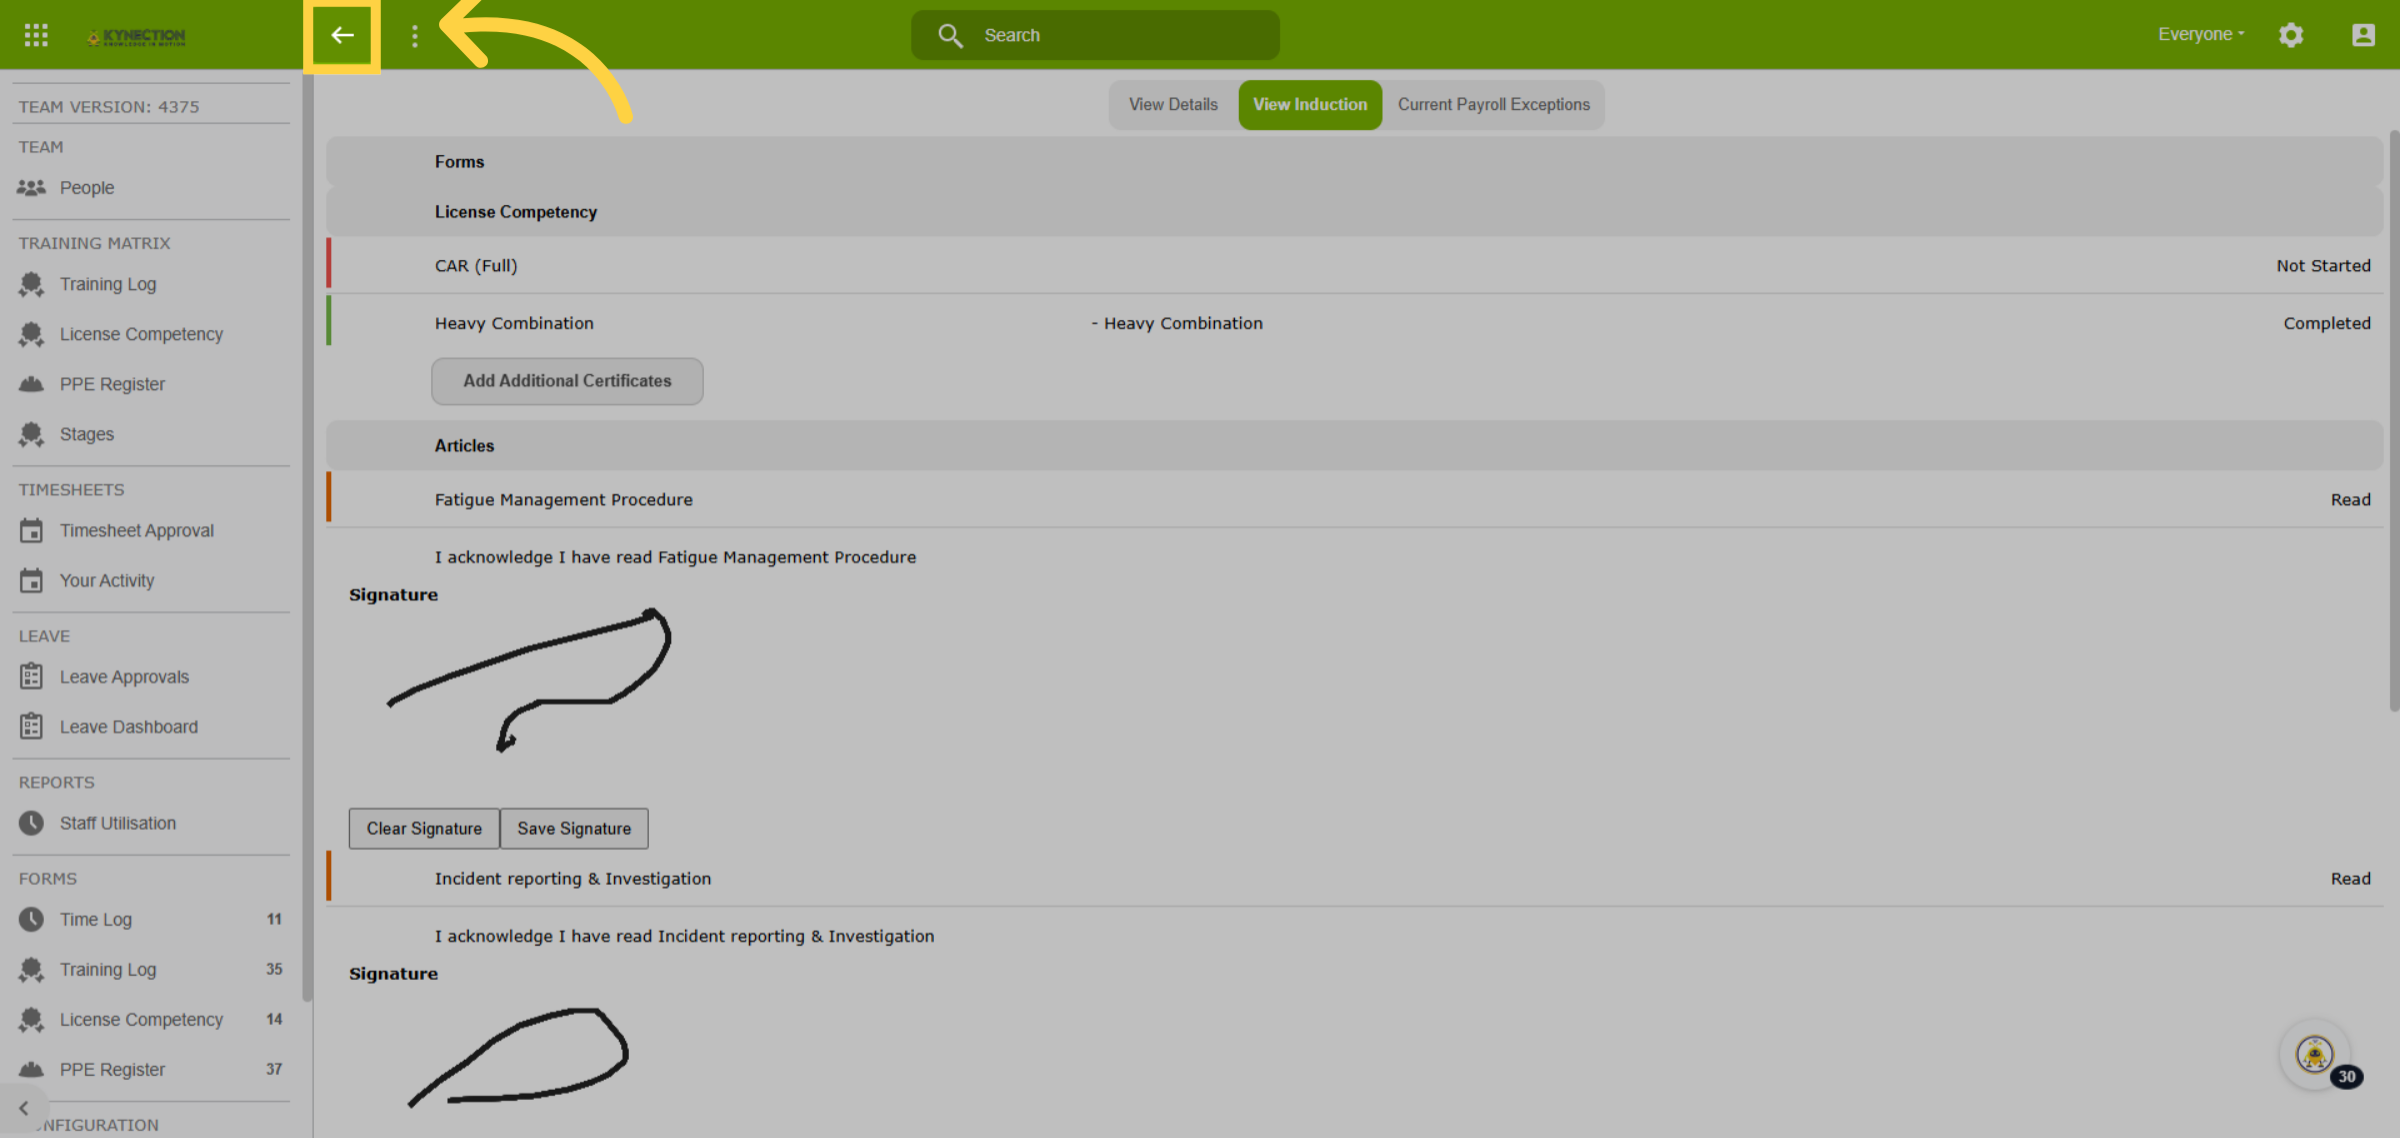
11. Edit Profile
To make changes to an employee's profile, return to their profile and click the edit pencil icon.
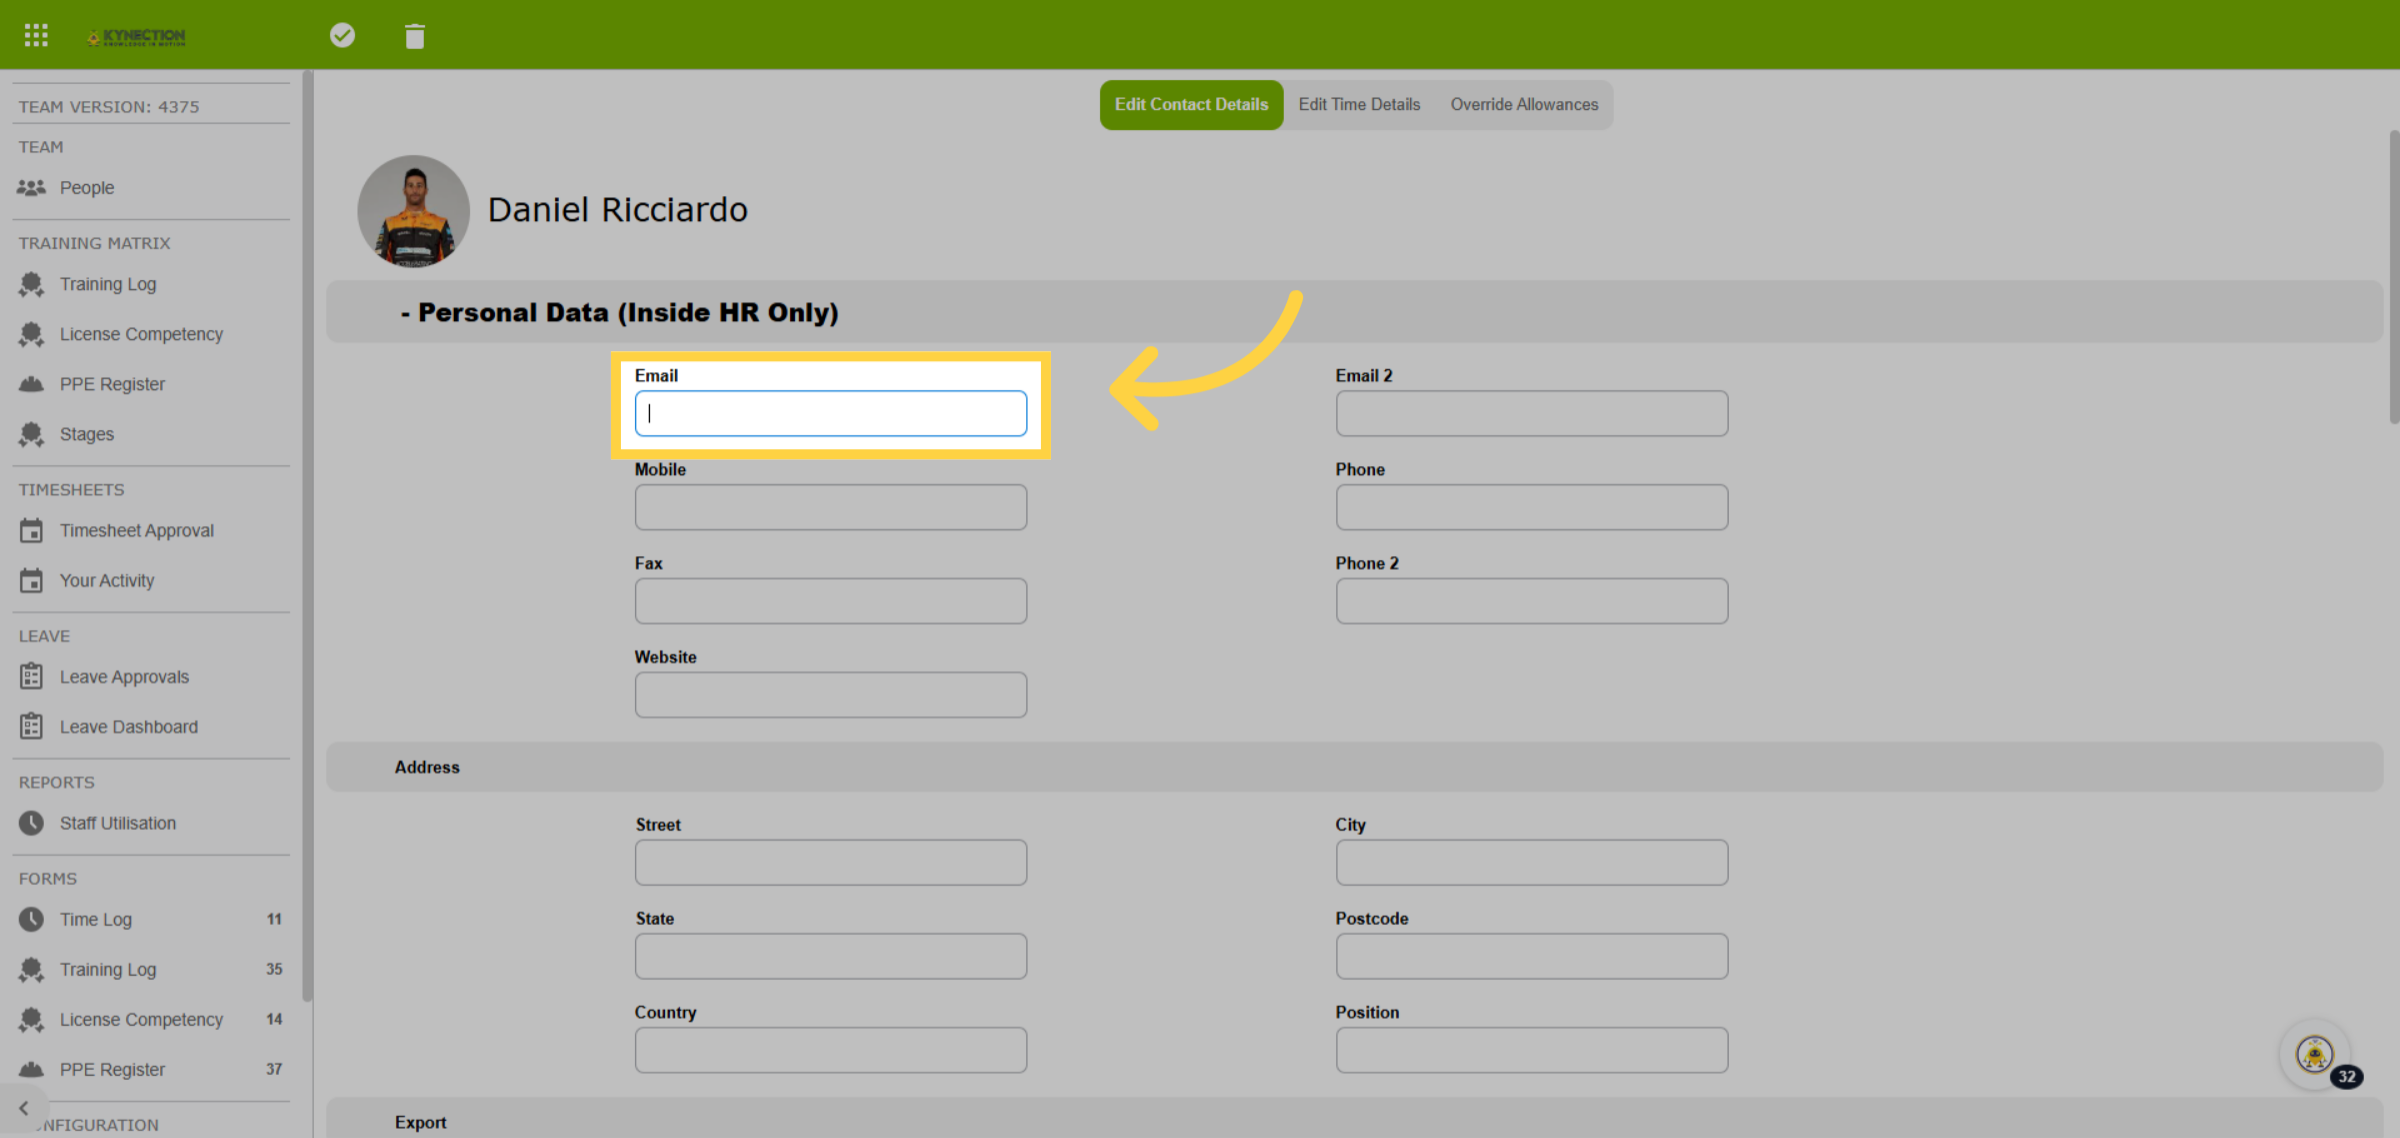
12. Edit Details
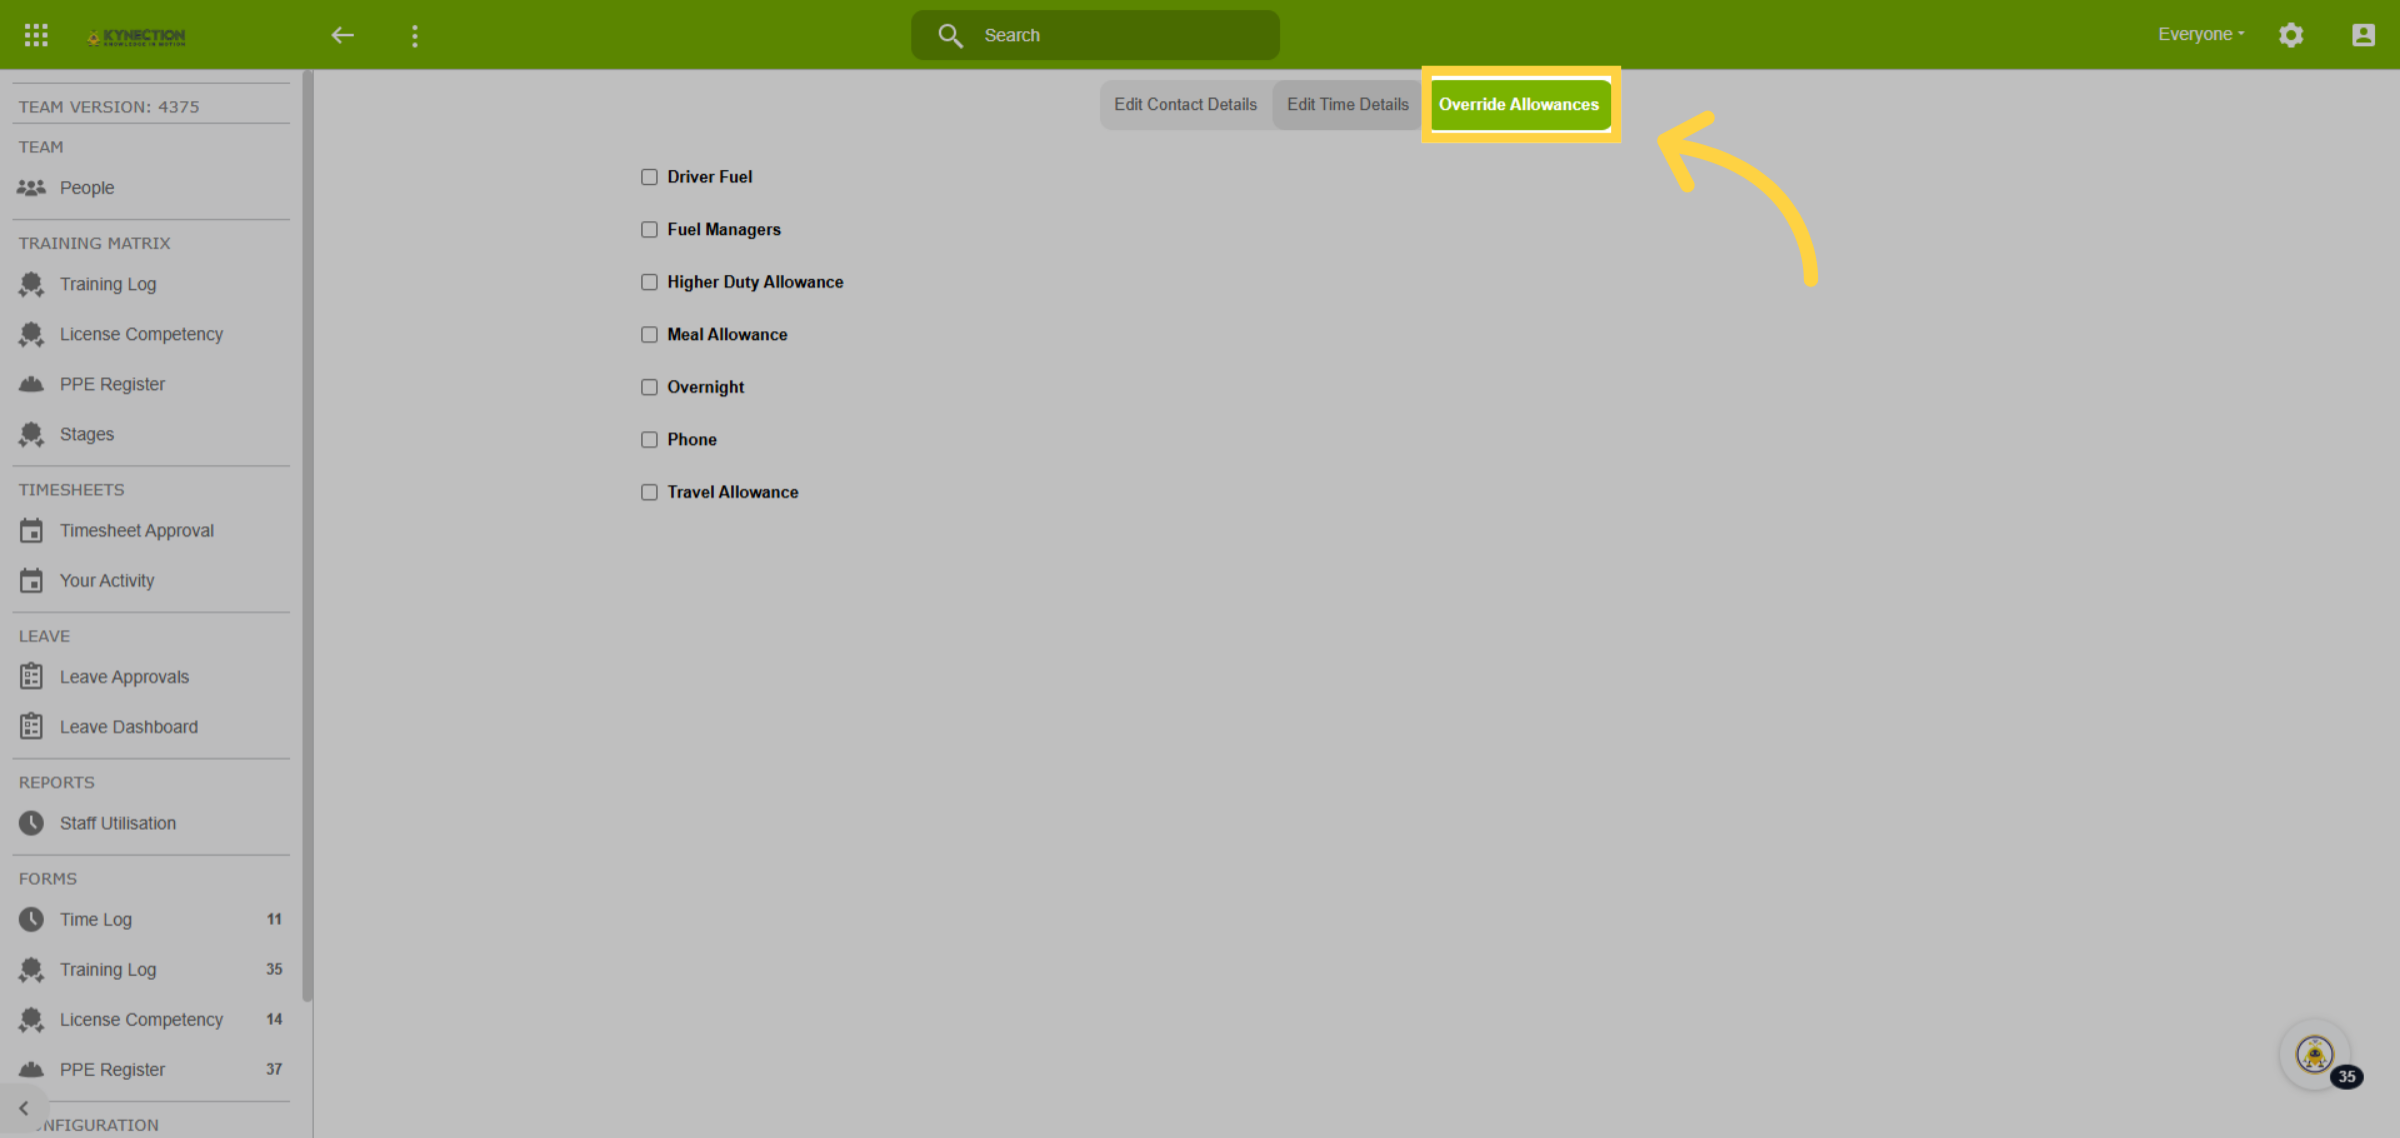
From the profile page, select the pencil in the toolbar to edit and make any necessary modifications to the profile. Next, proceed to the Override Allowances tab.
13. Override Allowances
In the Override Allowances tab, allowances can be adjusted if they differ from the role's assigned allowances. This is typically an exception, such as when an employee is entitled to or excluded from a specific allowance for their role.
14. Edit Time Details
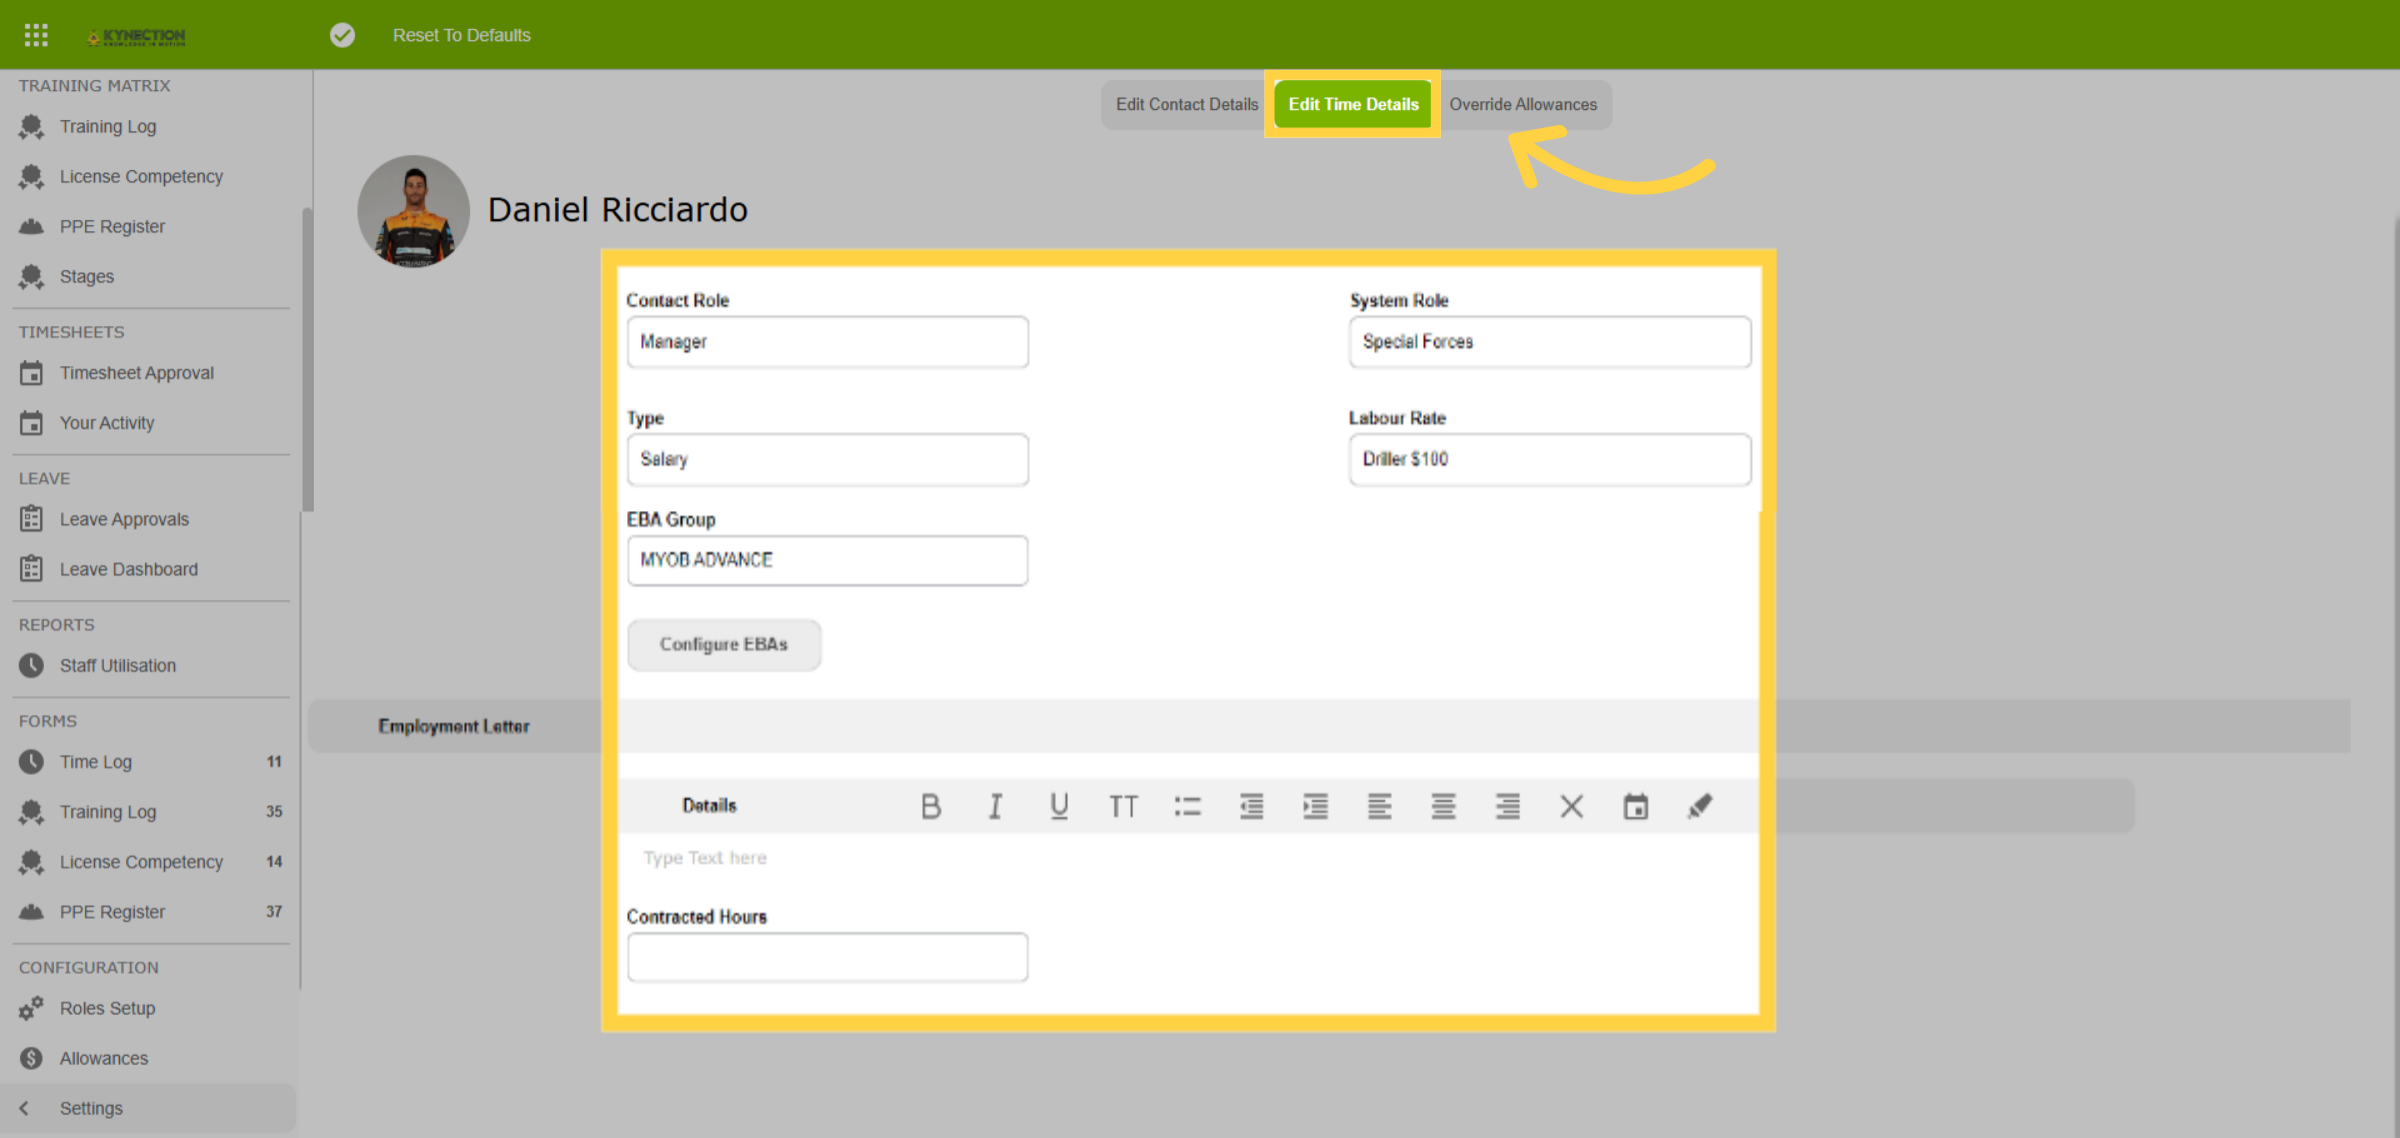
In the Edit Time Details tab, review and confirm the user's role, pay type, employee type, and assigned E.B.A. group.
15. E.B.A. Settings
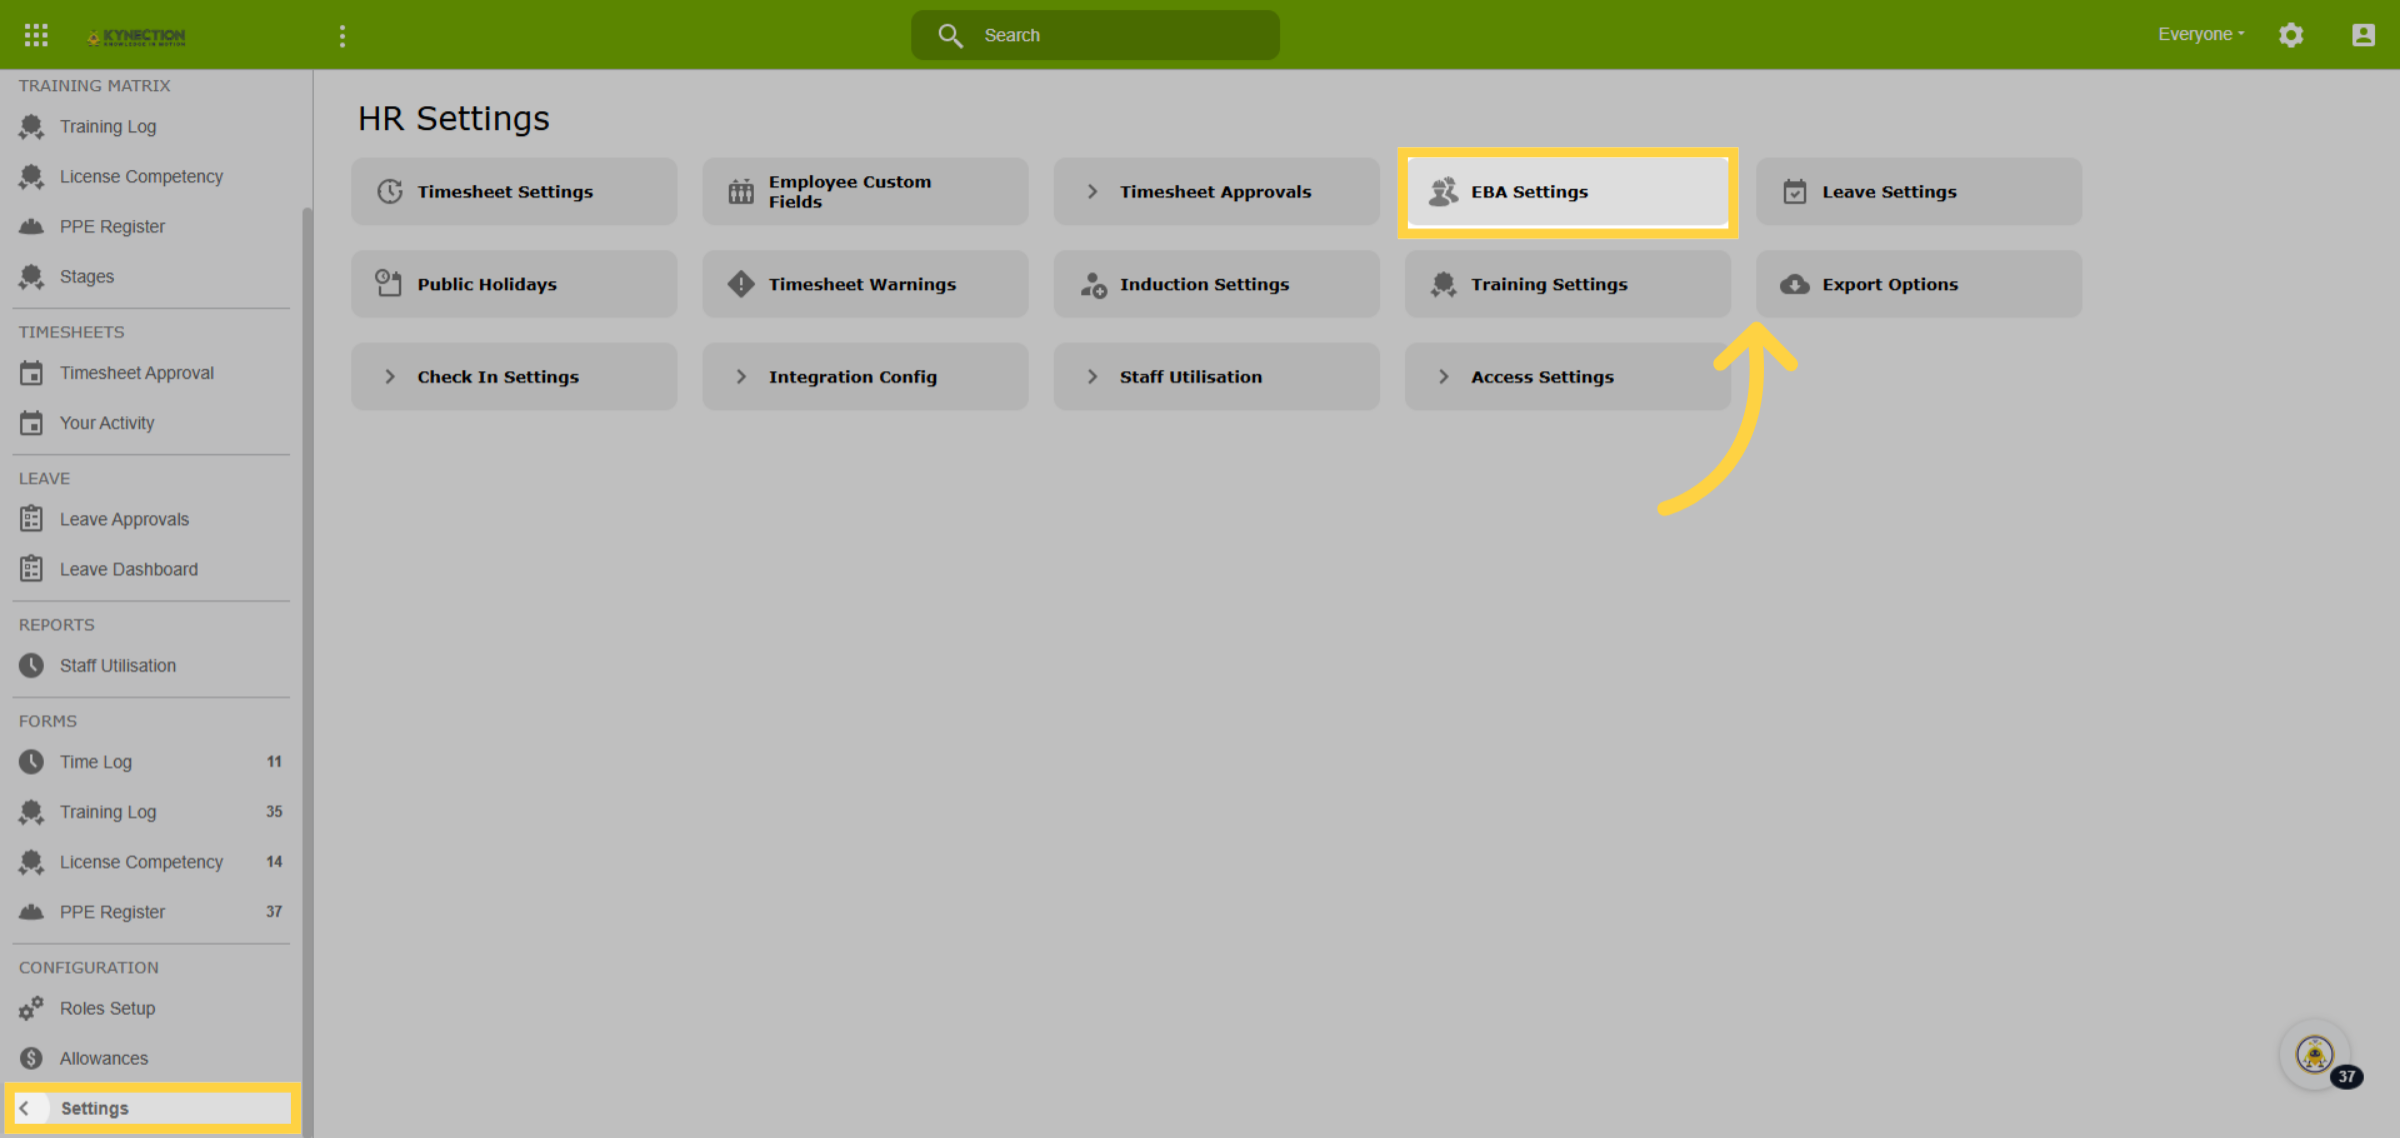
Now, let's explore how E.B.A.s are set up. Timesheet calculations are based on the E.B.A. allocated to the user in the People module. To view, edit, or create new E.B.A.s, select E.B.A. Settings from Settings.
16. EBA Group
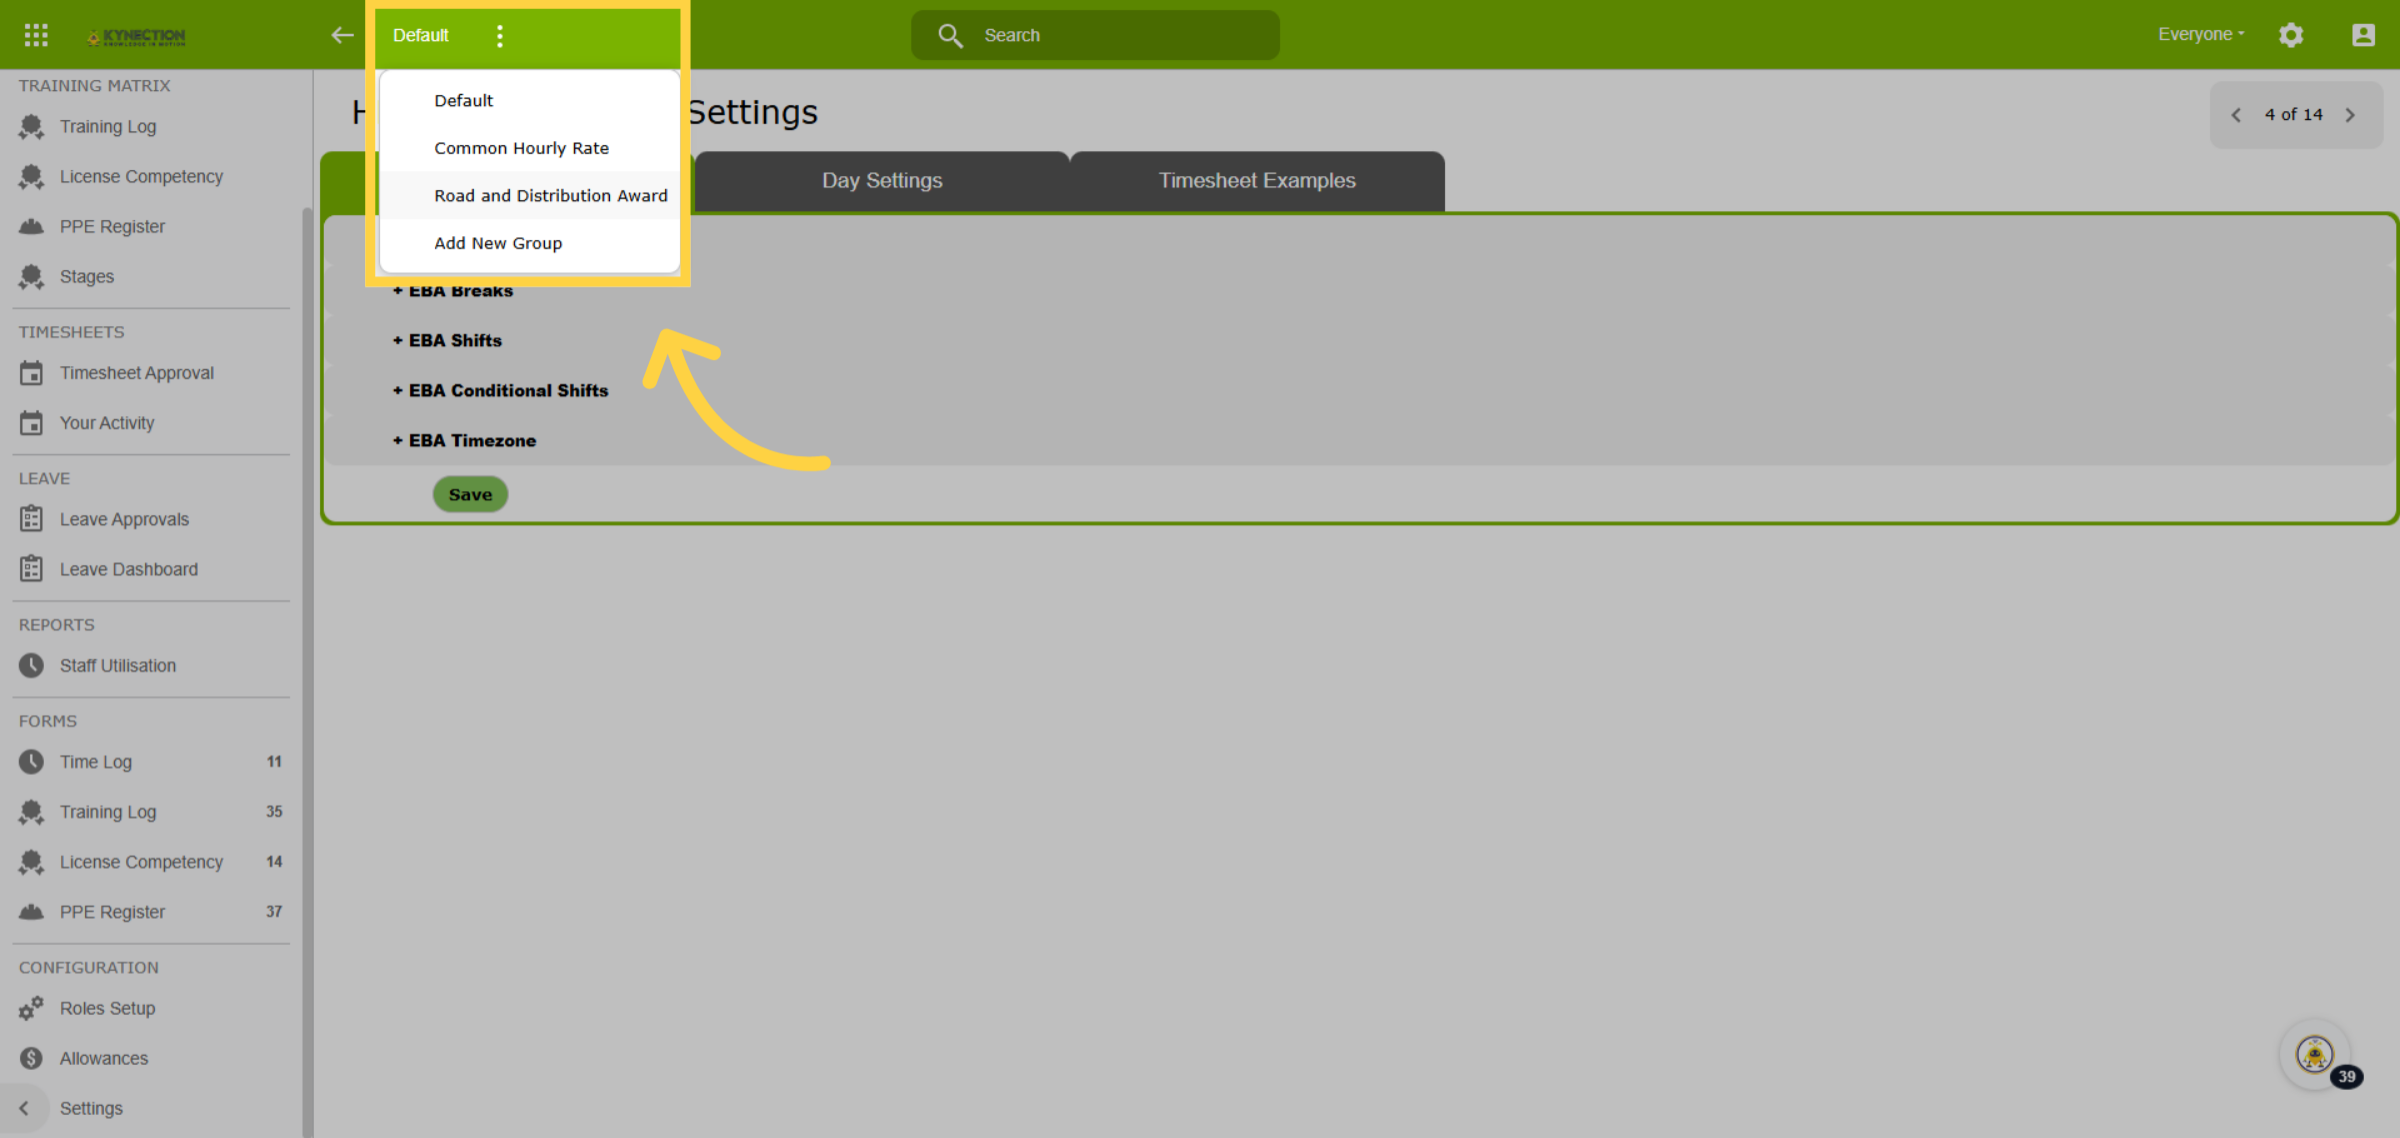
Click on Default from the toolbar to reveal a drop-down list of E.B.A. groups currently in use. The final option allows you to Add New Group. Select an E.B.A. to view or edit.
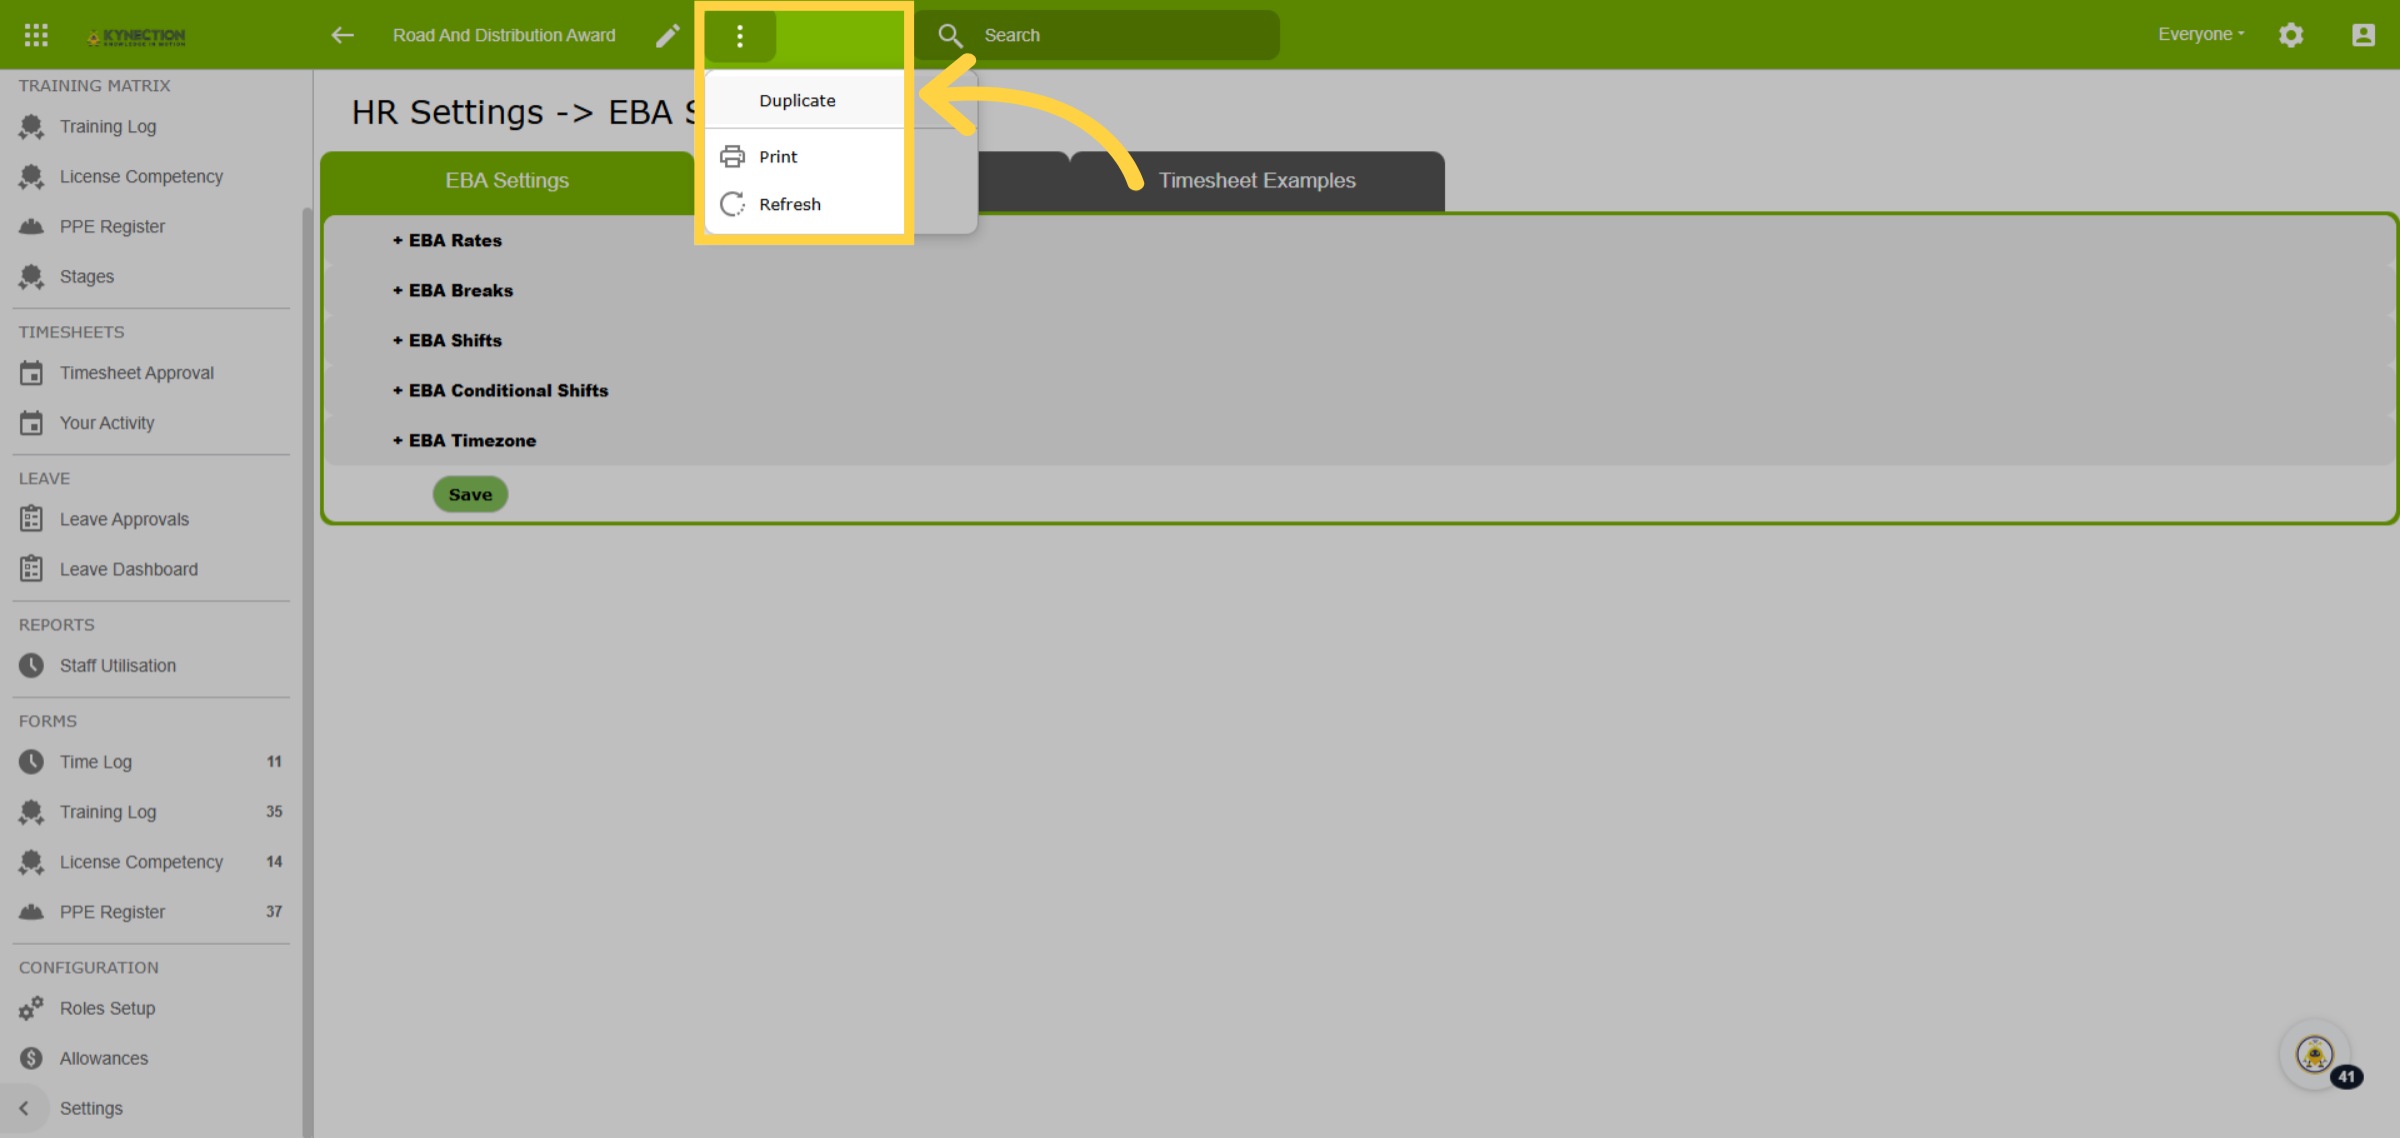
17. Duplicate EBA
Duplicating an existing E.B.A. is an efficient way to create a new one if a similar E.B.A. already exists. Open the E.B.A., select 3 dots from the toolbar, and then Duplicate. Name the E.B.A.
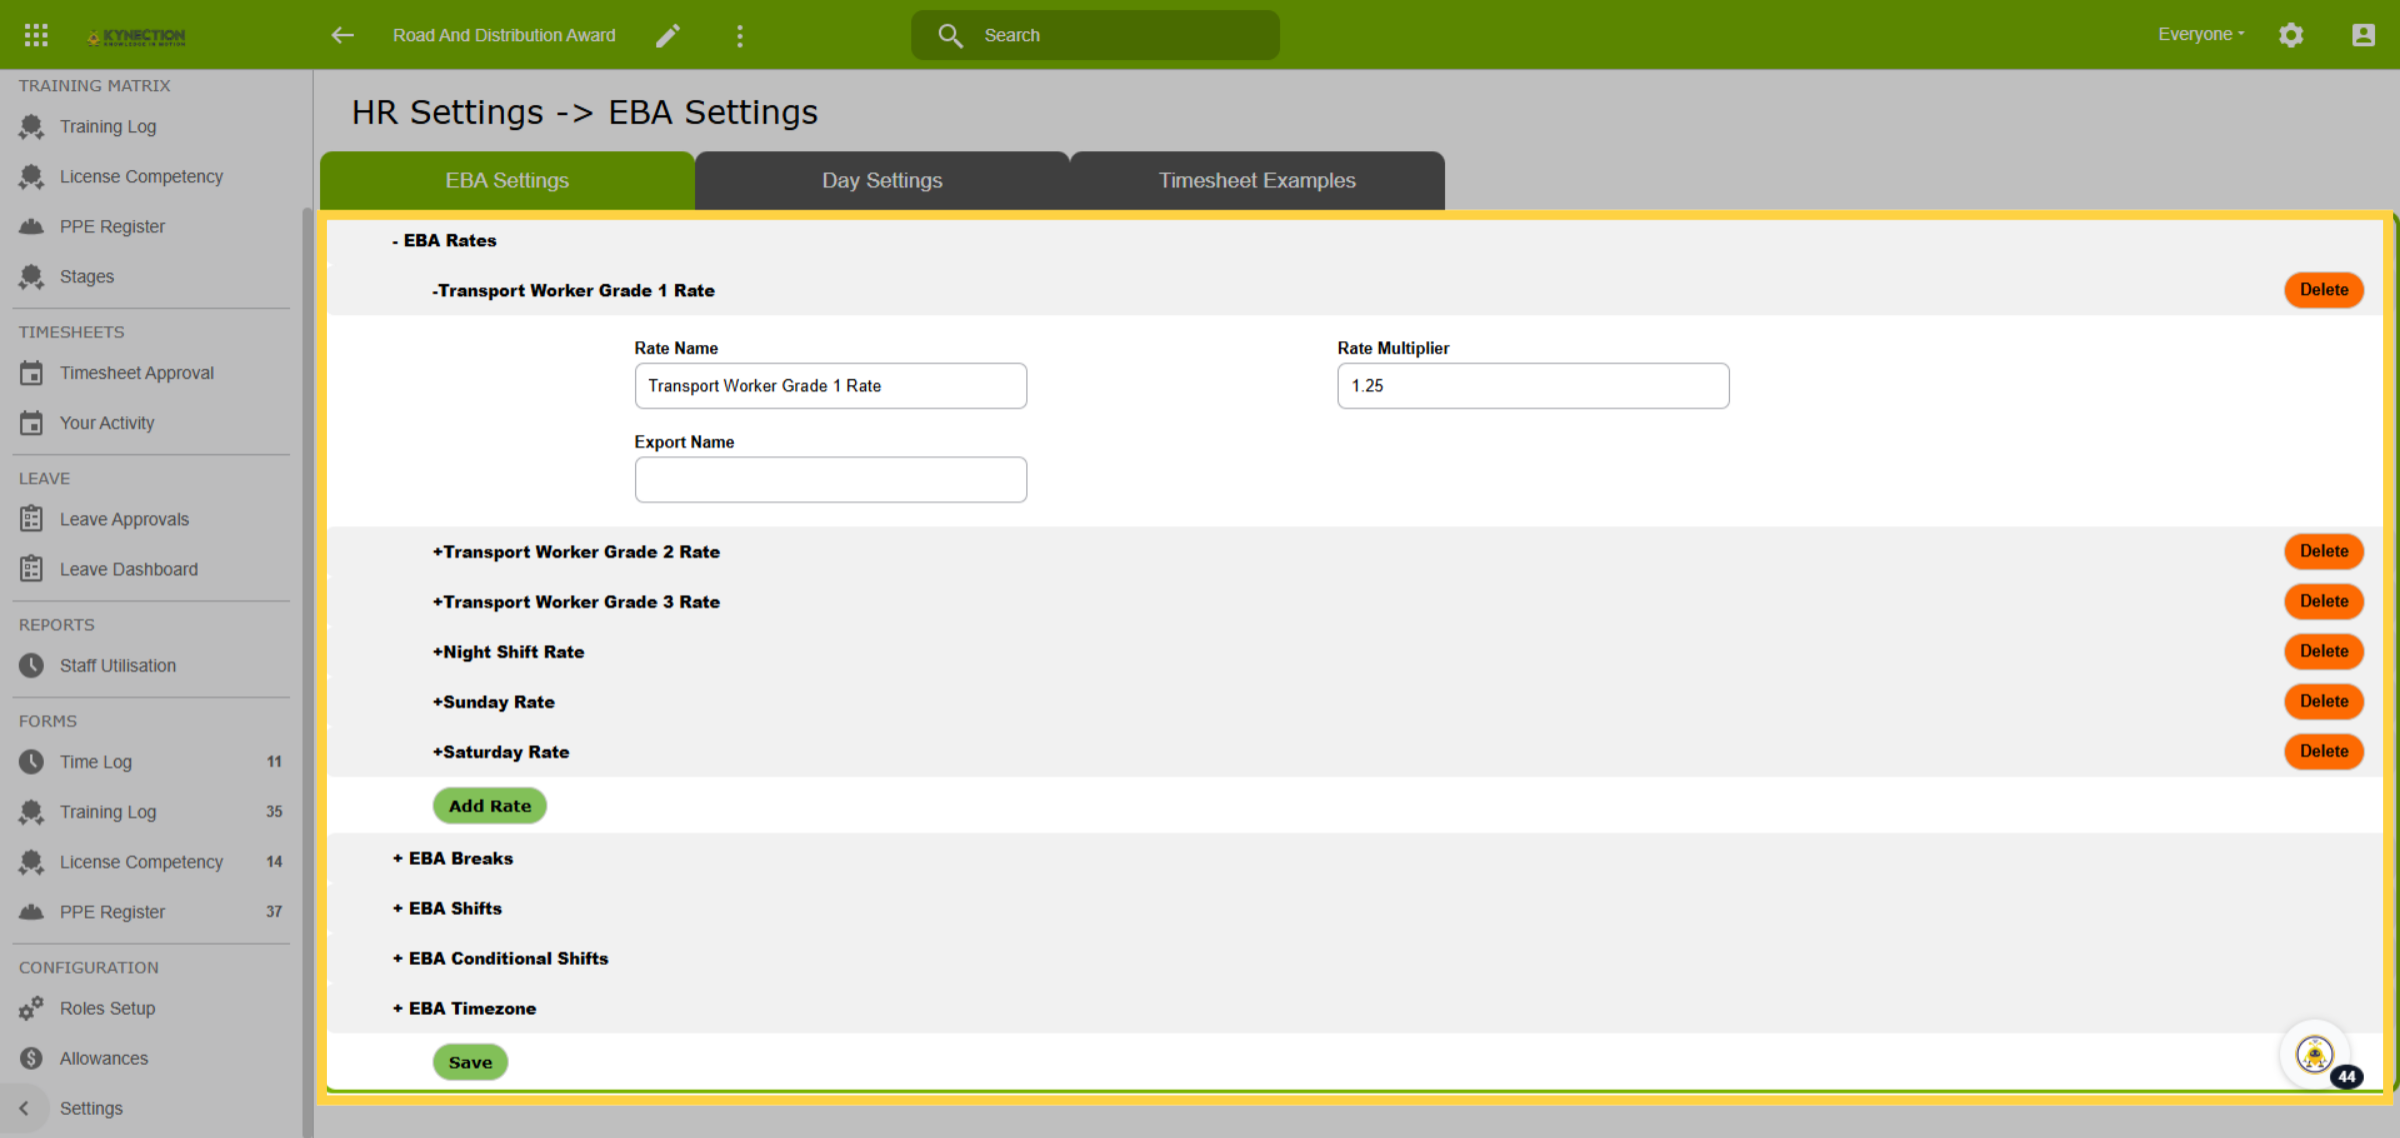
18. EBA Rates
If creating a new E.B.A. from scratch, add the E.B.A. rates applicable to the award. If duplicating, verify existing E.B.A. rates and breaks are correct.
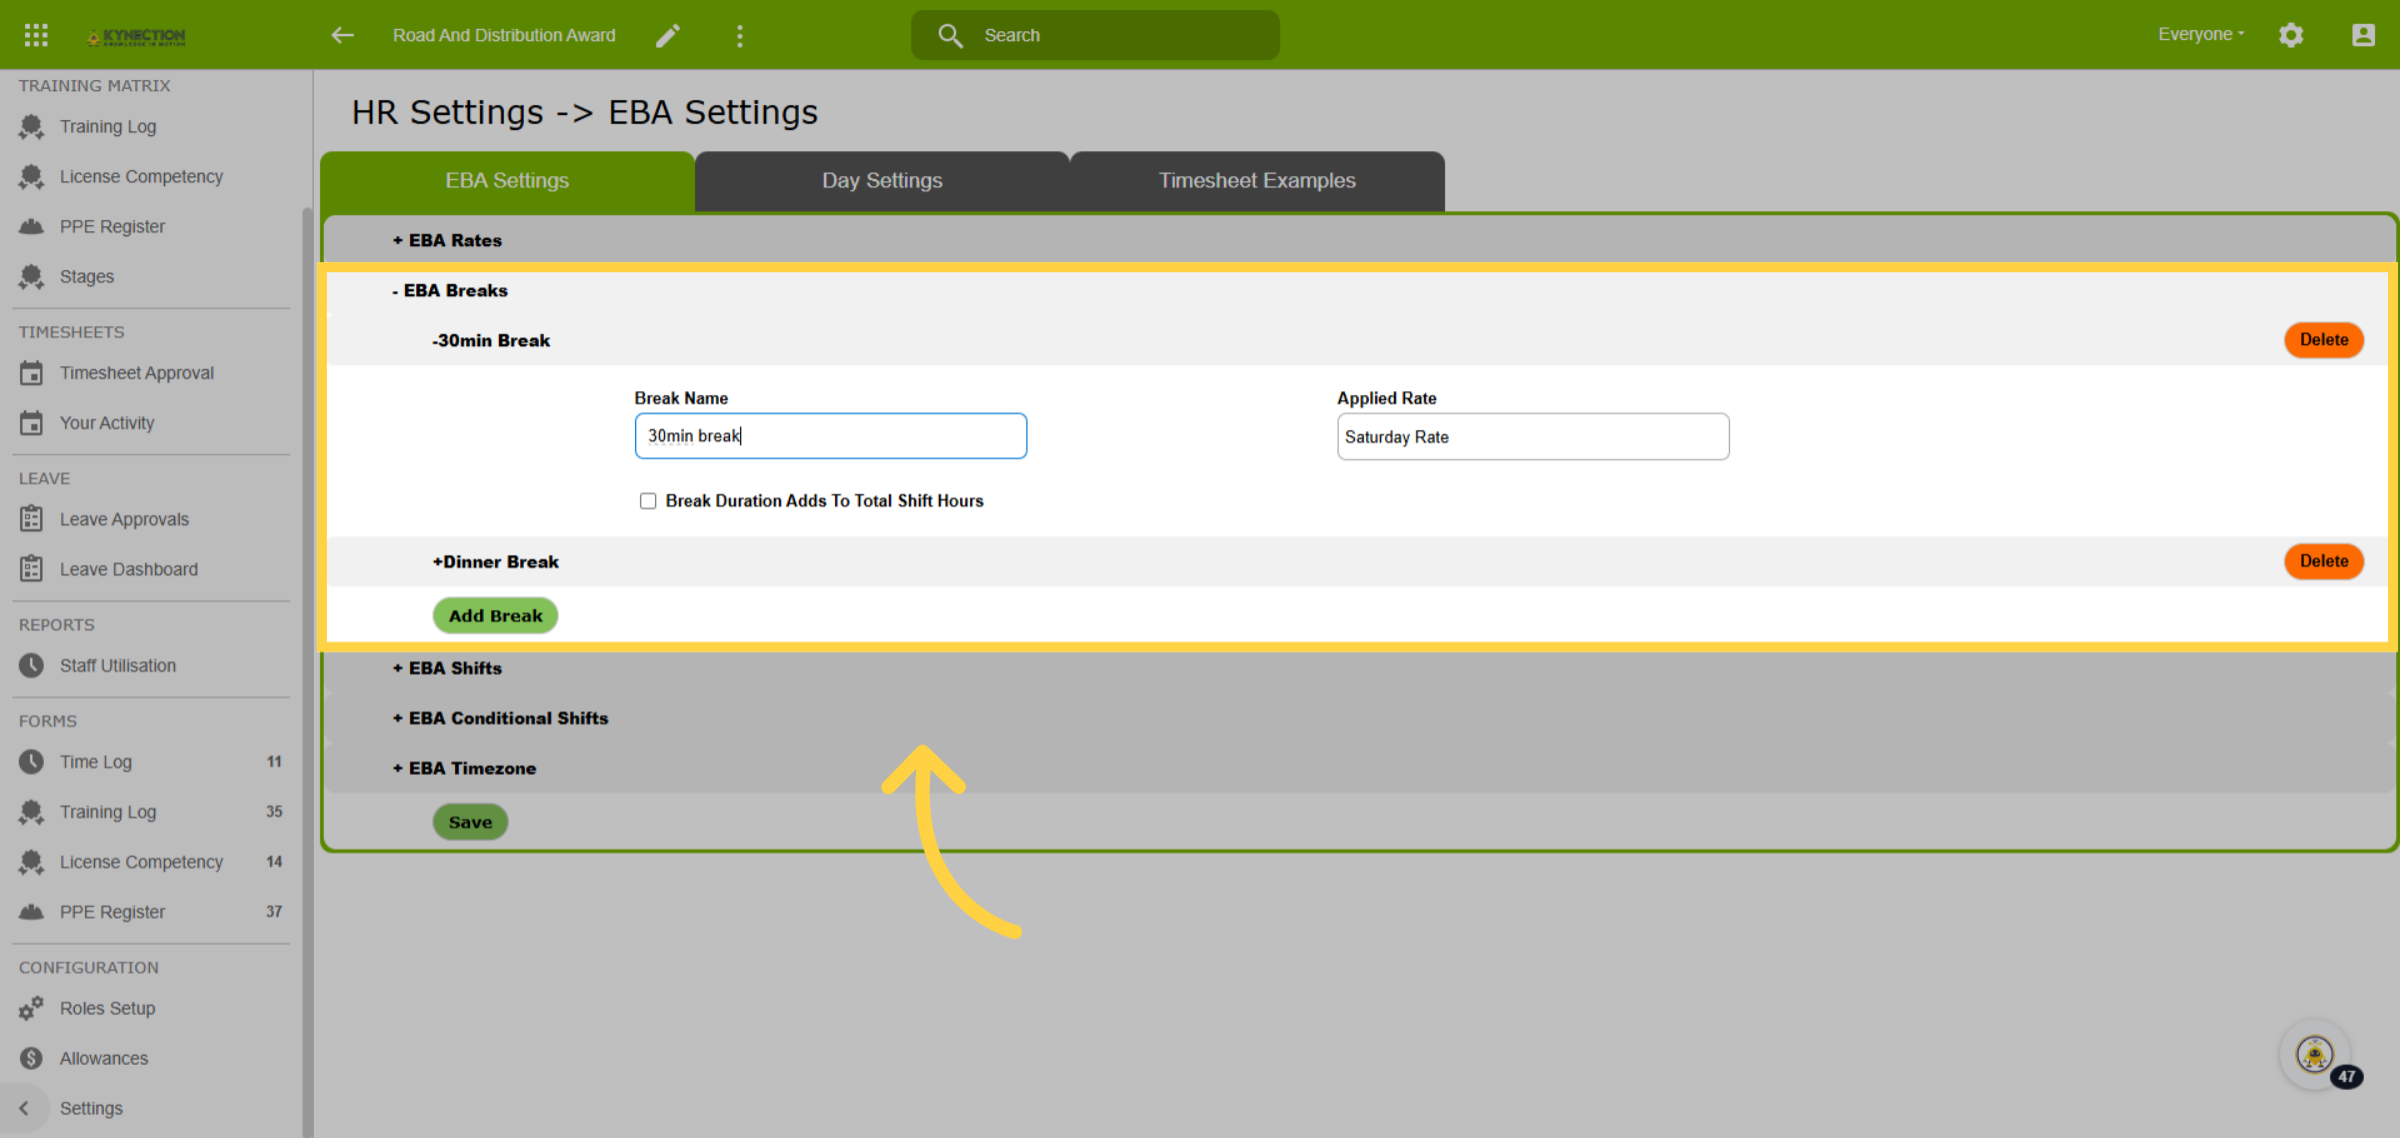
19. EBA Breaks
Include any applicable breaks for the award, or confirm breaks if duplicating.
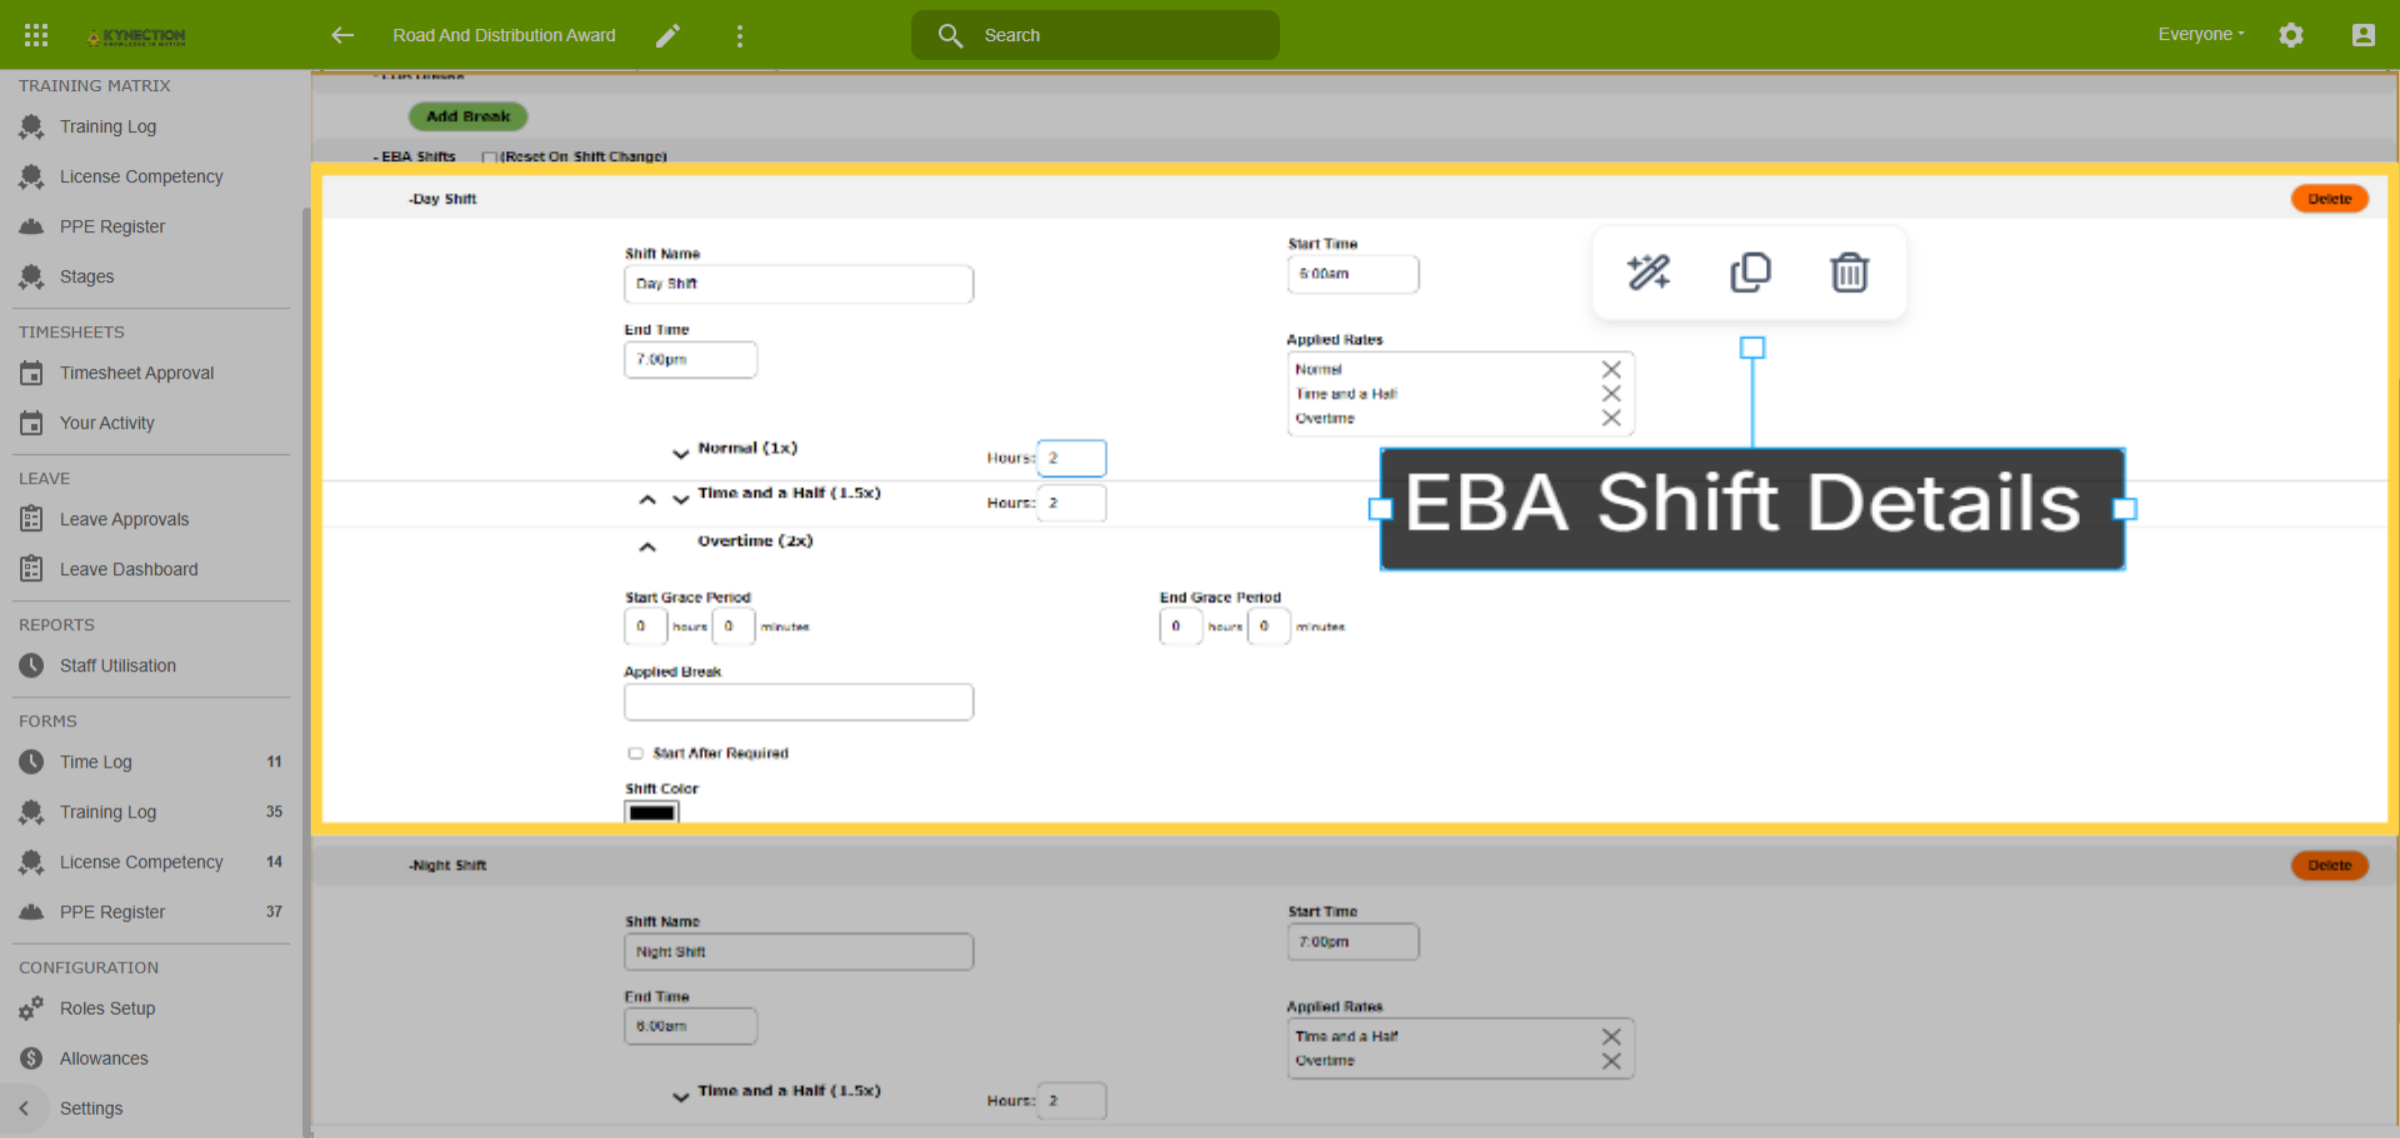
20. E.B.A. Shift Details
Add the relevant start and end times, along with applied rates for each group. Multiple shifts cover variances for day, night, weekend, and public holiday shifts. Scroll down and save changes.
21. Day Settings & Leave Hours
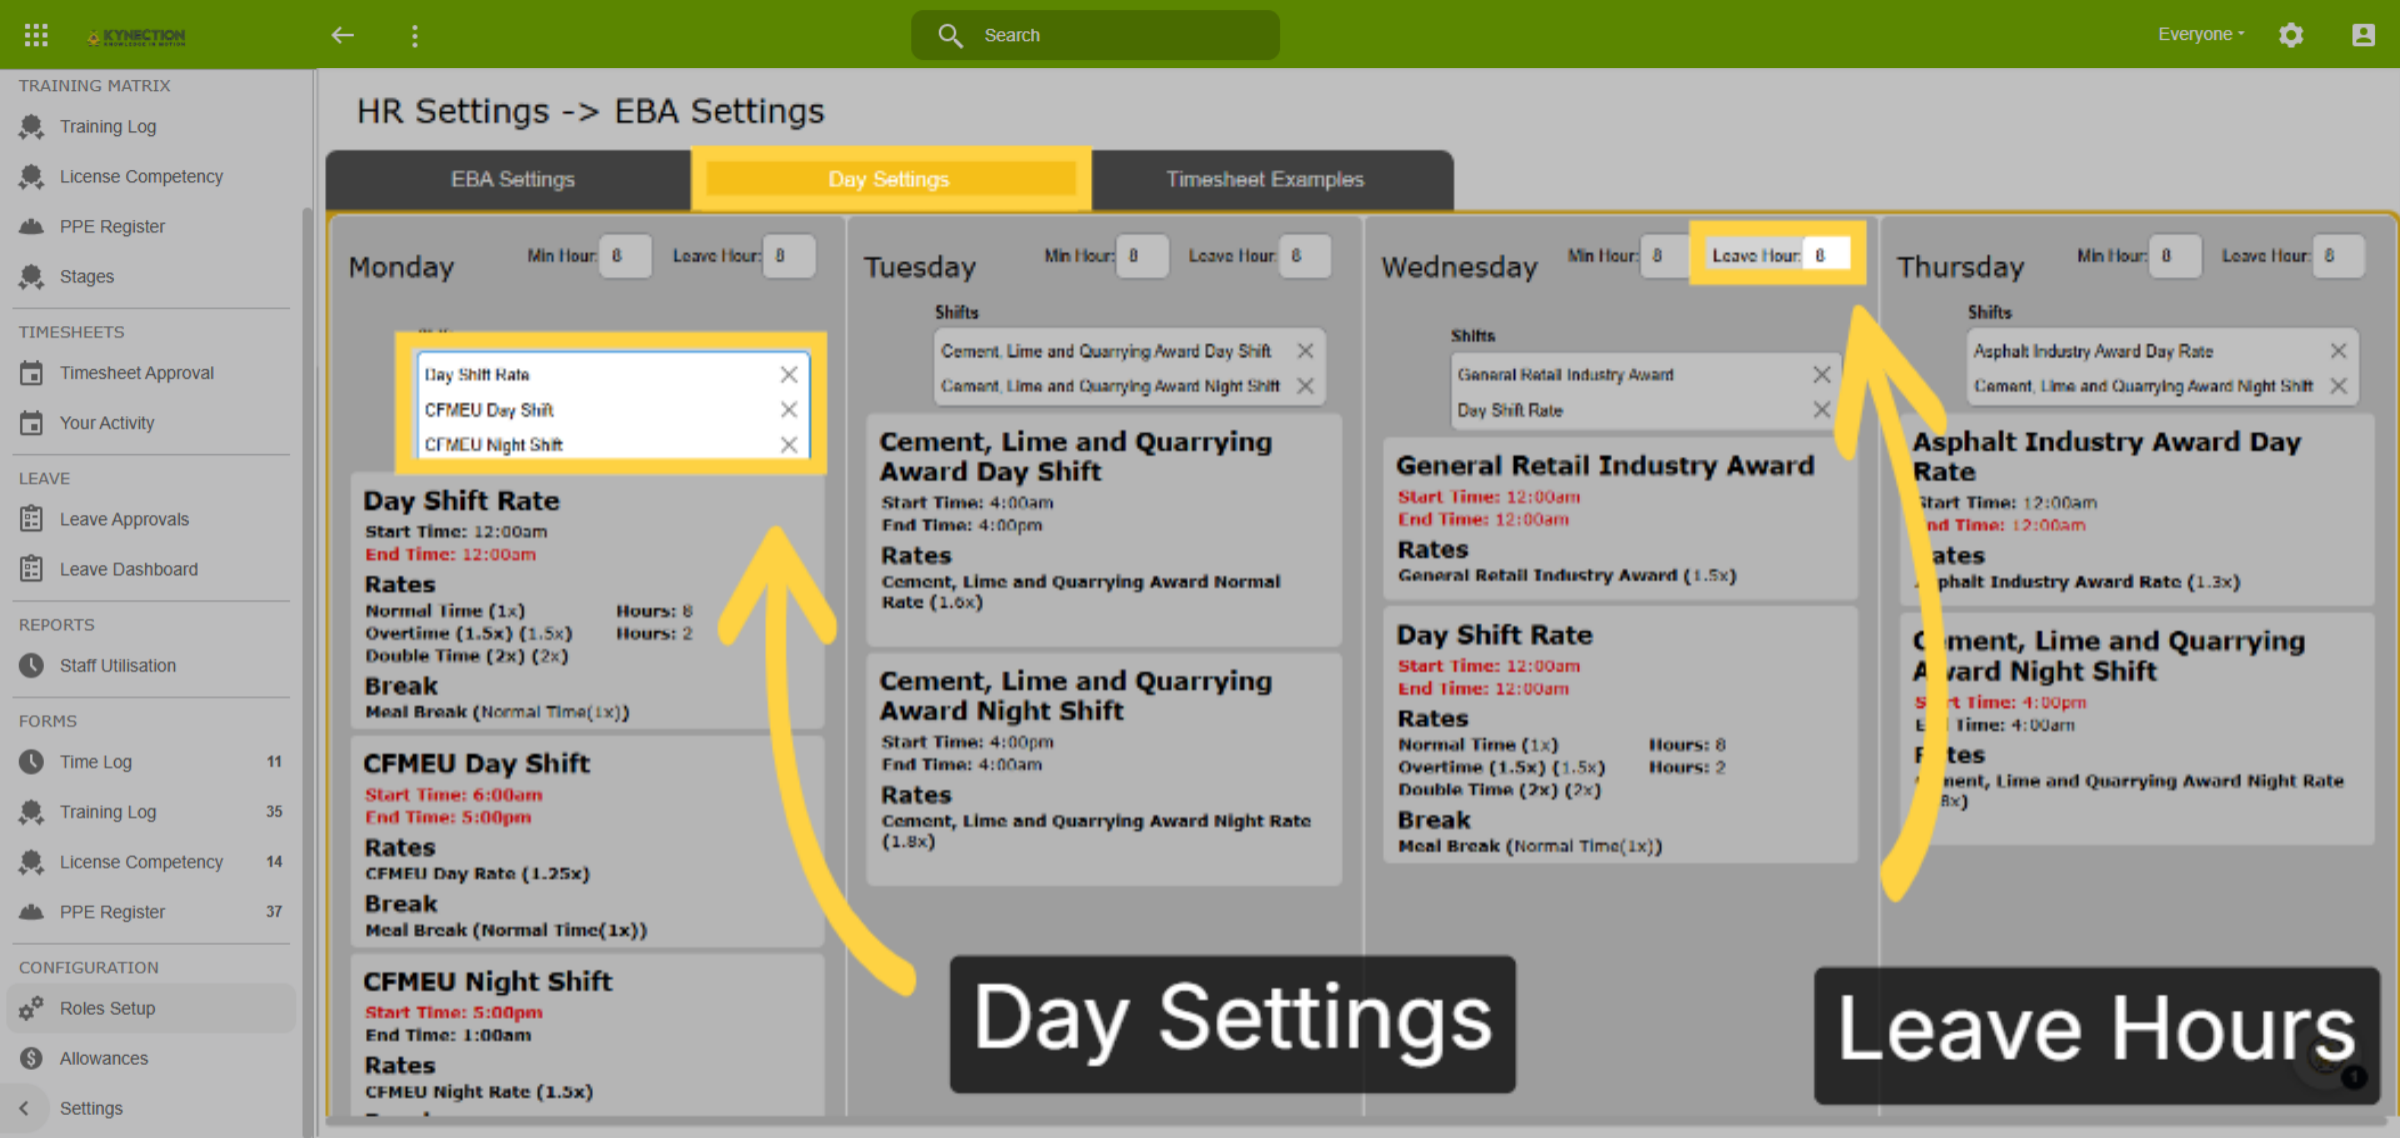
Select the Day Settings tab and add the shifts that apply to each day, including weekends and public holidays. The Leave Hours field records the number of hours that apply for leave.
22. Link E.B.A. to Role
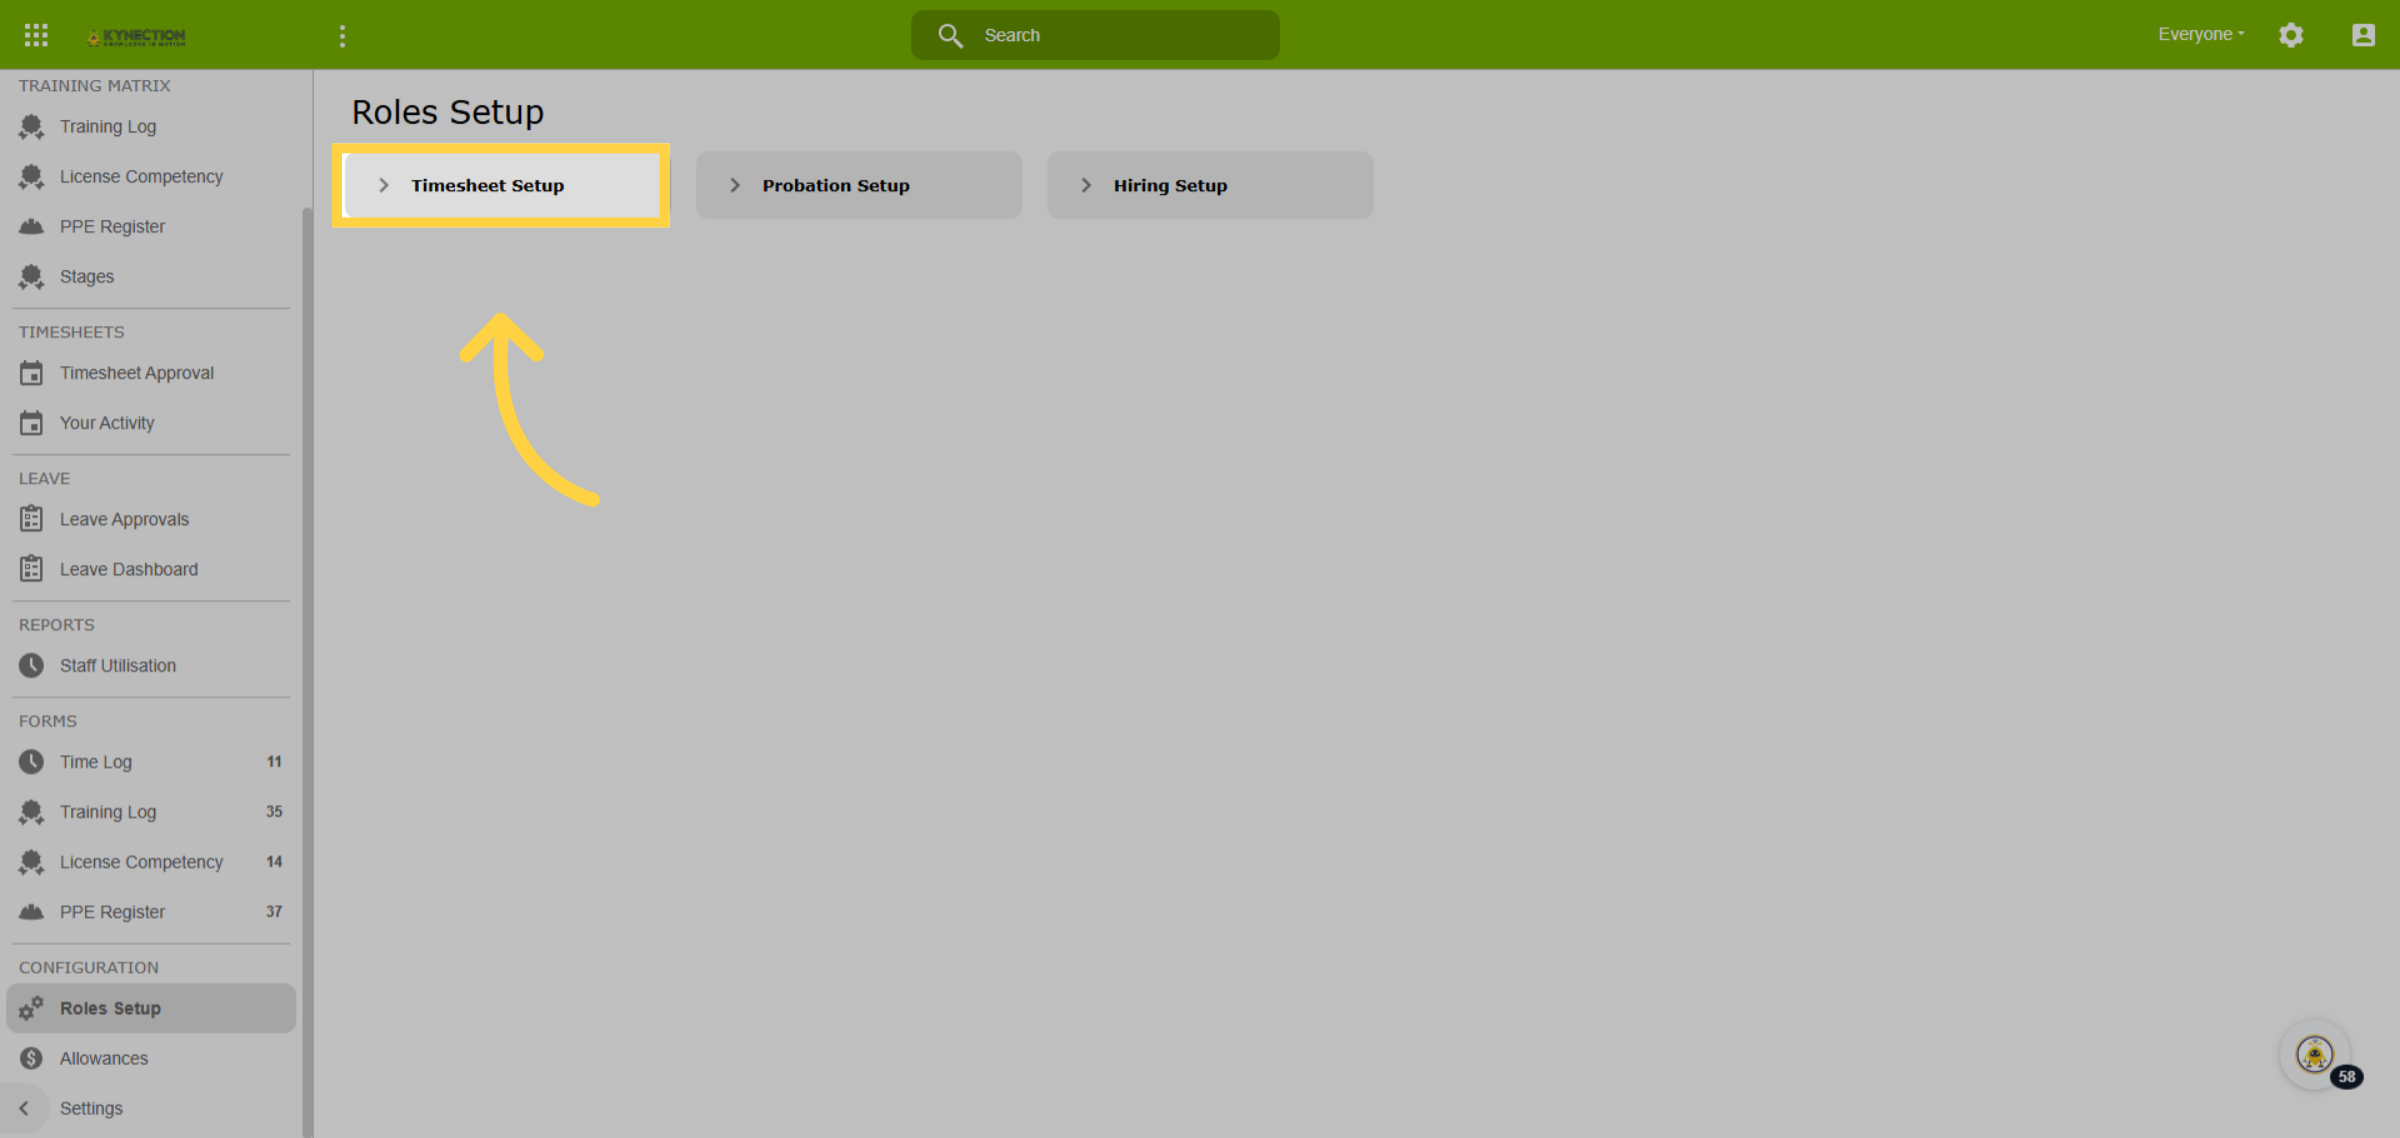
With the E.B.A. set up, link it to one or more roles. Select Timesheet Setup from Role Setup.
23. Select Role
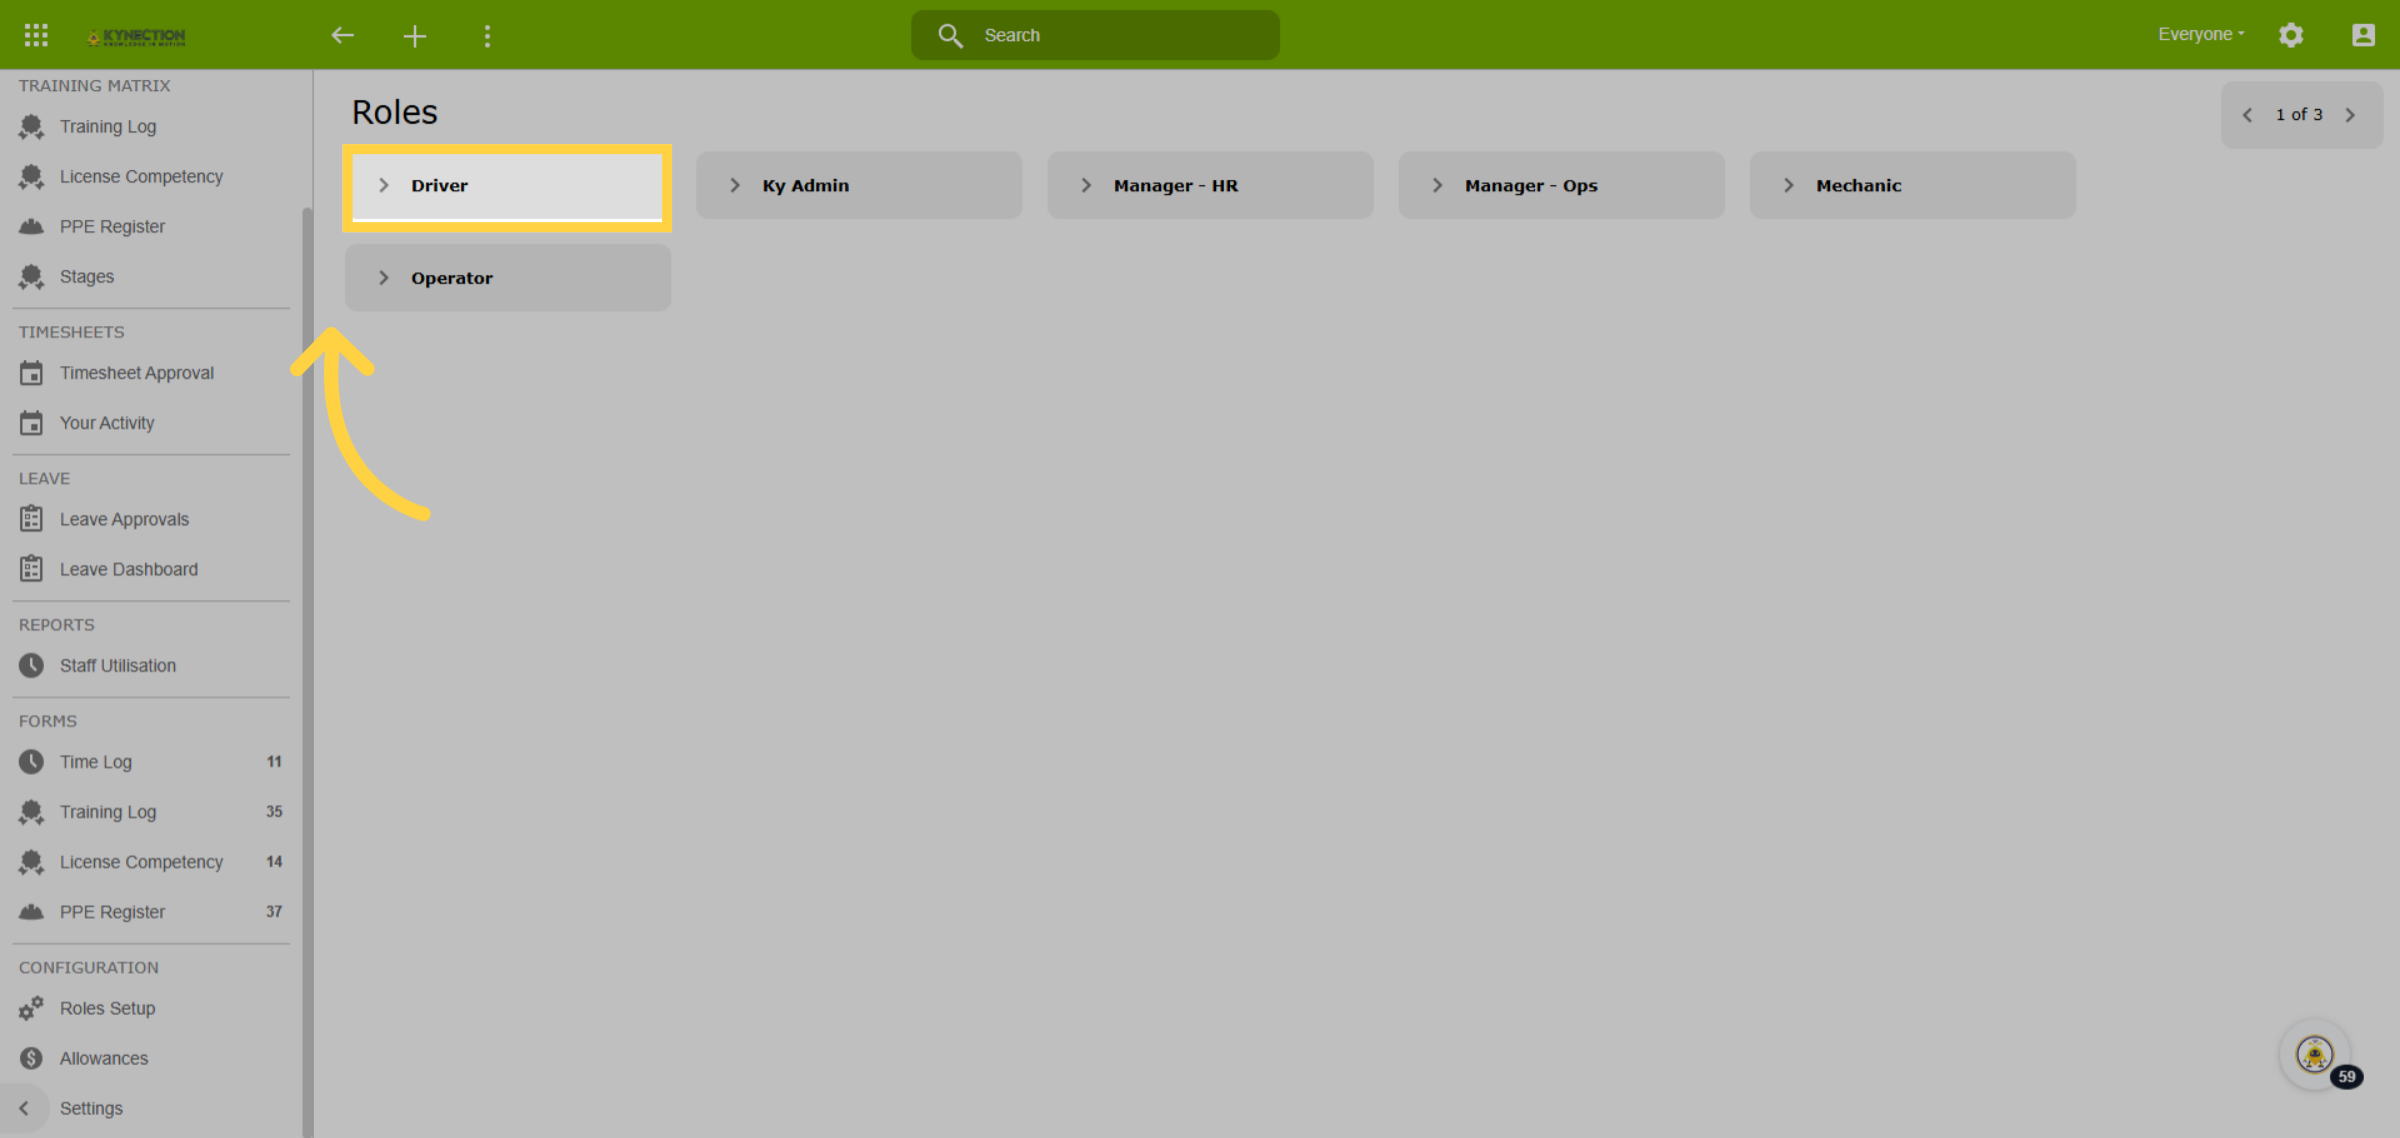
Open the role to link the E.B.A.
24. Select EBA
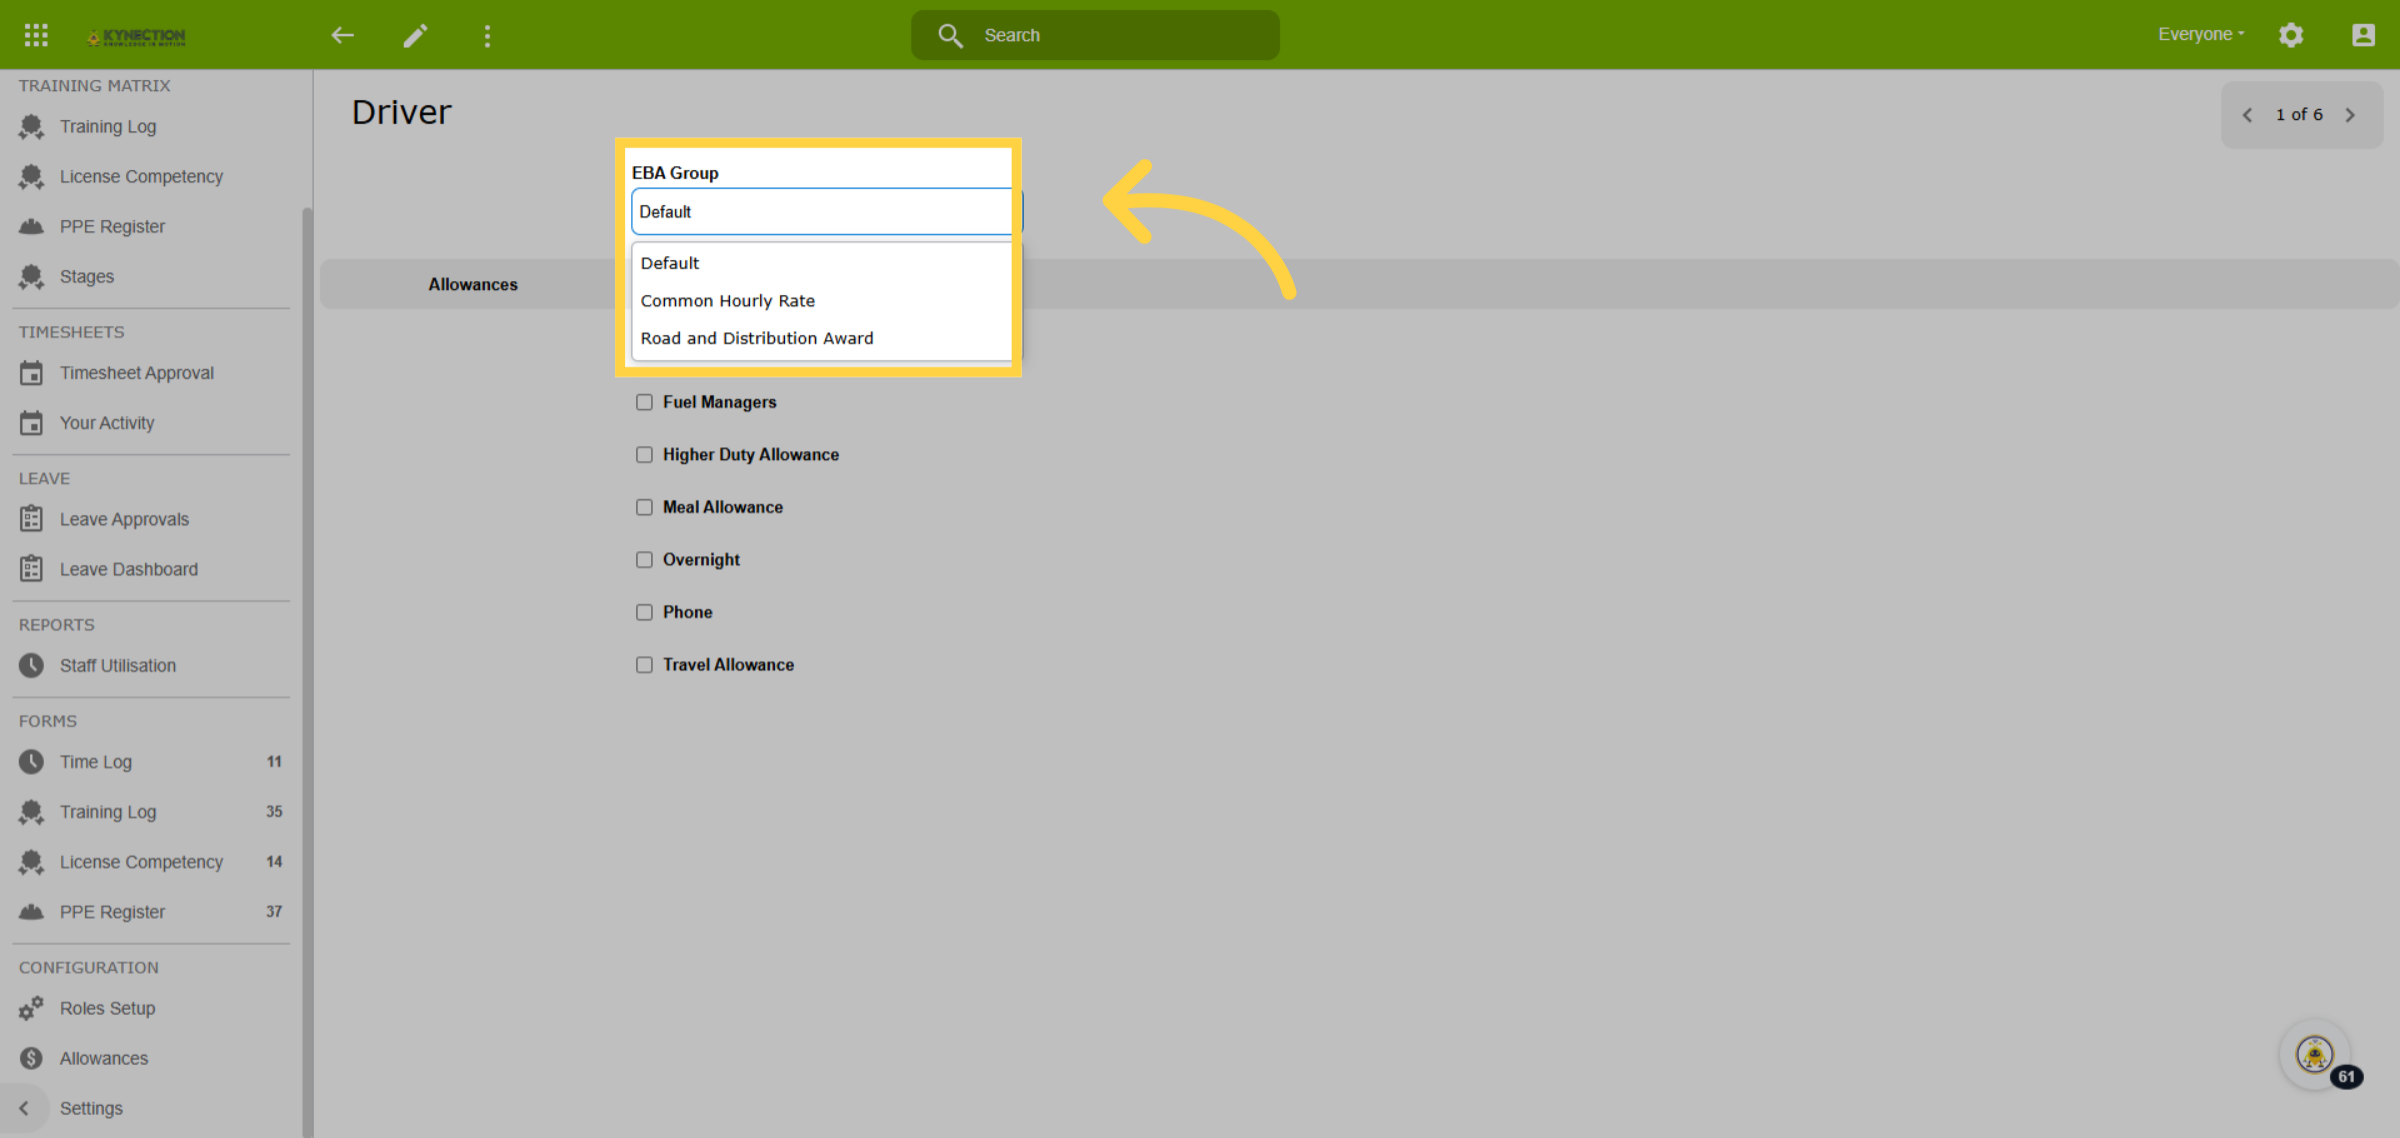
Use the drop-down list to select the E.B.A. for the role.
25. Add Allowances
Navigate to Allowances and then select those that apply.
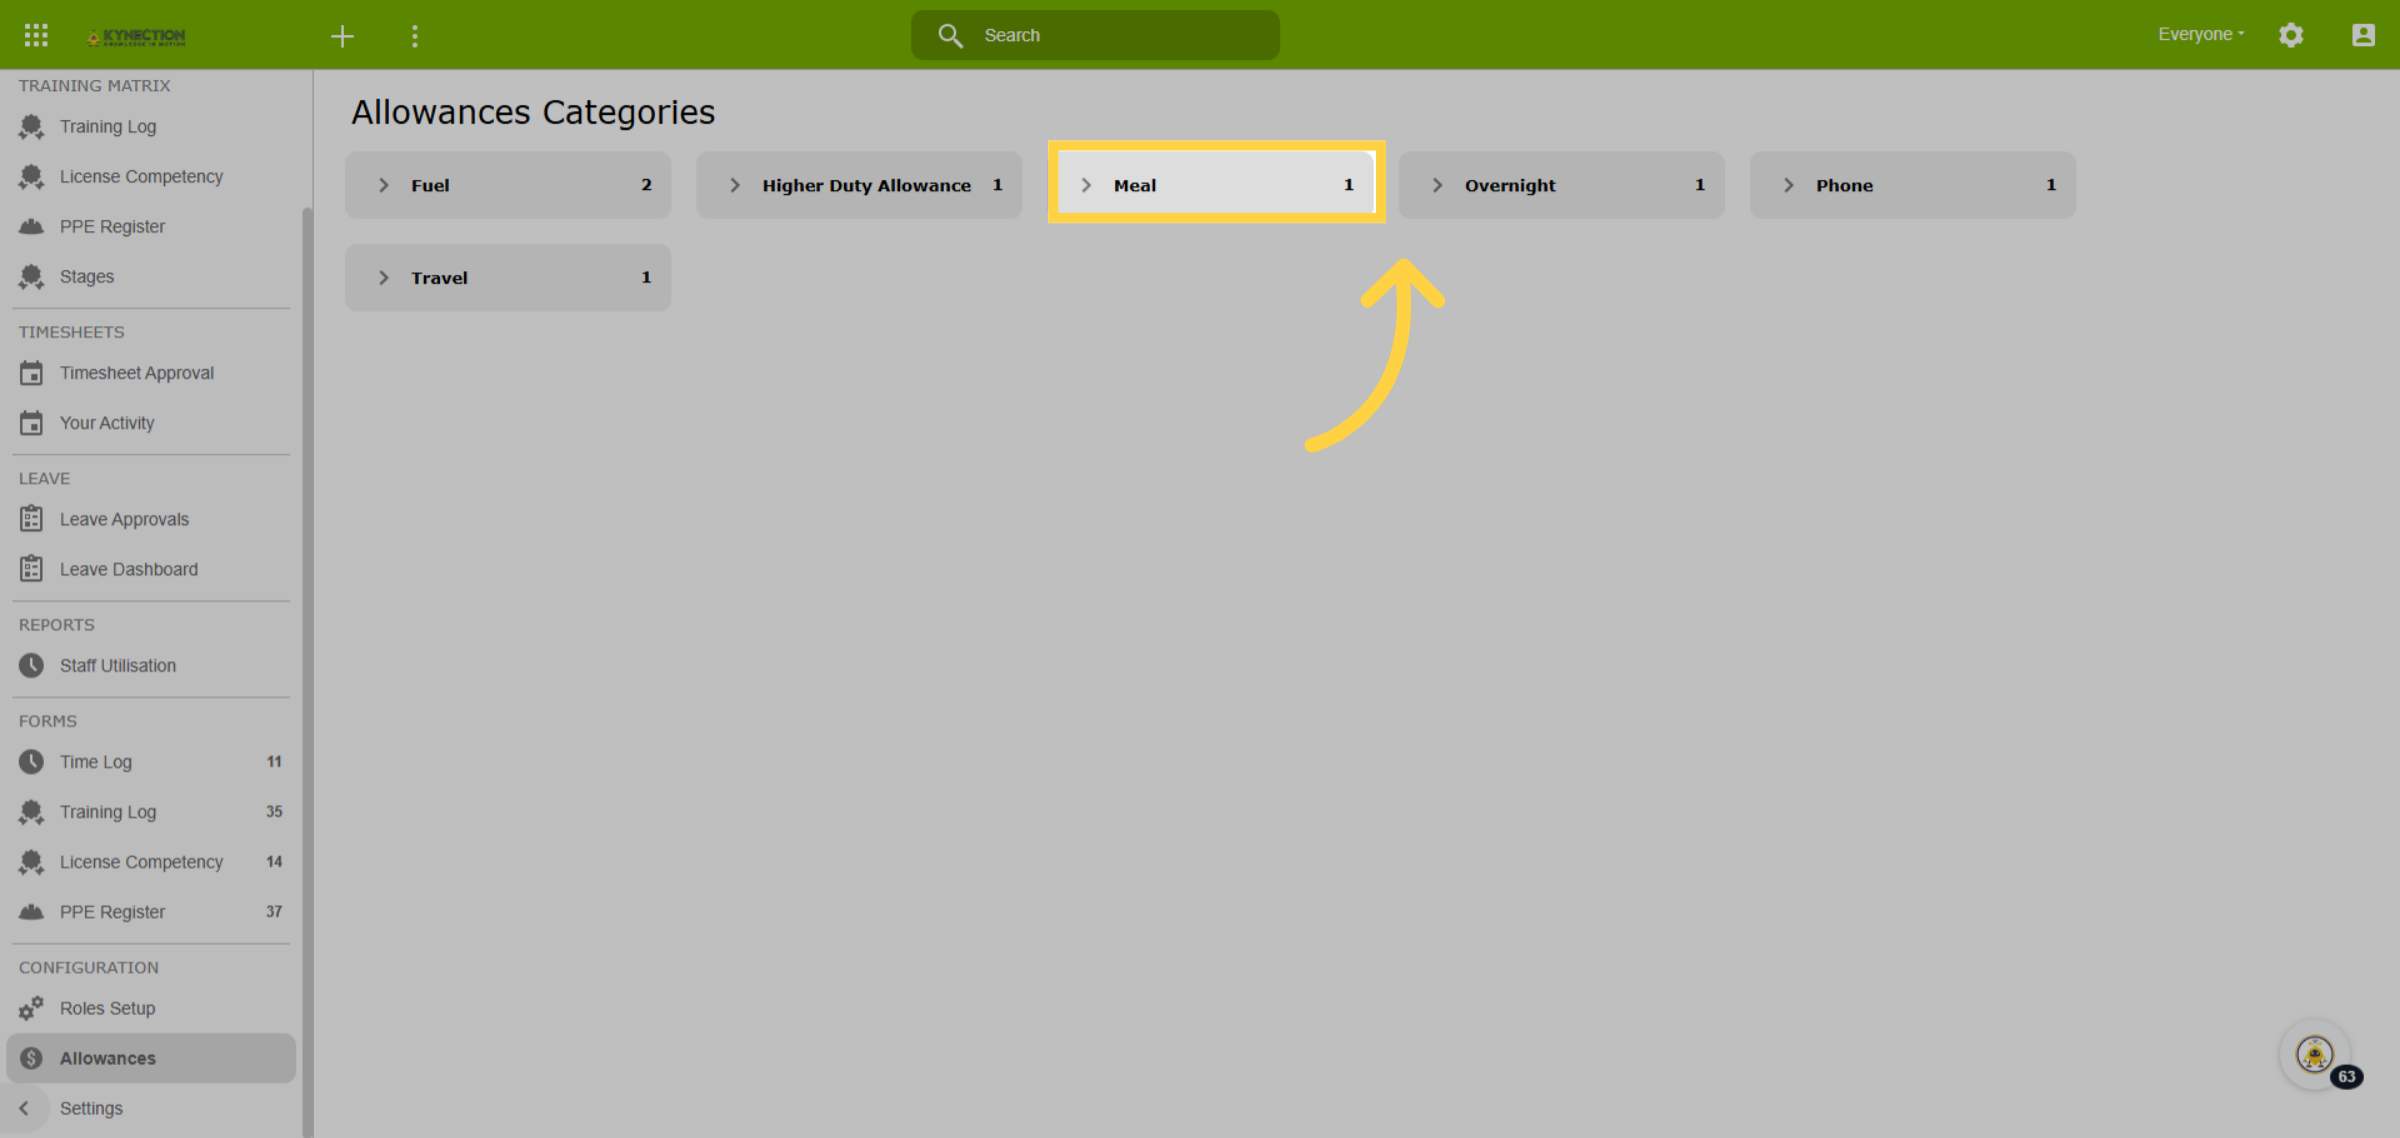
26. Add EBA
Add the E.B.A. so the allowance automatically applies in timesheet calculations. This concludes creating an E.B.A.
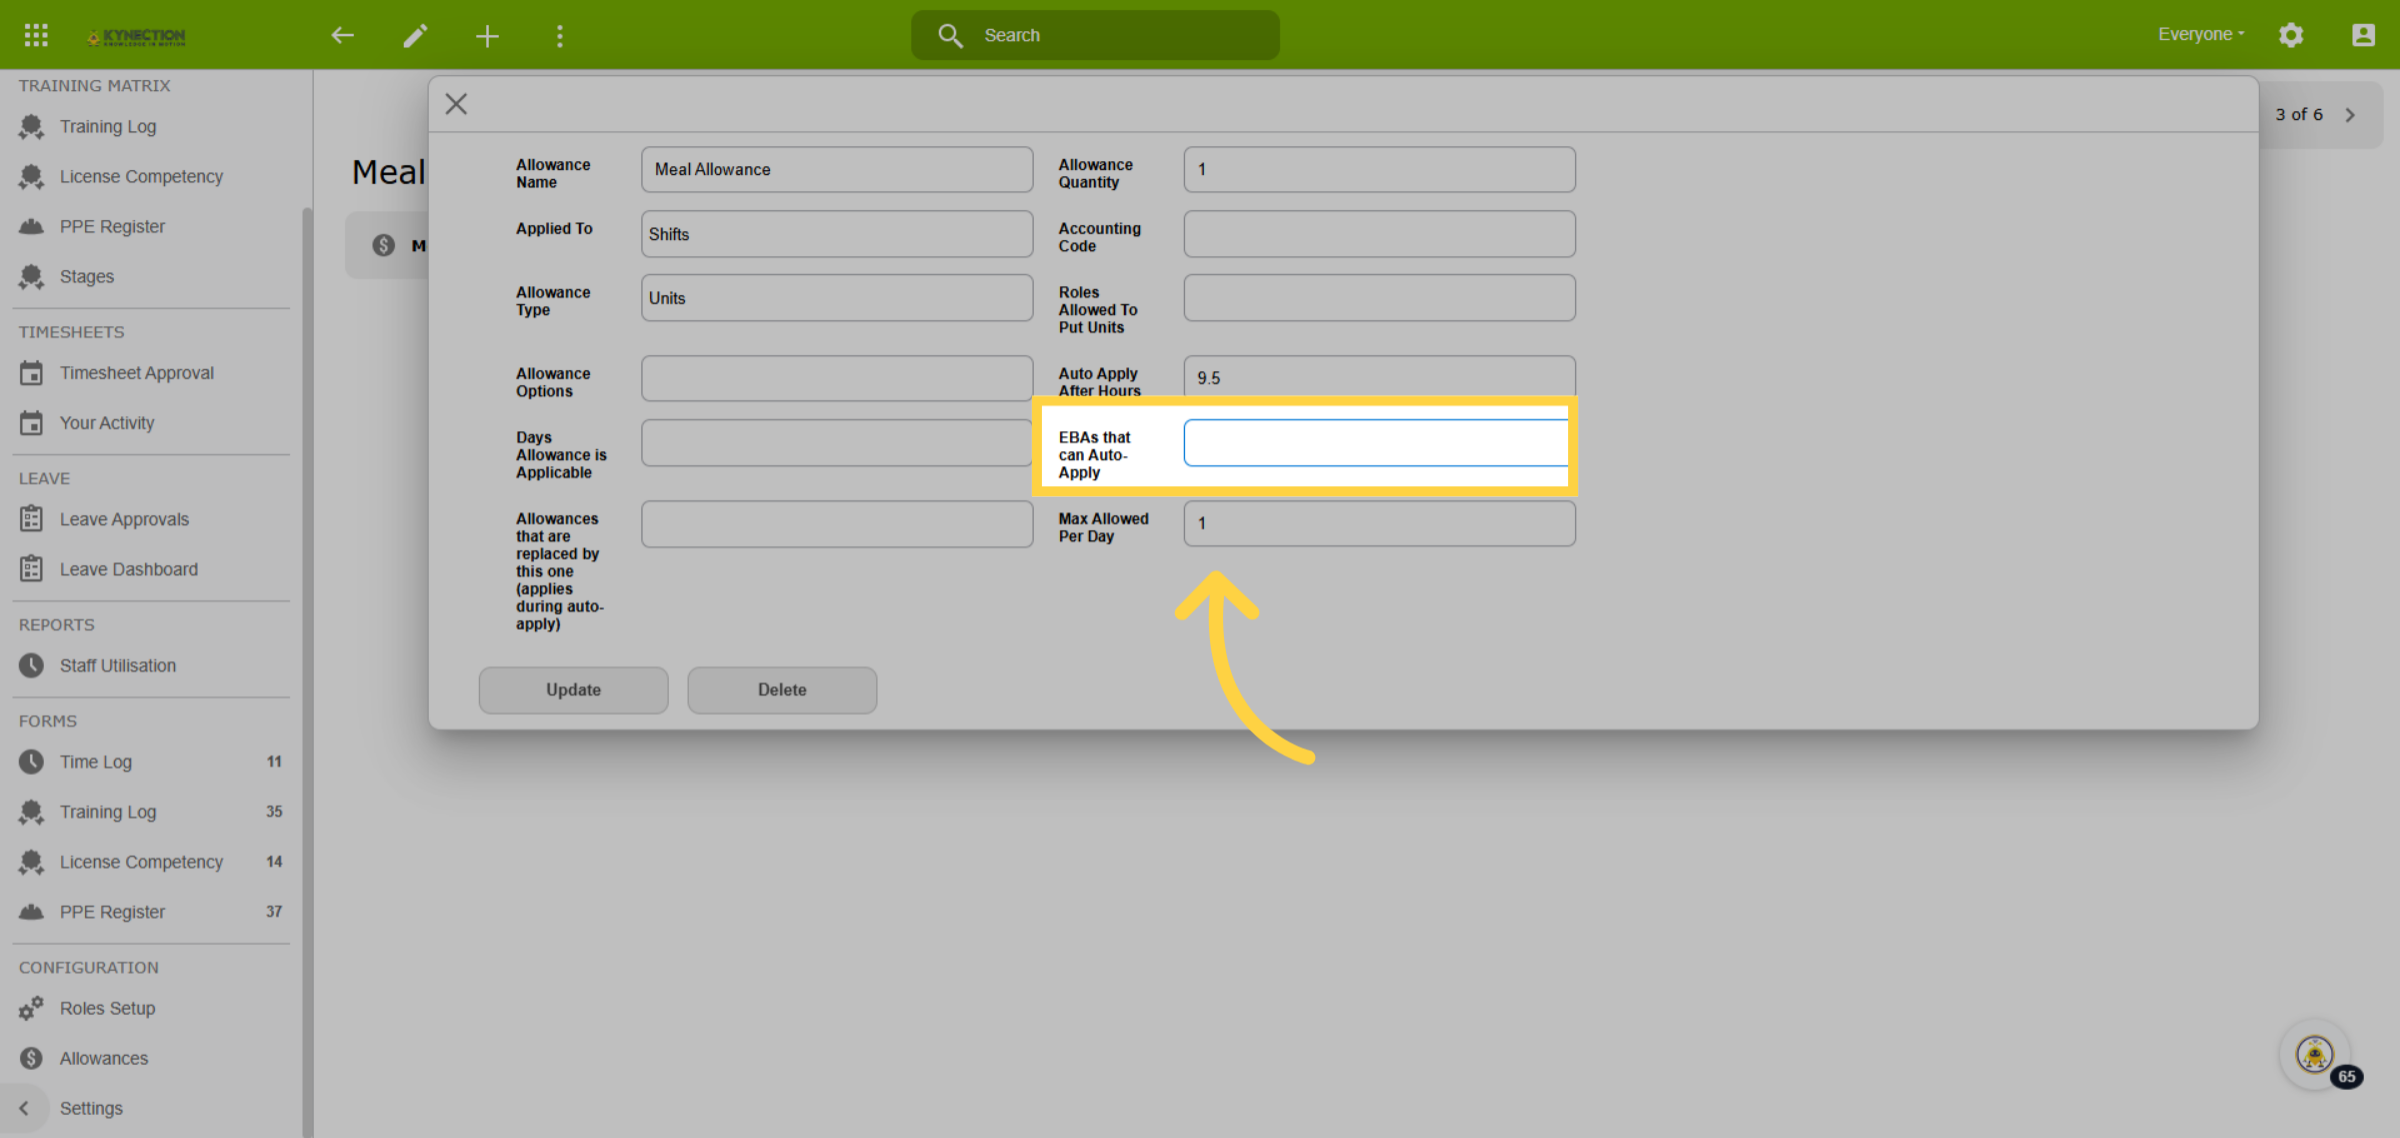
27. Training Matrix
The first option in the Training Matrix is the Training Log. This tab displays employee competencies, showing upcoming renewal statuses with a traffic light system: green for never expiring, yellow for expiring in 30 days, red for expired, and orange for not yet submitted. Users can import CSV files to populate the database and export data to a spreadsheet. The filter icon allows filtering by contact, role, or certificate group for more specific views.
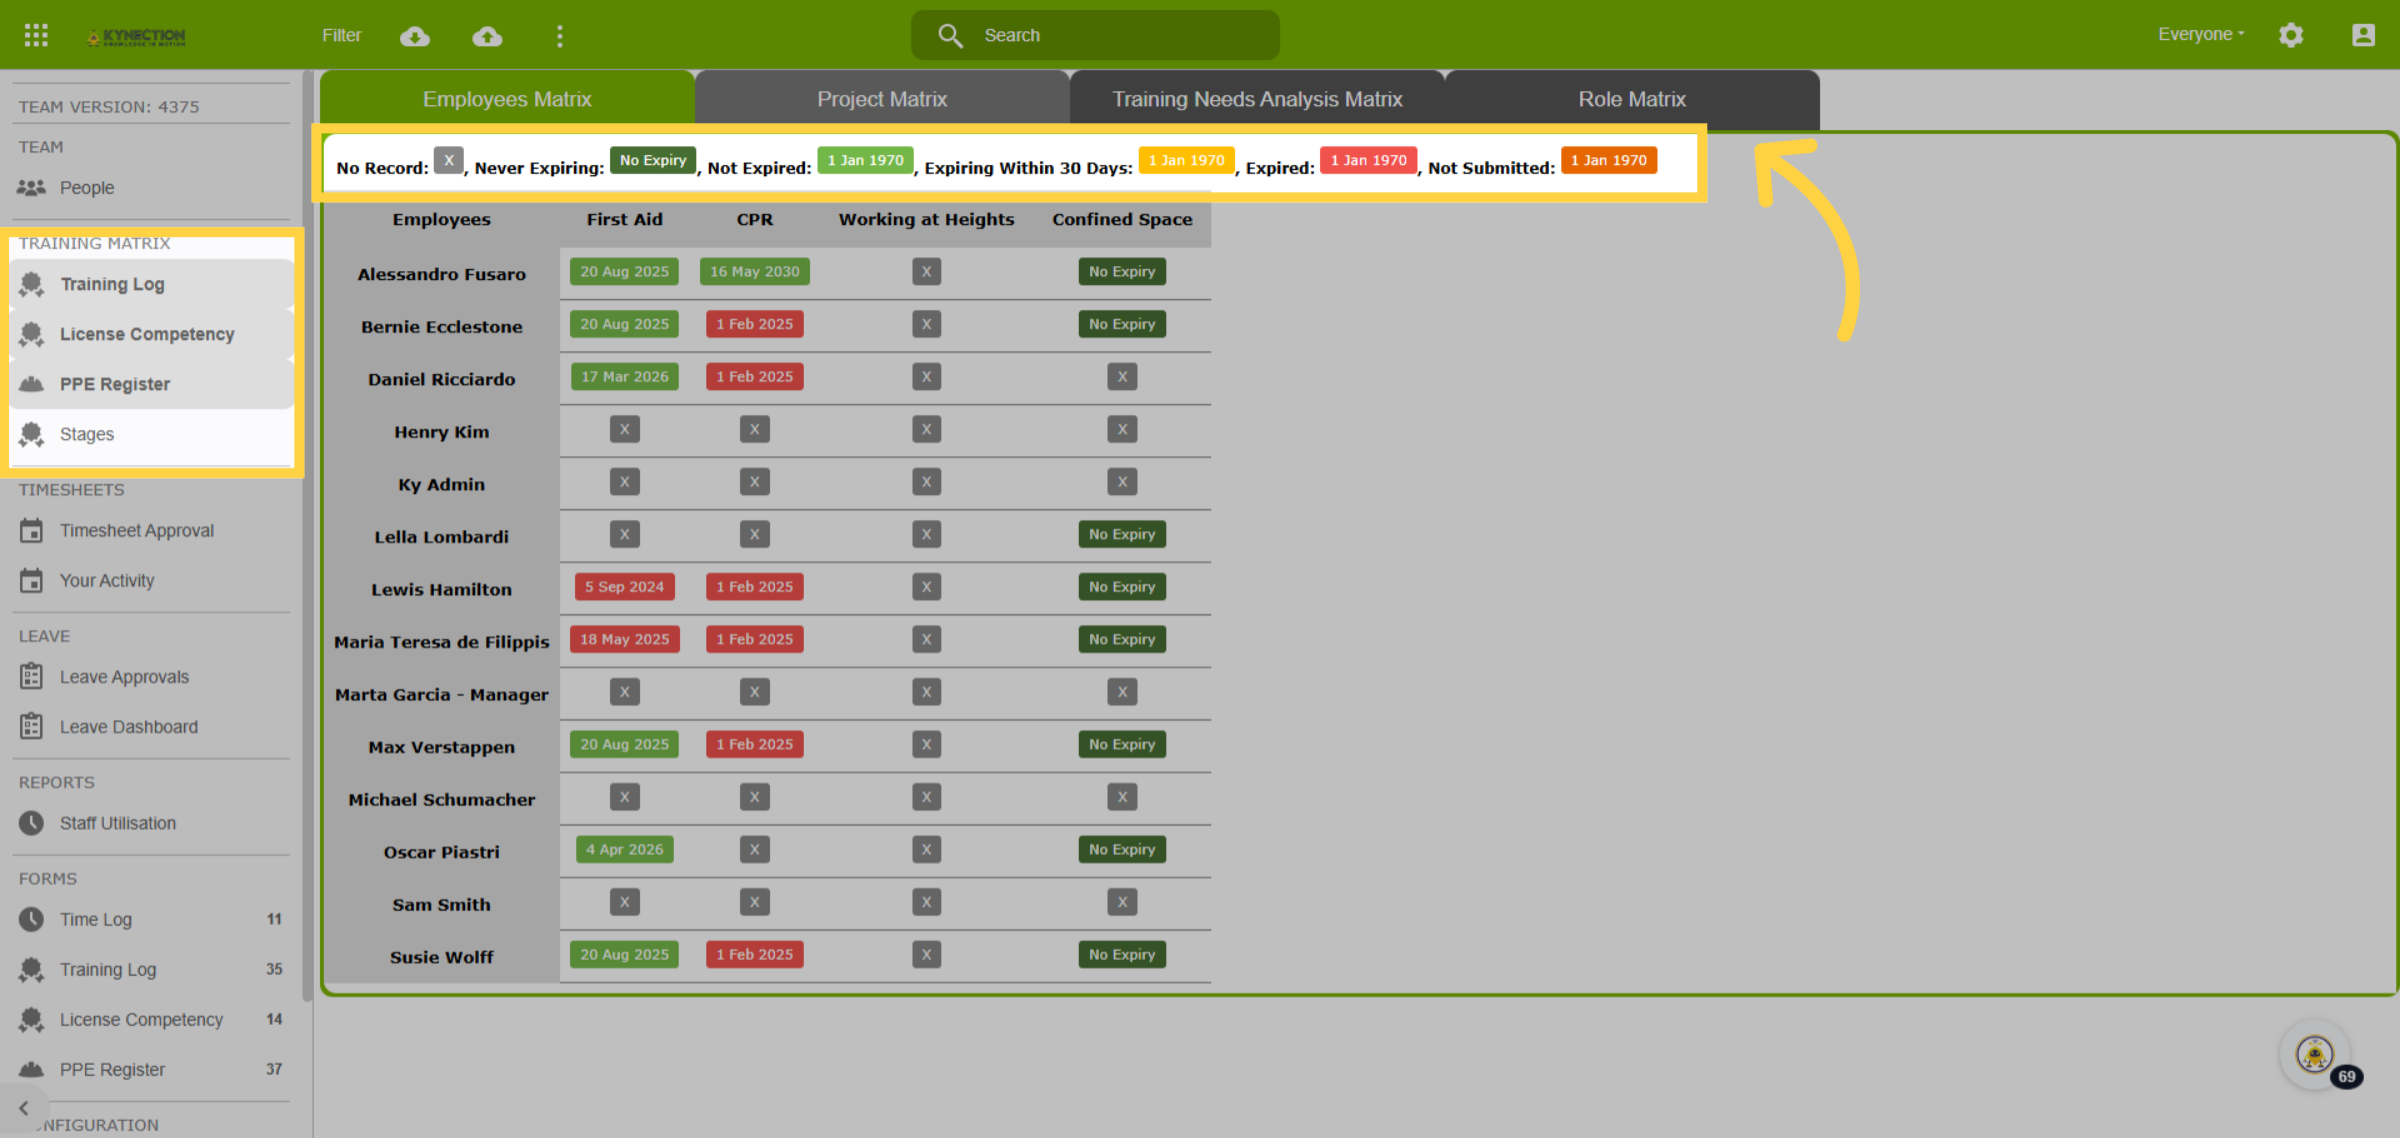
28. Project Matrix
The Project Matrix identifies qualified employees for specific projects. For example, Arnold is fully qualified for the Snowy Hydraulic project, holding a red card, working with children check, and a heavy vehicle licence. This system ensures proper employee job alignment.
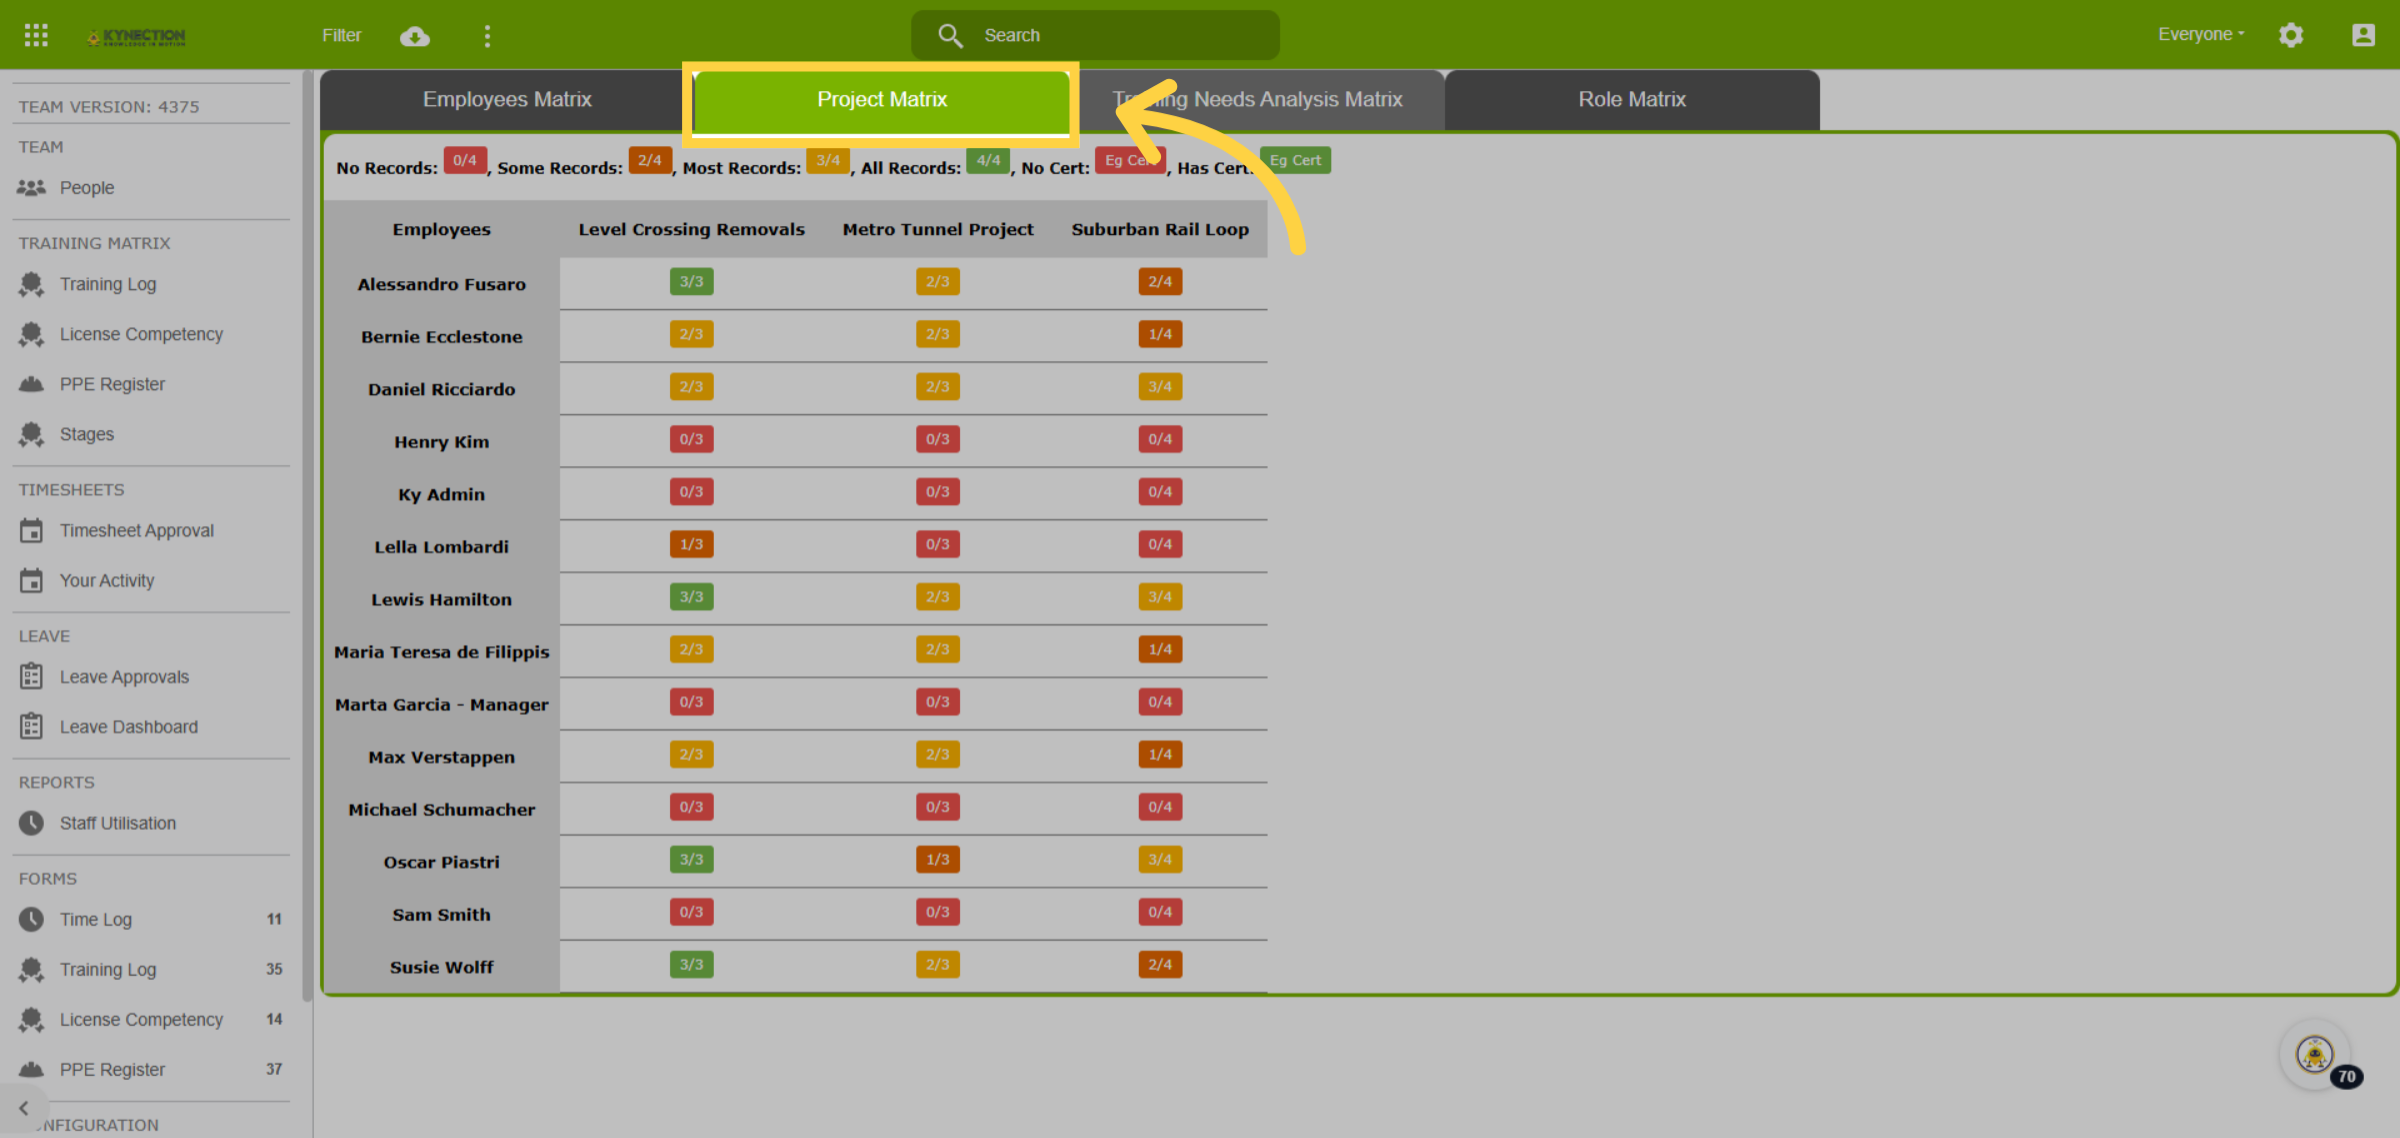
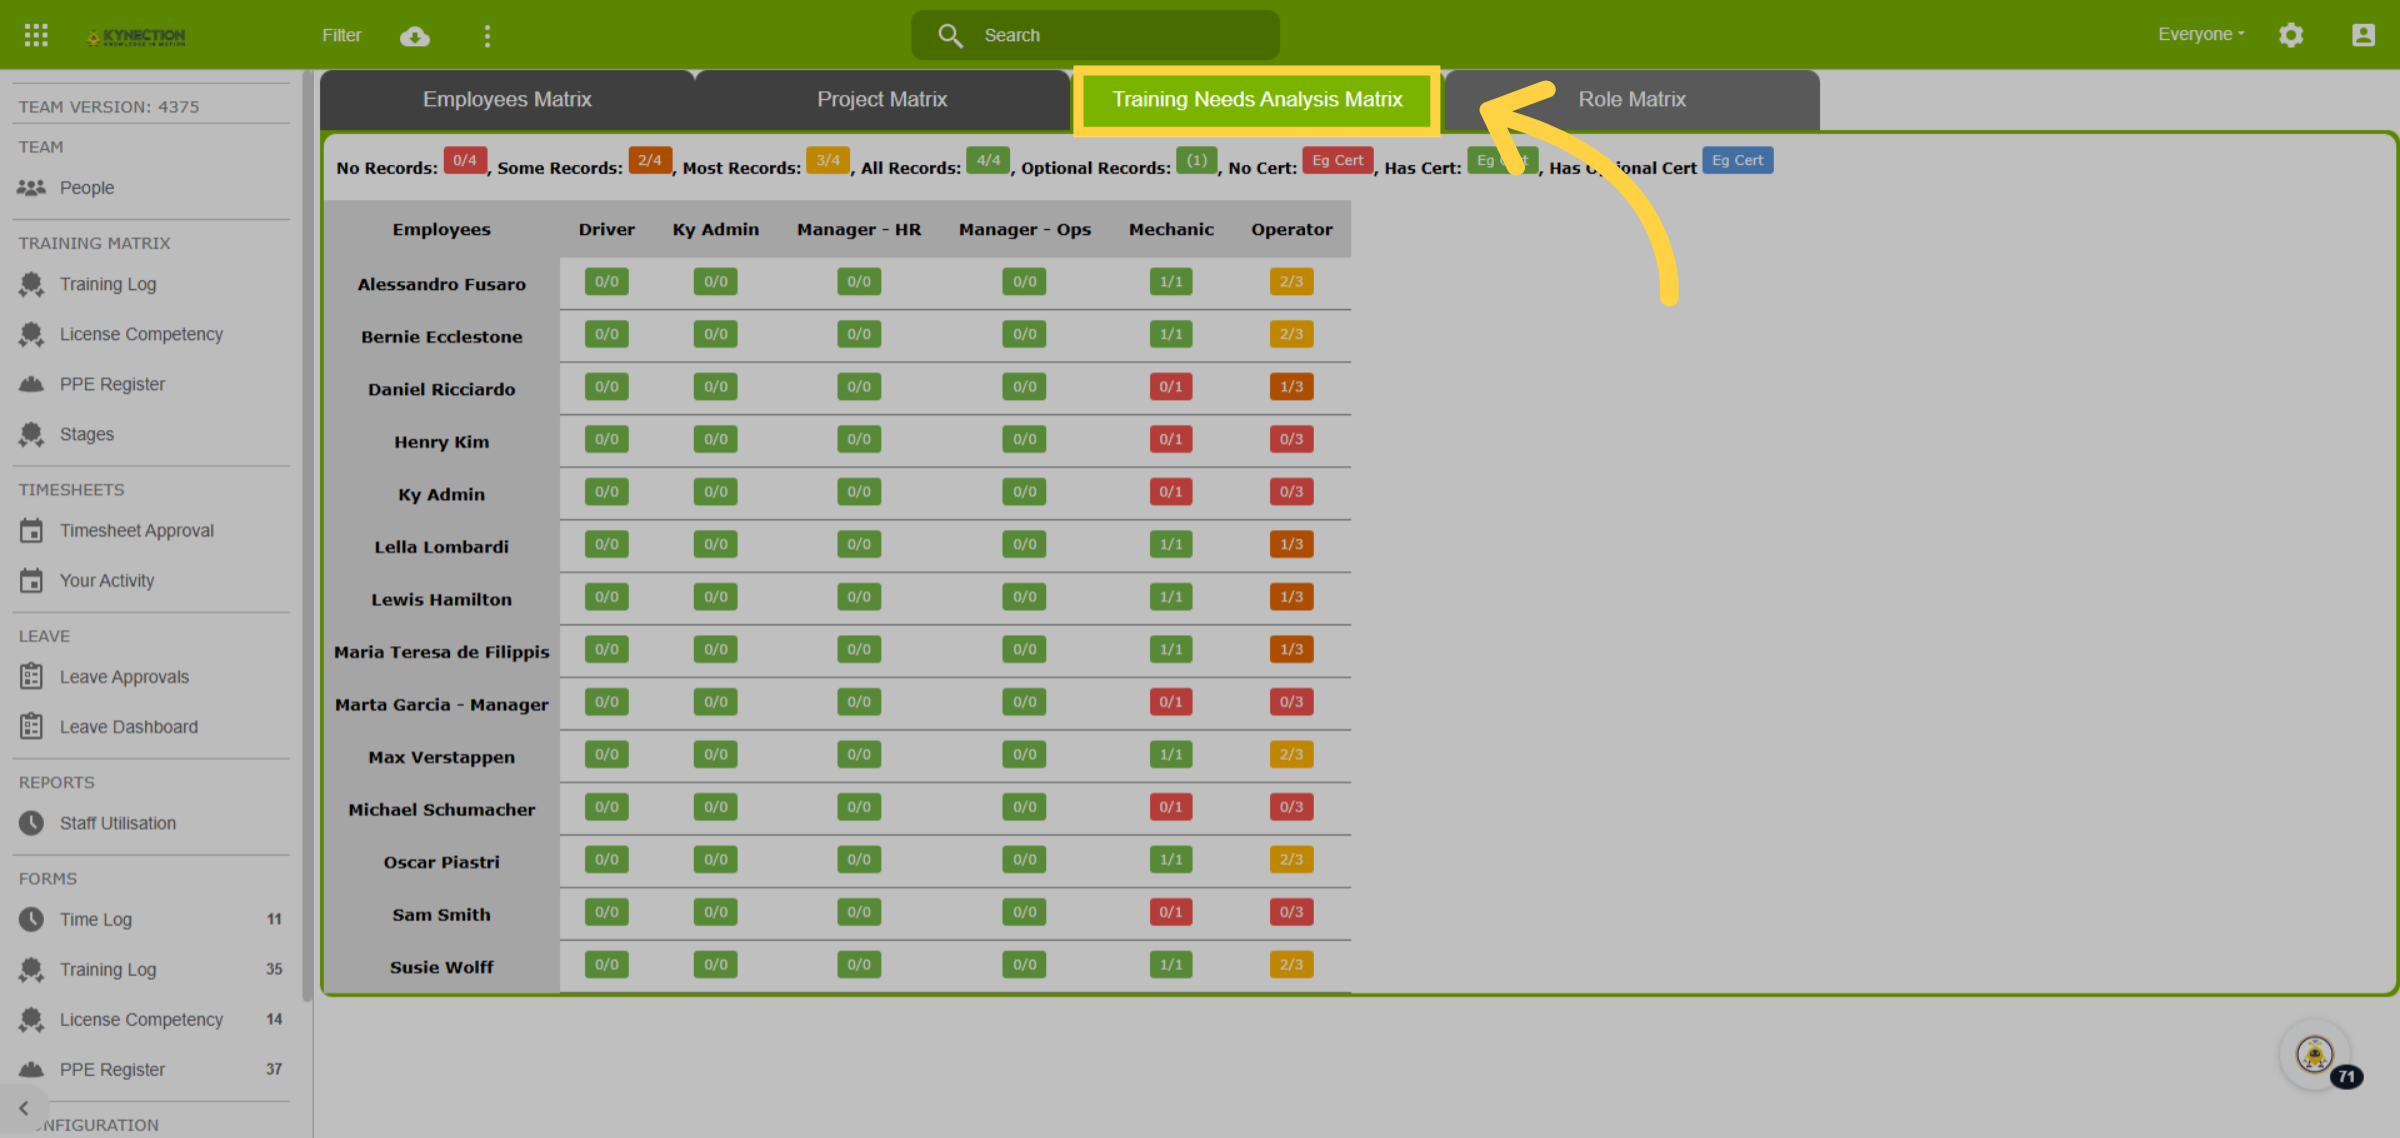
29. Training Needs Analysis Matrix
To view qualifications, click on the Training Needs Analysis Matrix tab. This allows you to review all training needs for each employee.
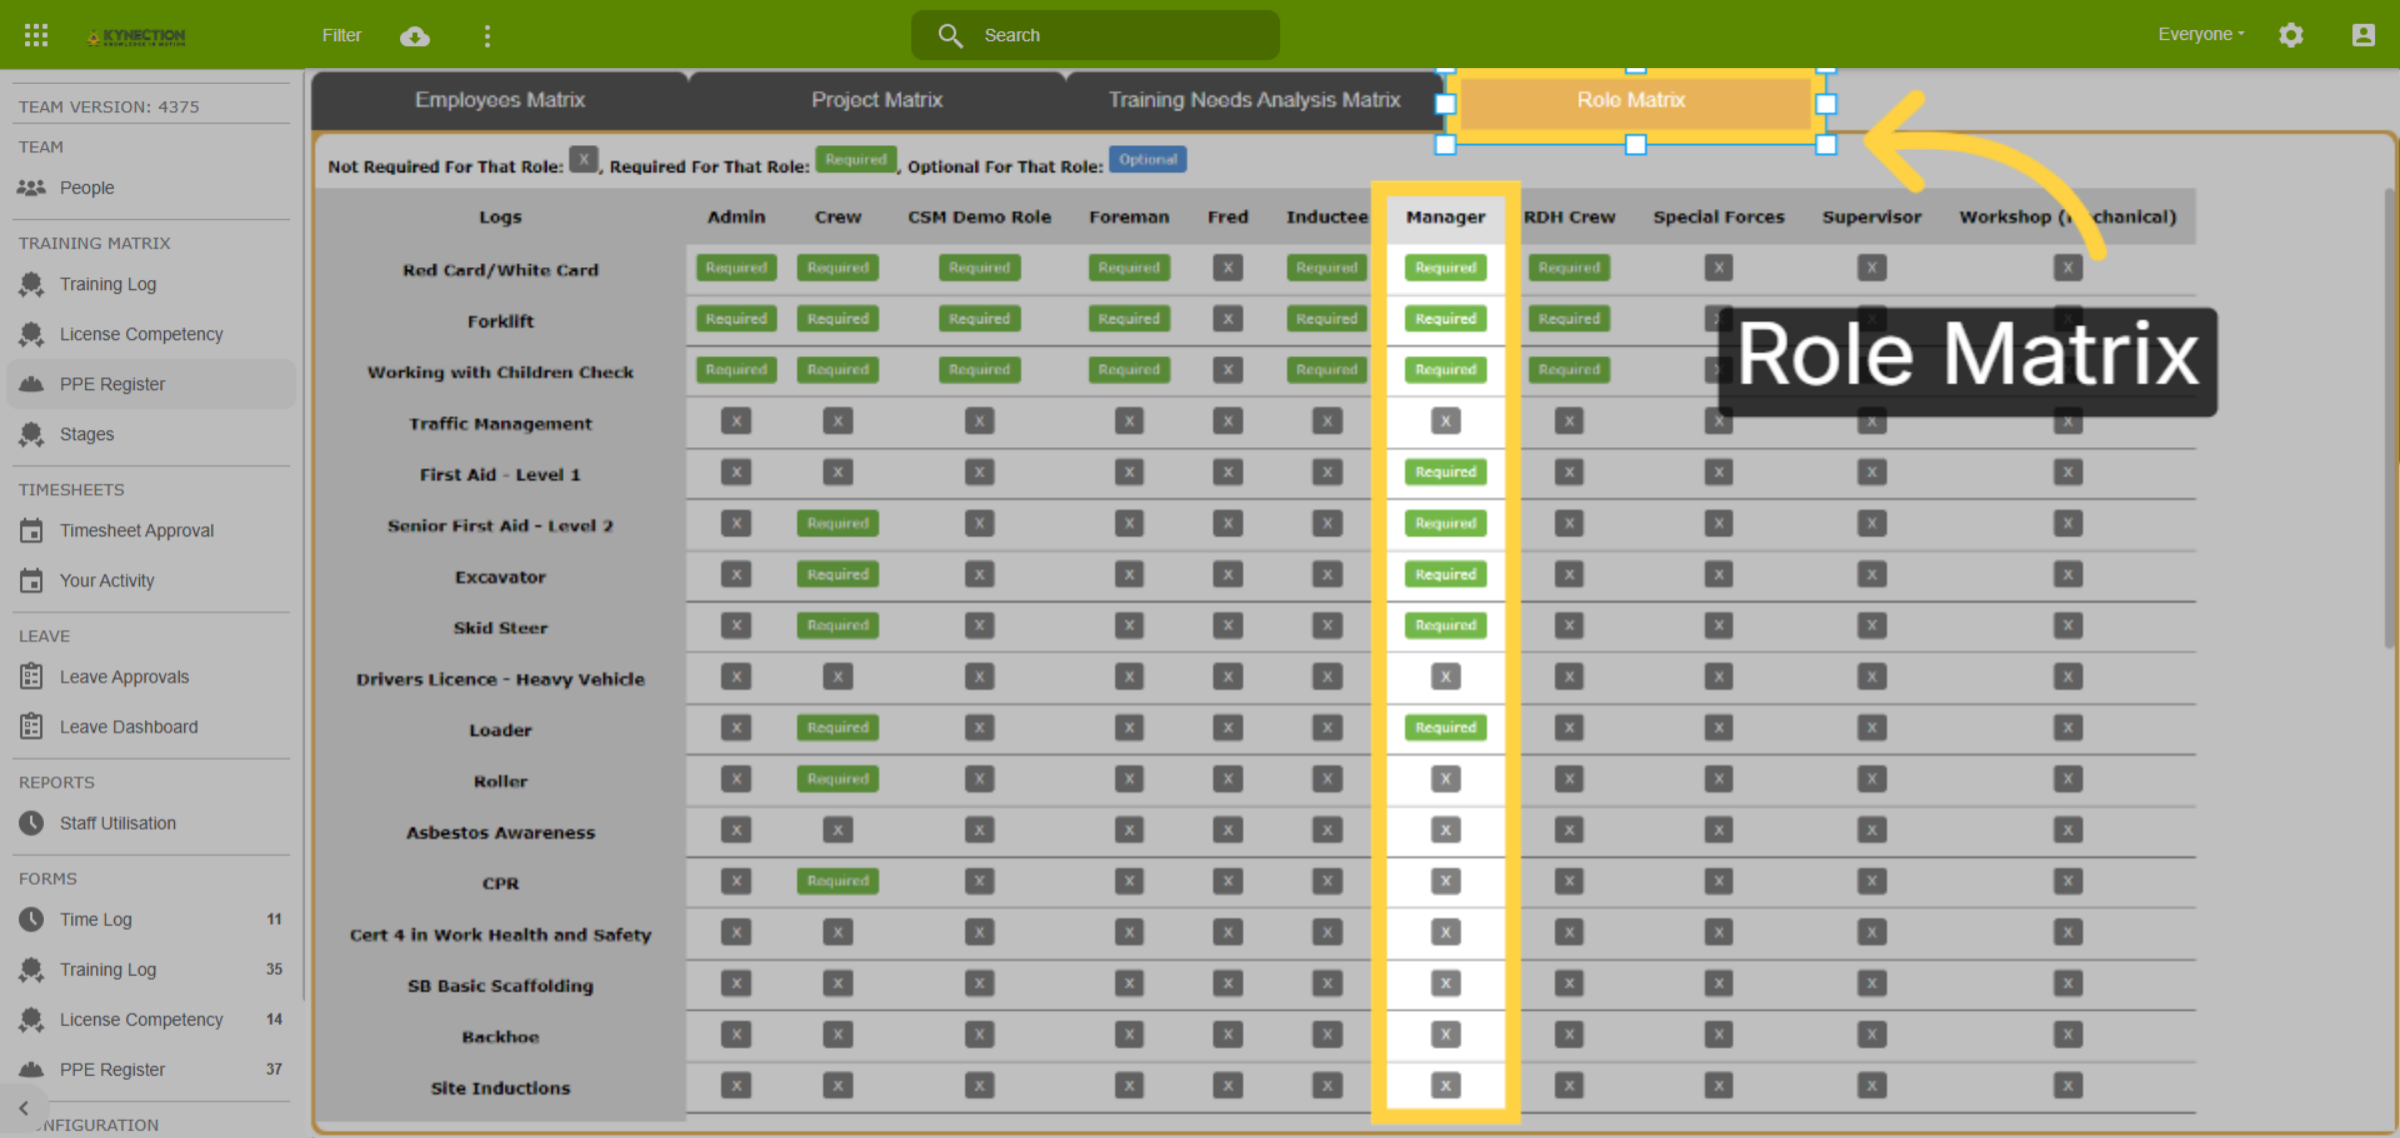
30. Role Matrix
The Role Matrix provides a detailed list of standard certification requirements for specific roles. This view, for example, shows the requirements for a manager.
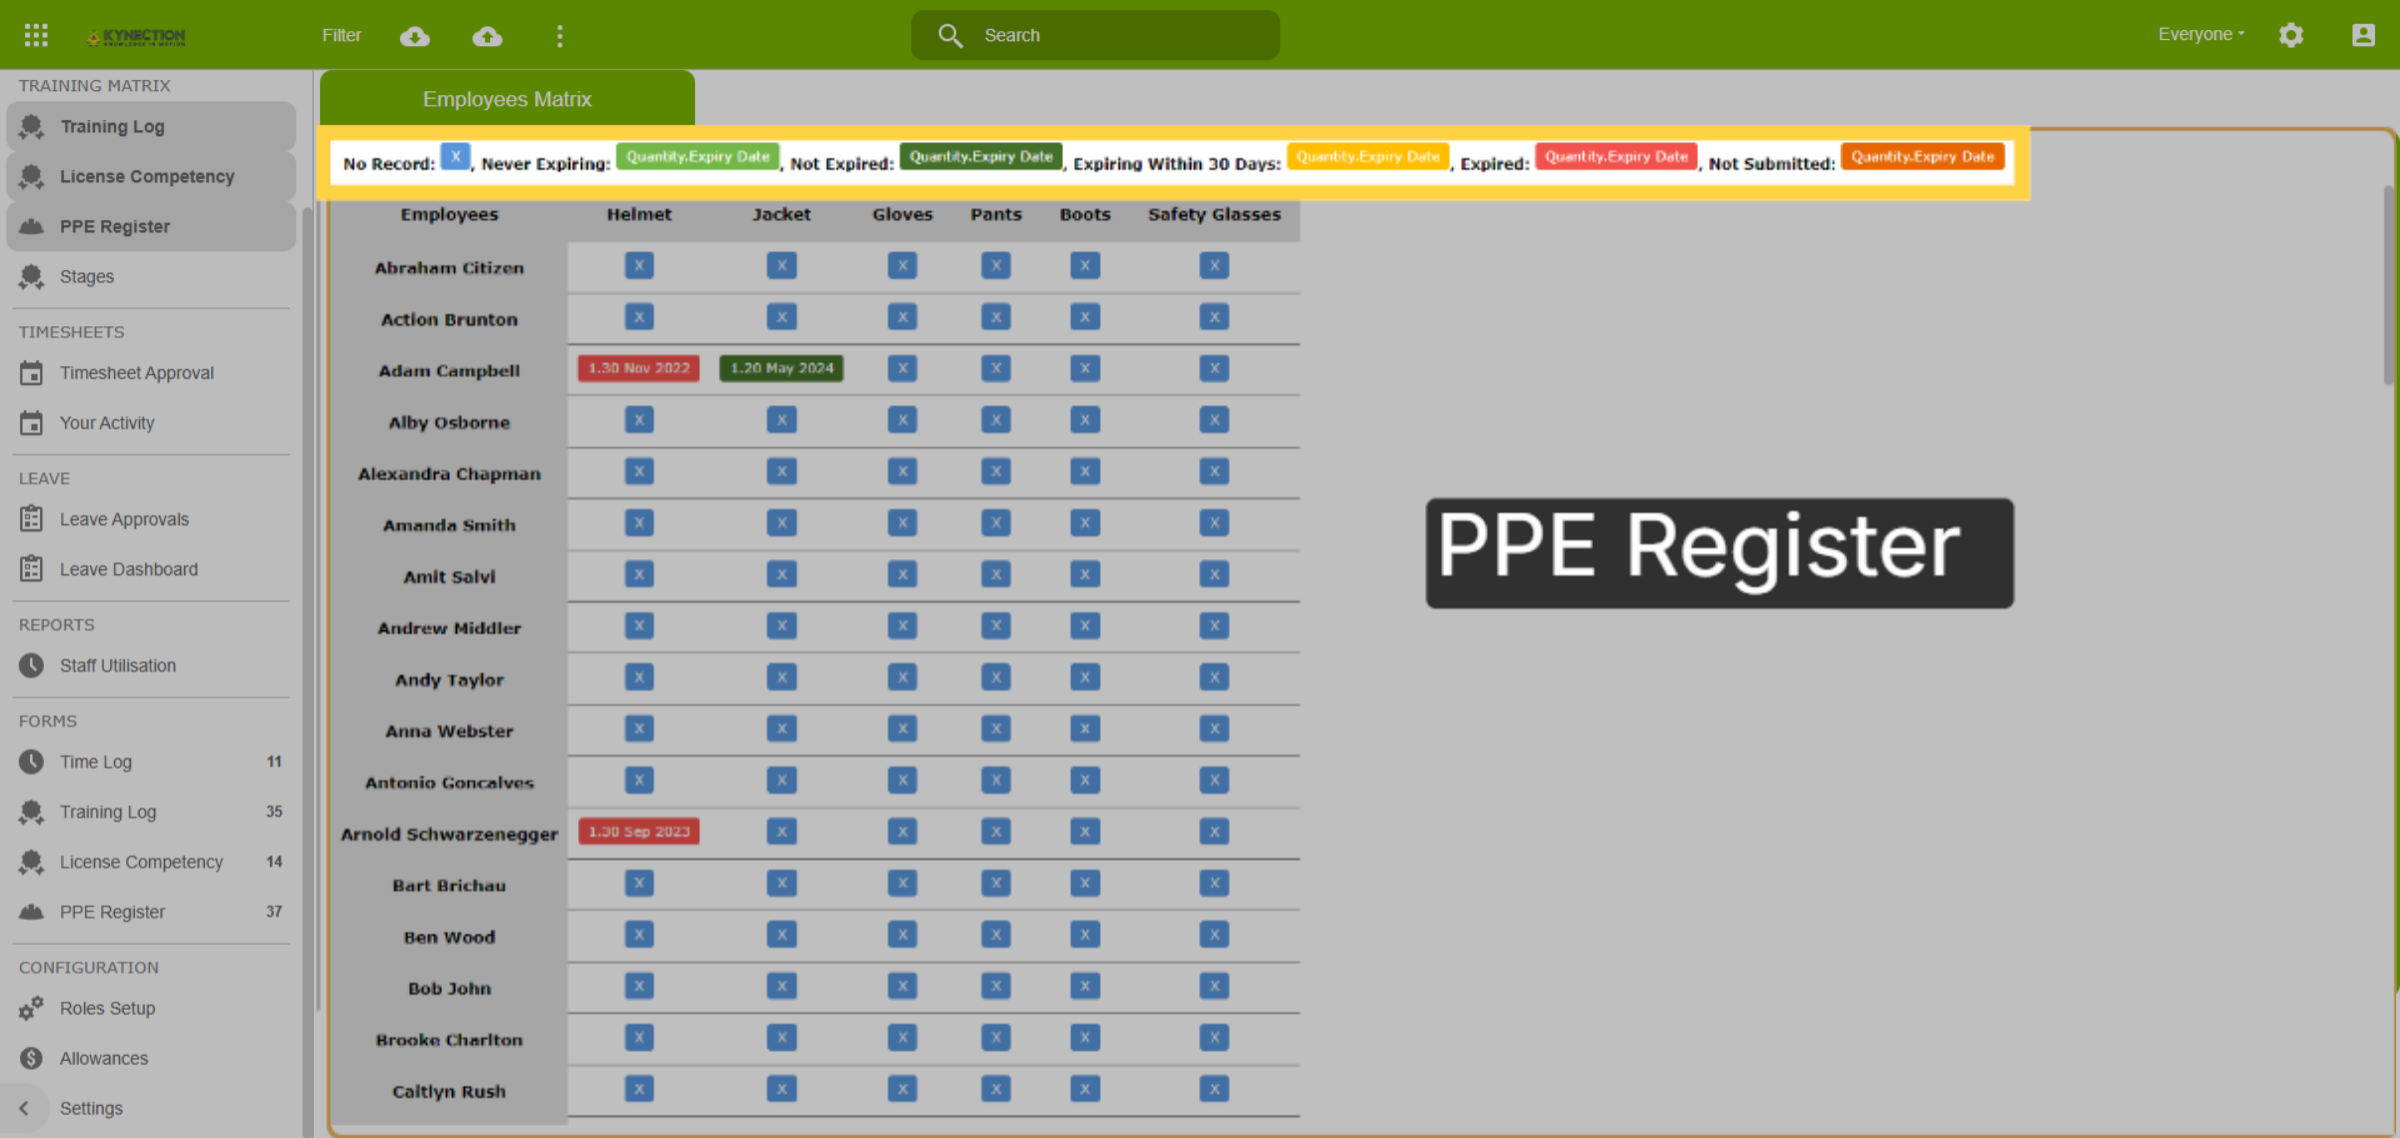
31. PPE Register
The PPE Register tab allows tracking of all equipment issued to employees. Items can be assigned expiry dates for timely replacement, ensuring compliance and safety.
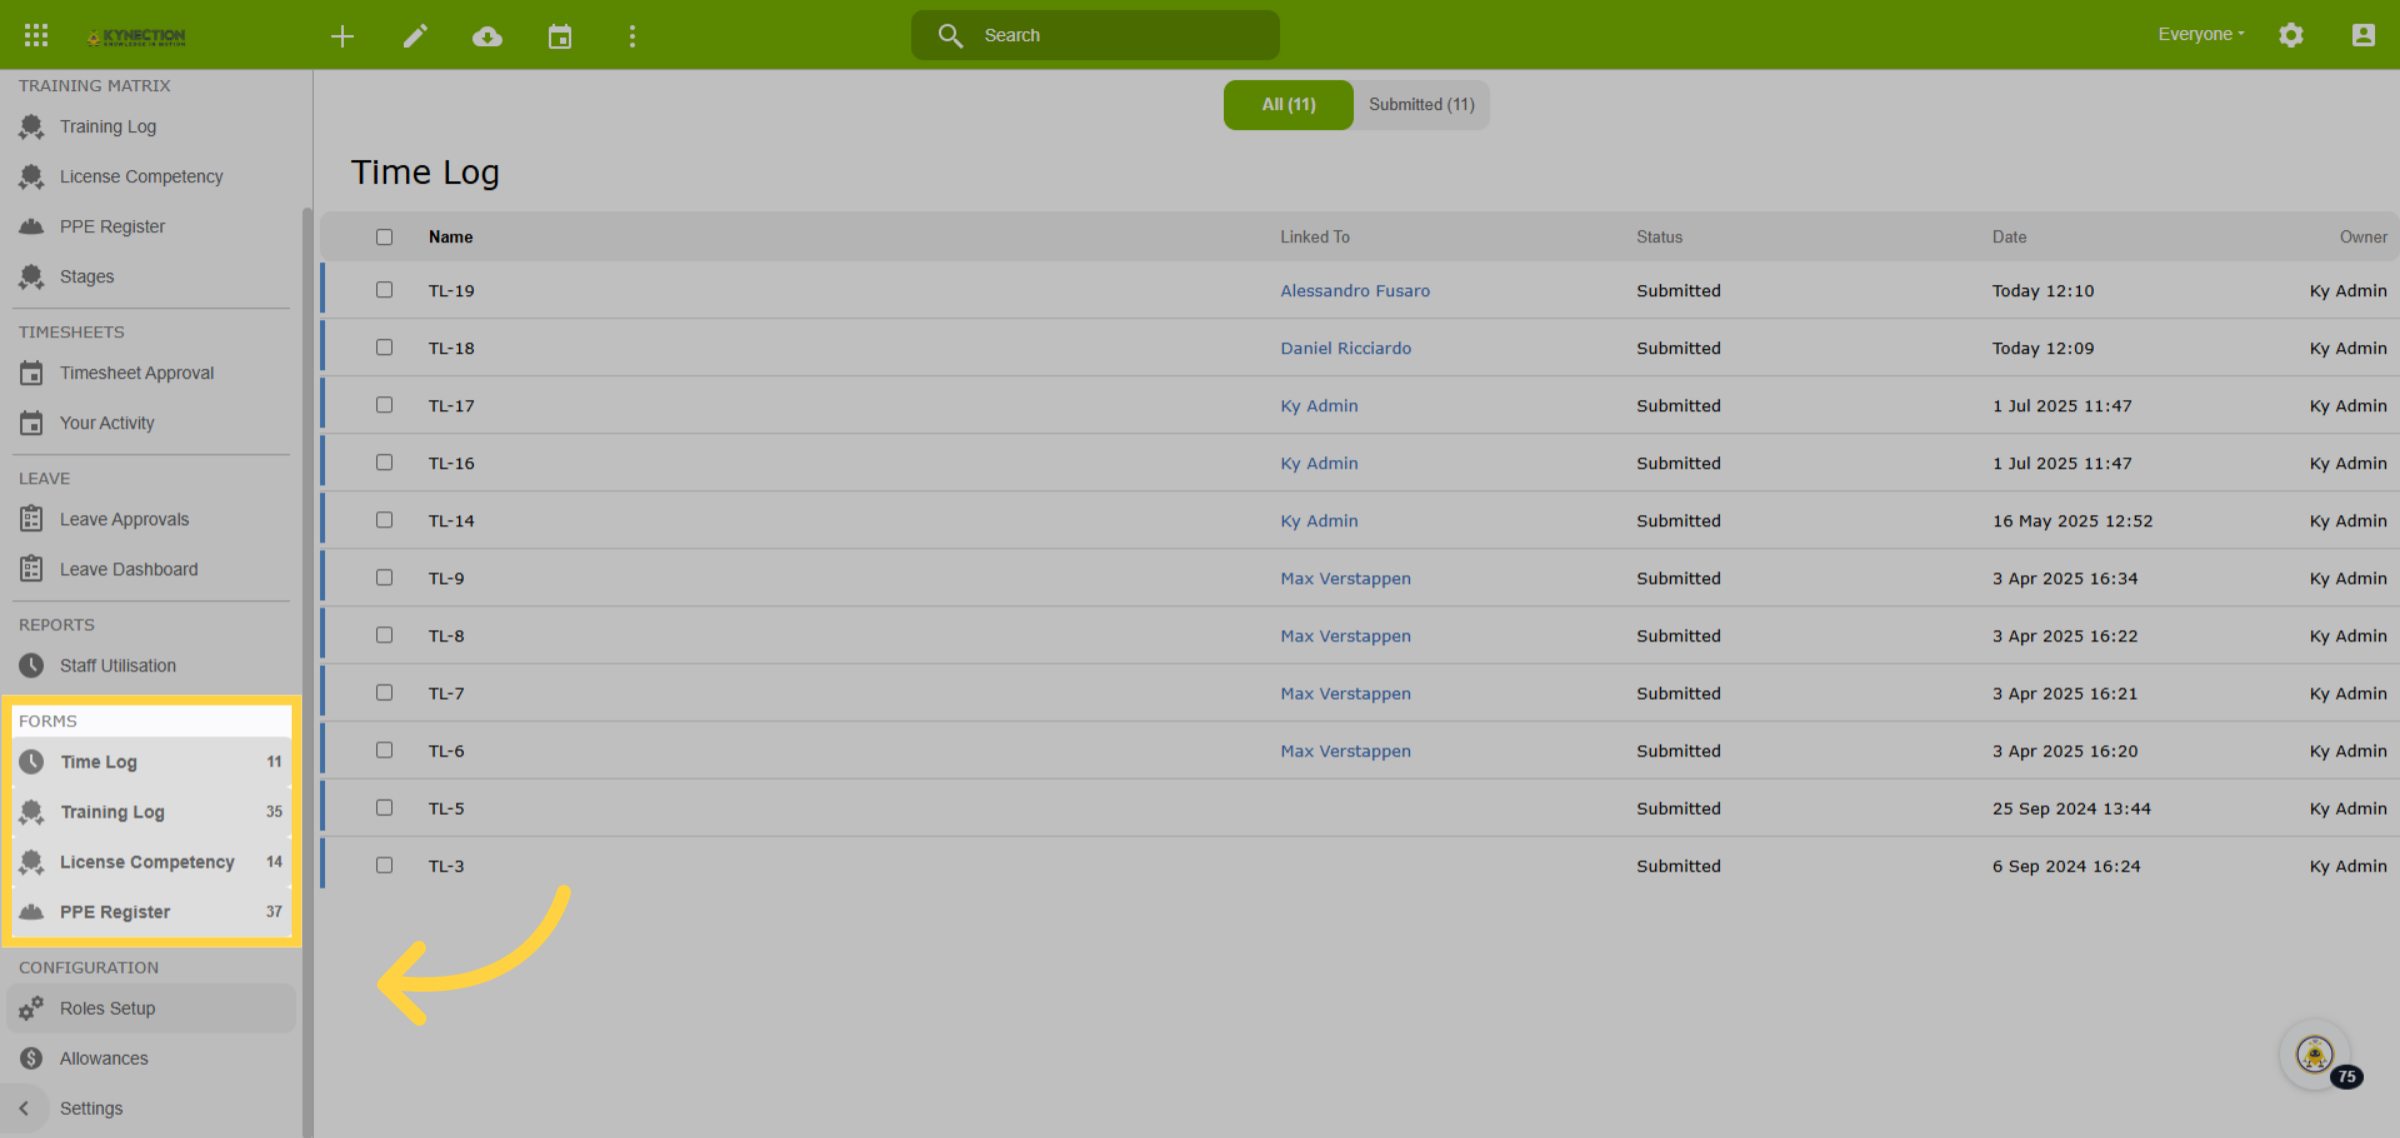
32. Submitted Forms
Forms provides a quick link to review forms submitted for the training matrix. Let's now look at configuring the Training Matrix, starting with the Training Log. Select Role Setup.
33. Hiring Setup
From Role Setup, proceed to Hiring Setup. If the button is configured to Induction Setup, return to the Settings menu to change this.
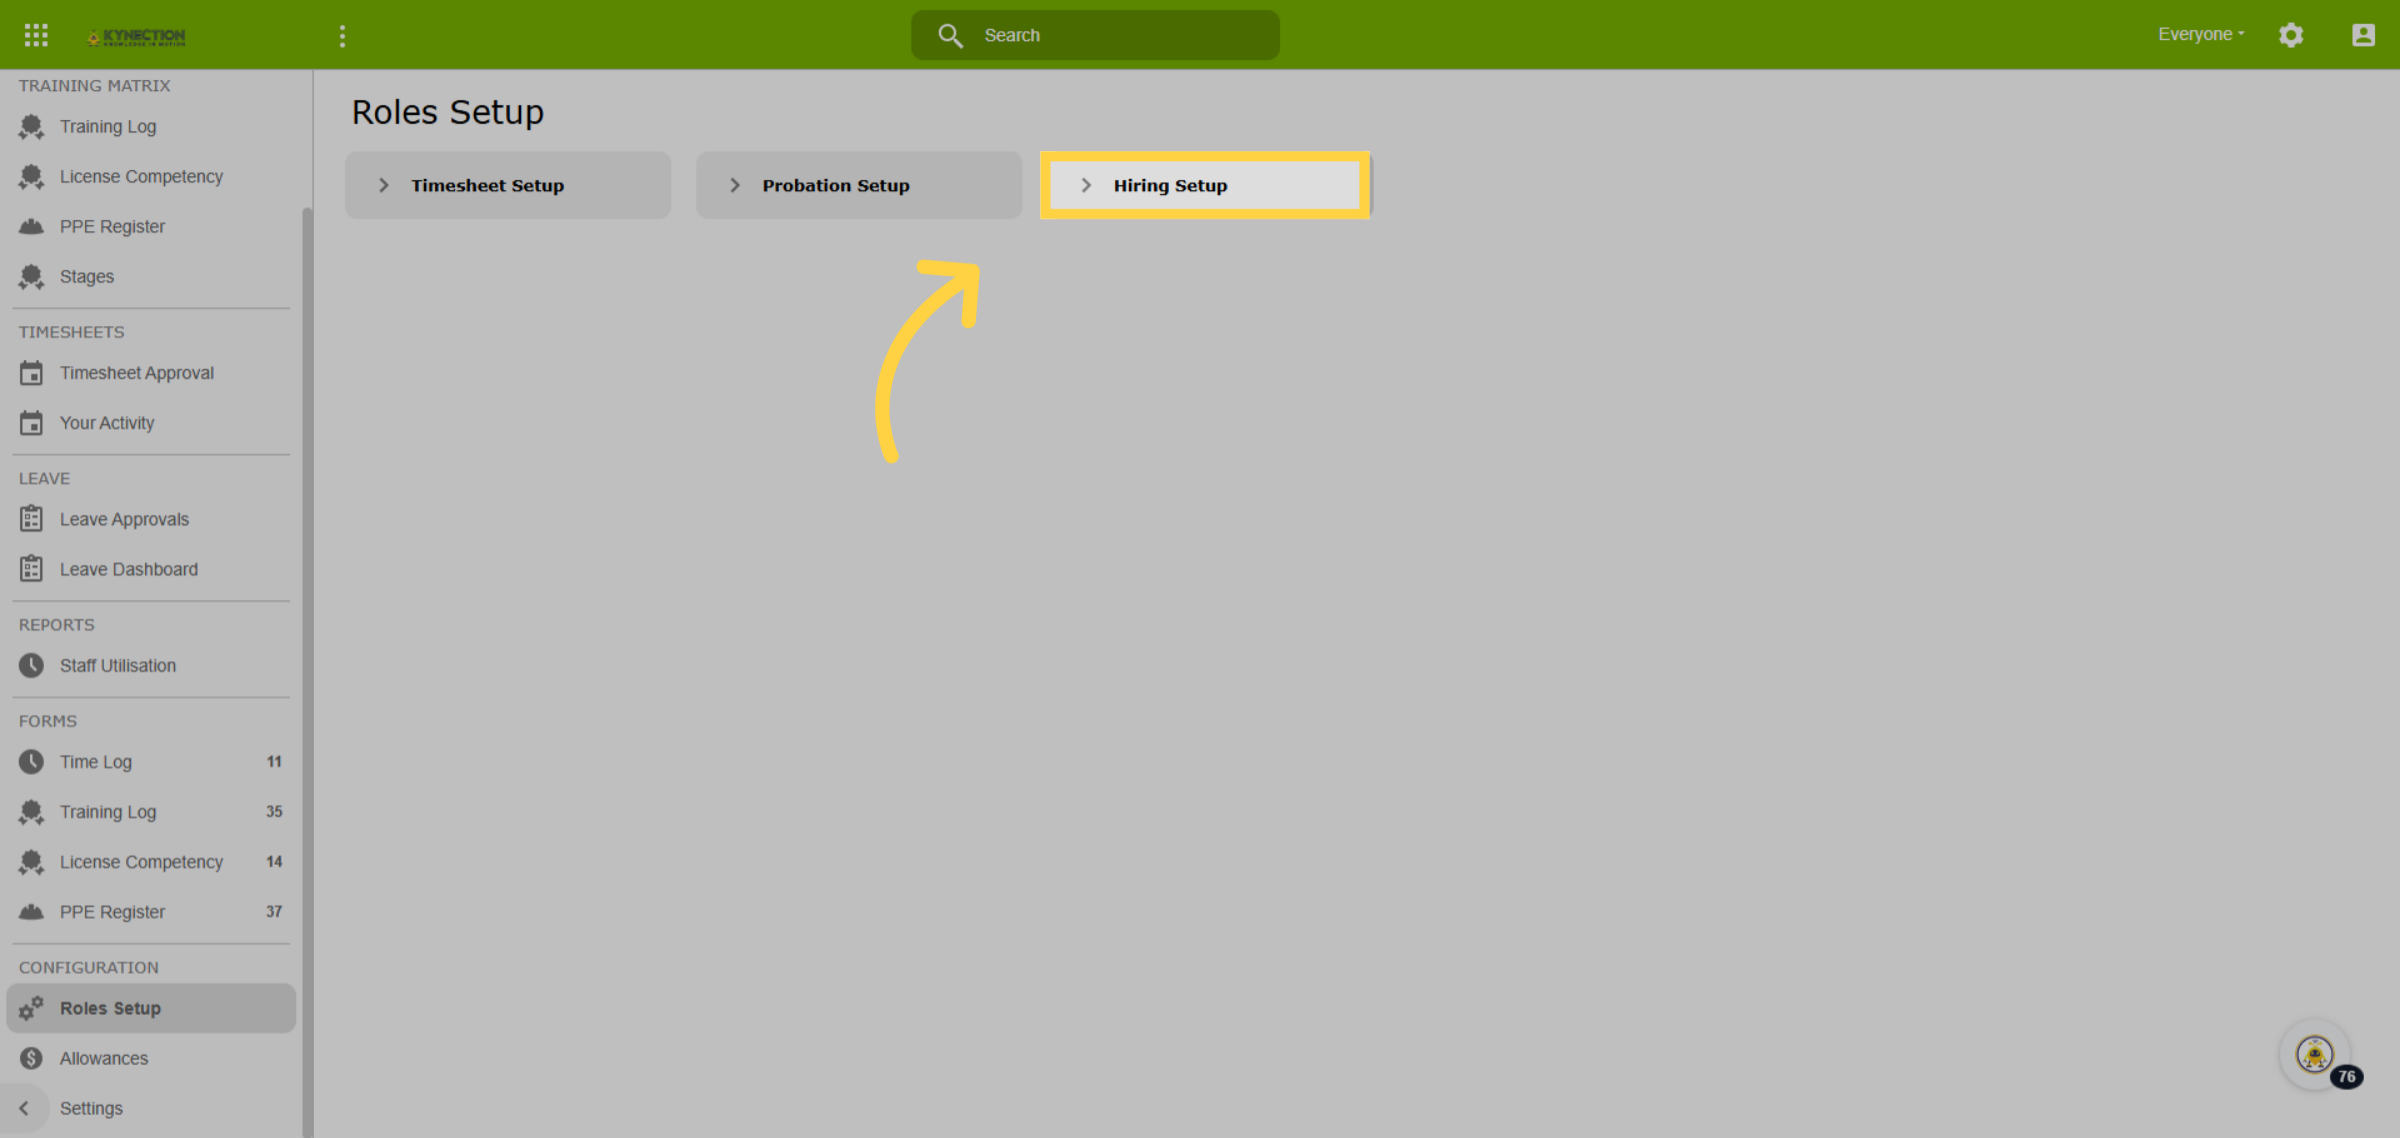
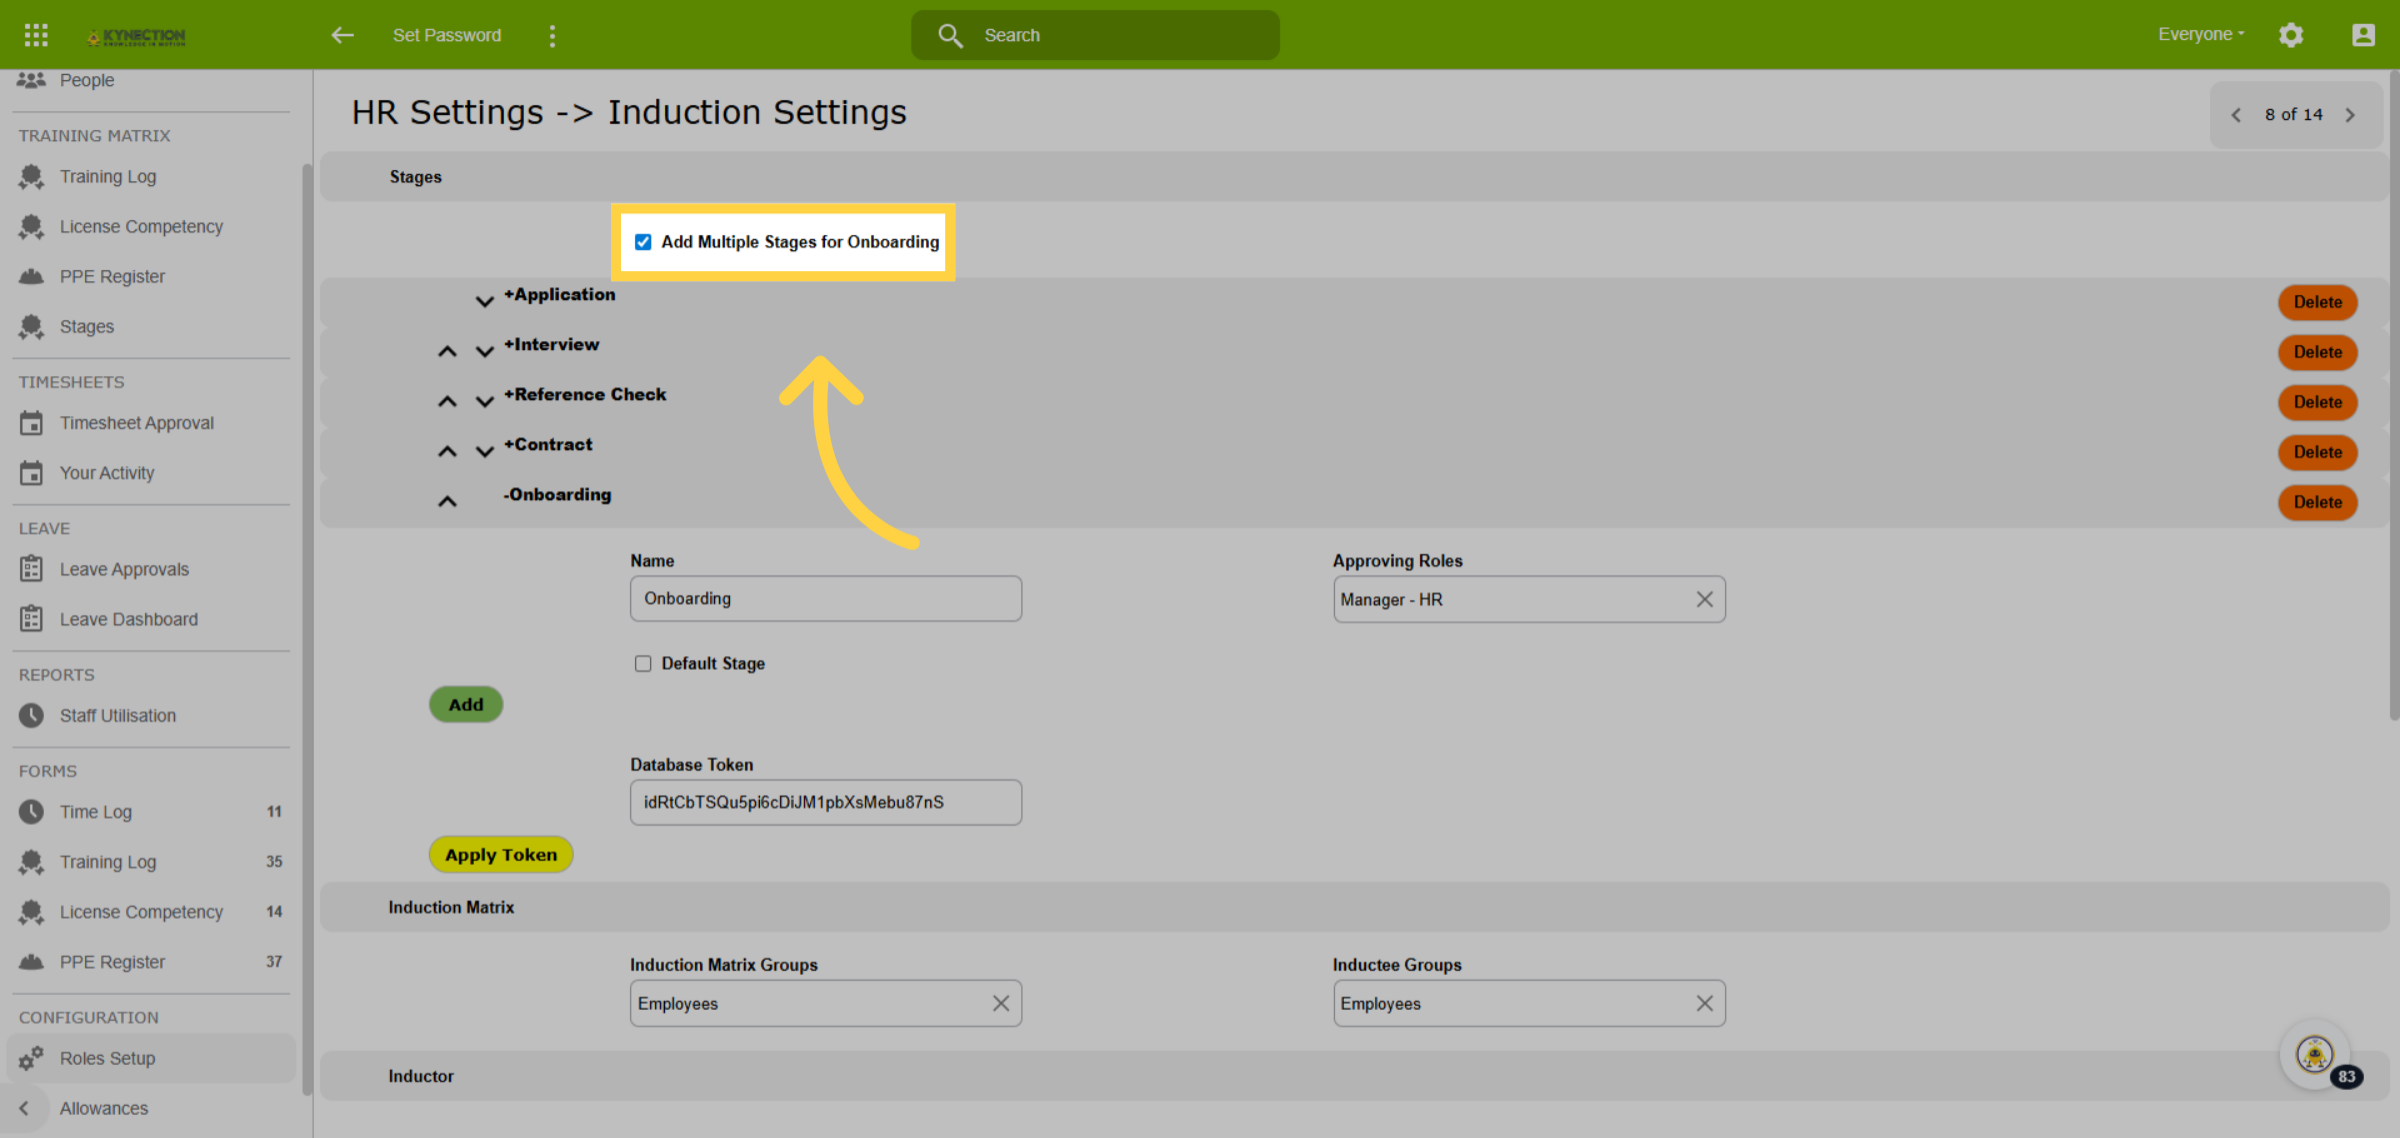
34. Tickbox for Multiple Stages
Navigate to Settings from the left pane menu, then select Induction Settings. Enable the Add Multiple Stages for Onboarding checkbox. Return to Role Setup and select Hiring Setup.
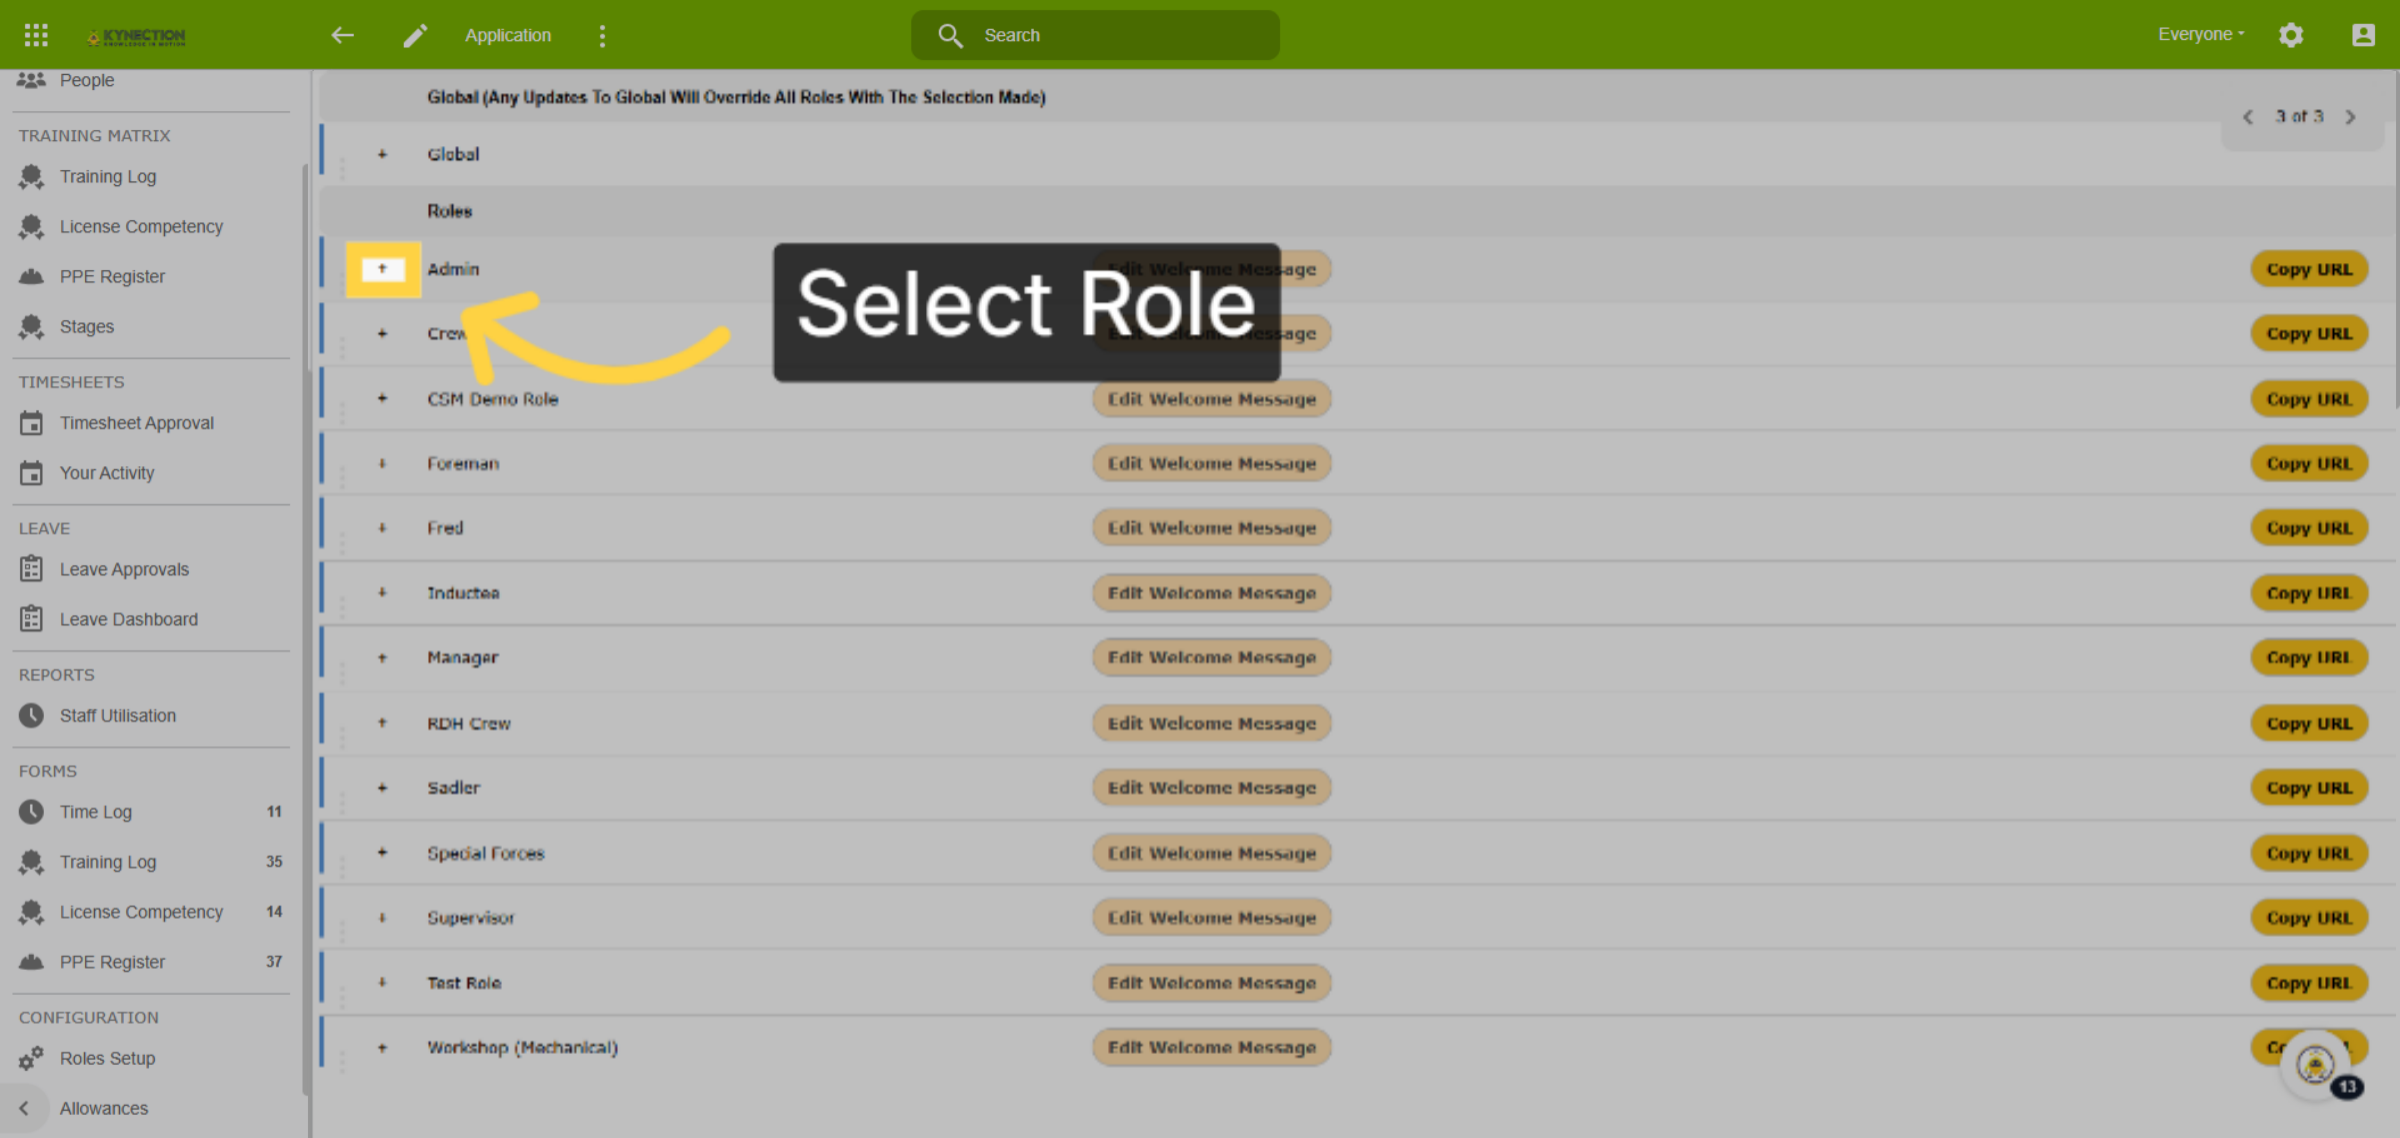
35. Select Role
To add a training record or licence competency at the role level, select the plus sign located to the left of the role. Please note that updates to global settings will override all roles.
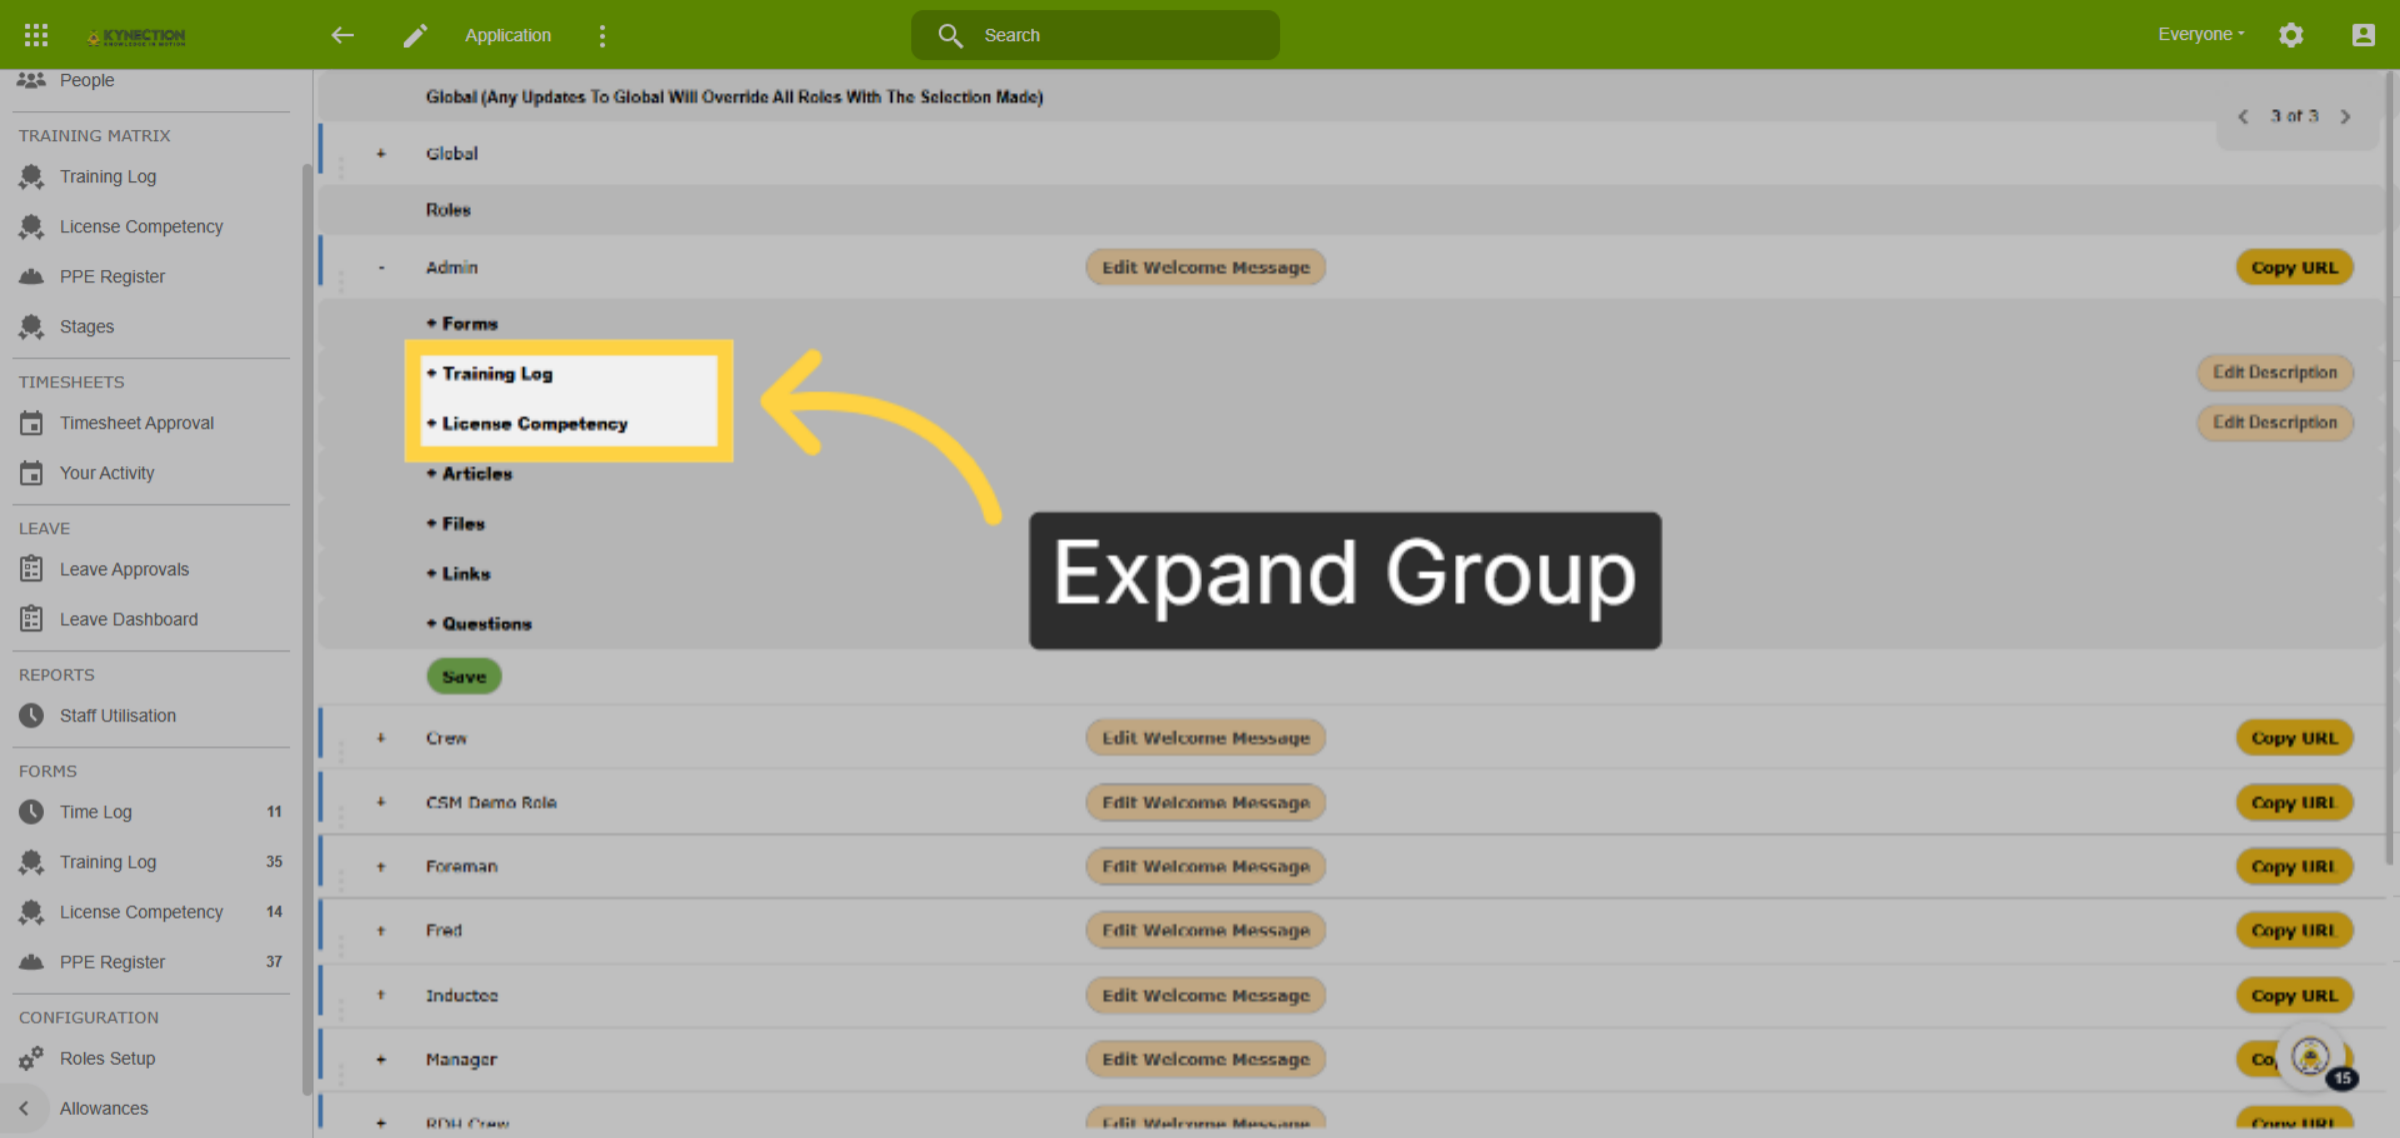
36. Training Log
Expand the Training Log or License Competency option by clicking the plus sign. This displays the list of predefined qualifications and competencies.
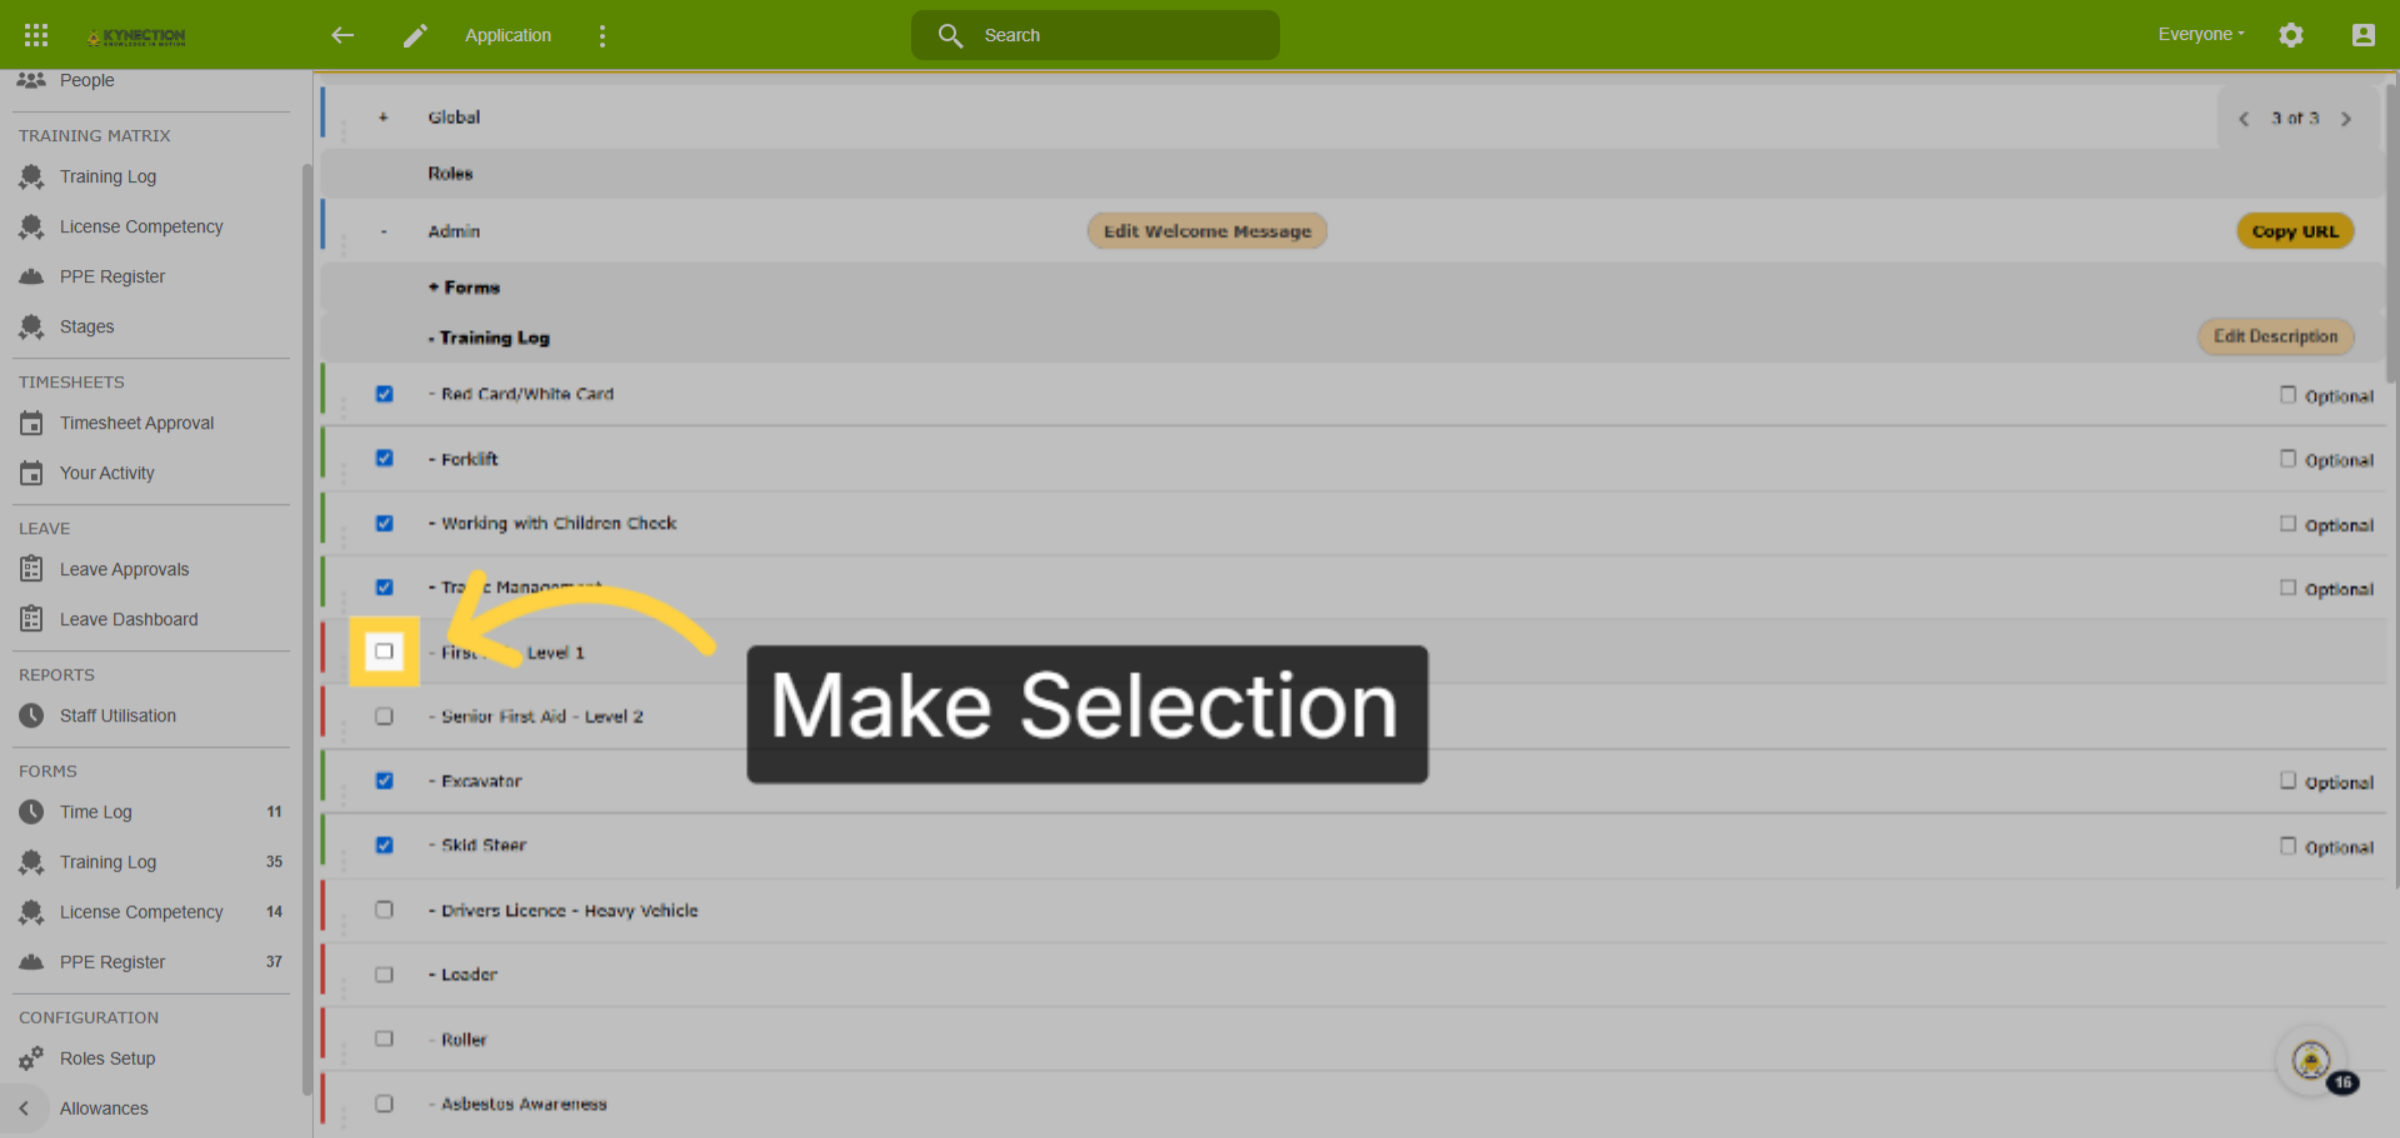
37. Make Selection
Enable the checkbox next to the competency or license name to link it to the role. Likewise, to remove a Training Log or License Competency from a role, deselect the checkbox.
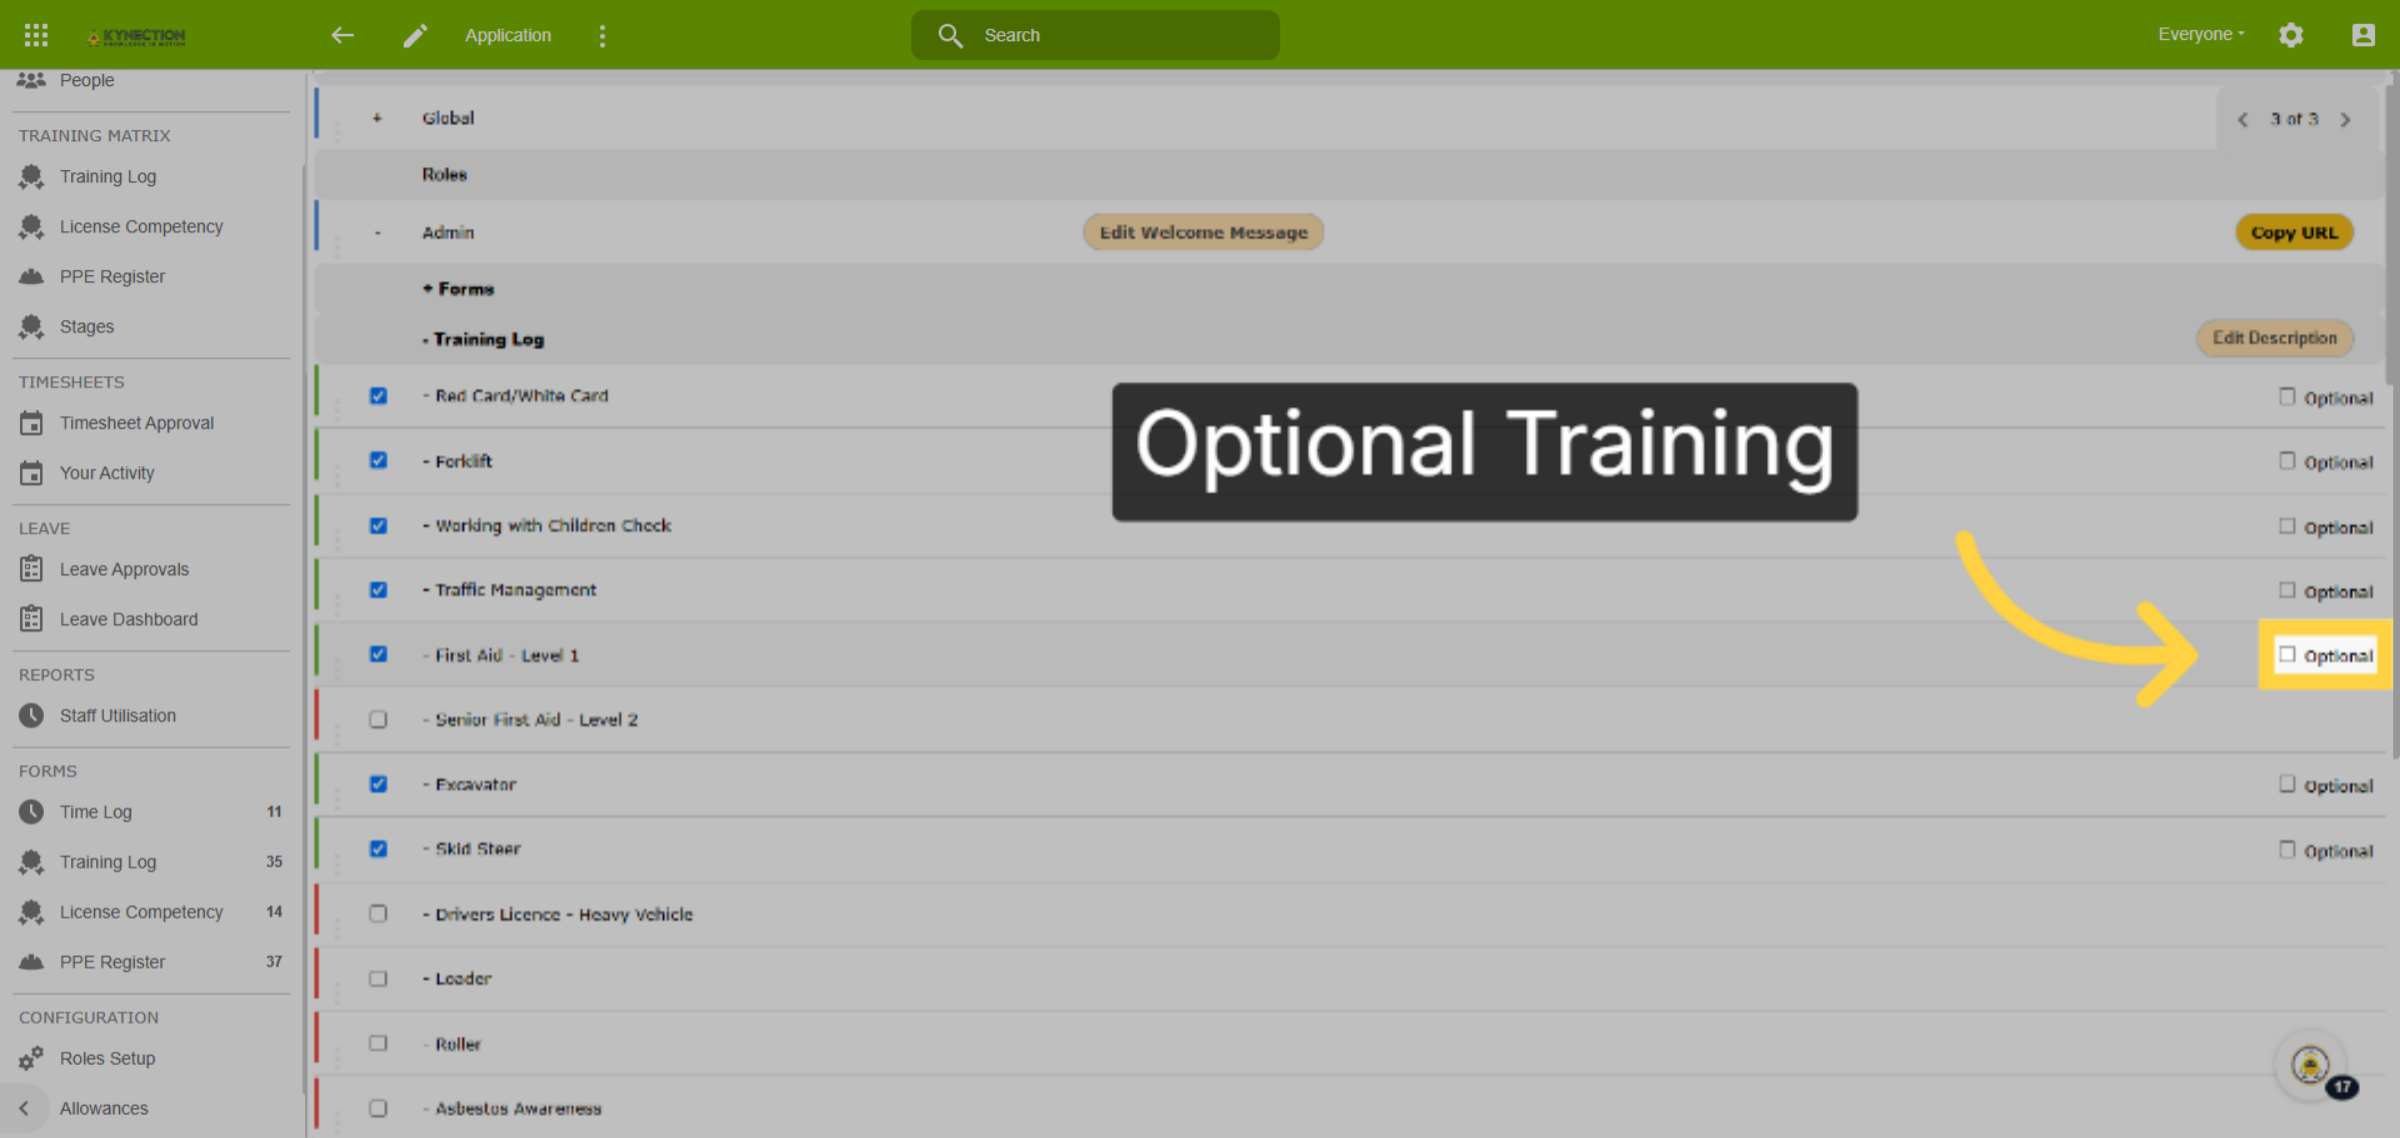
38. Optional Training
If the training is optional for the role, enable the checkbox on the right of the screen for the training log.
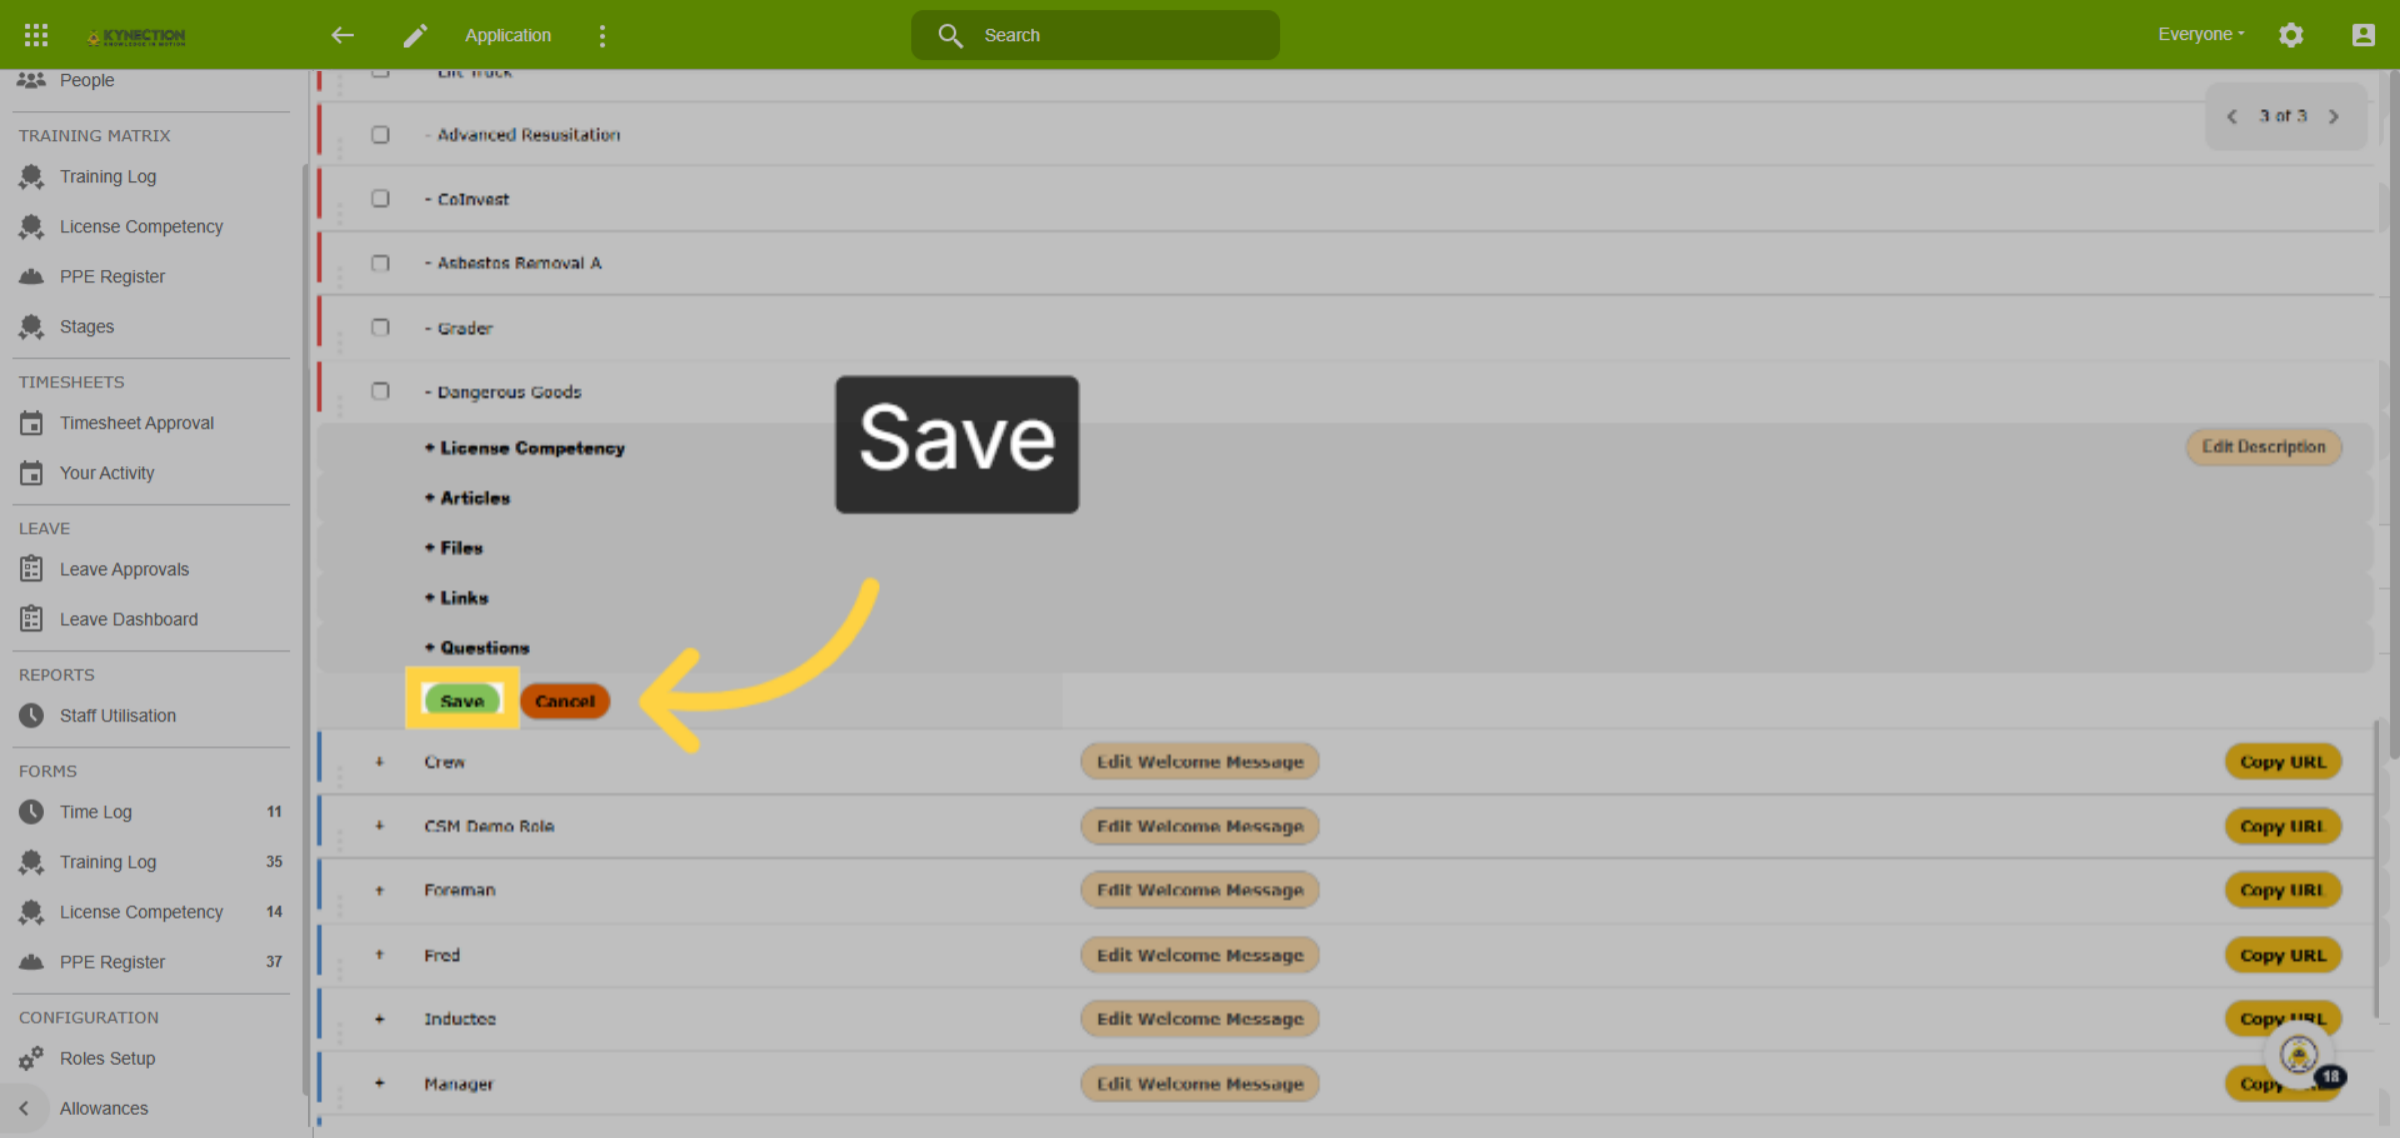
39. Save
Save the changes before exiting.
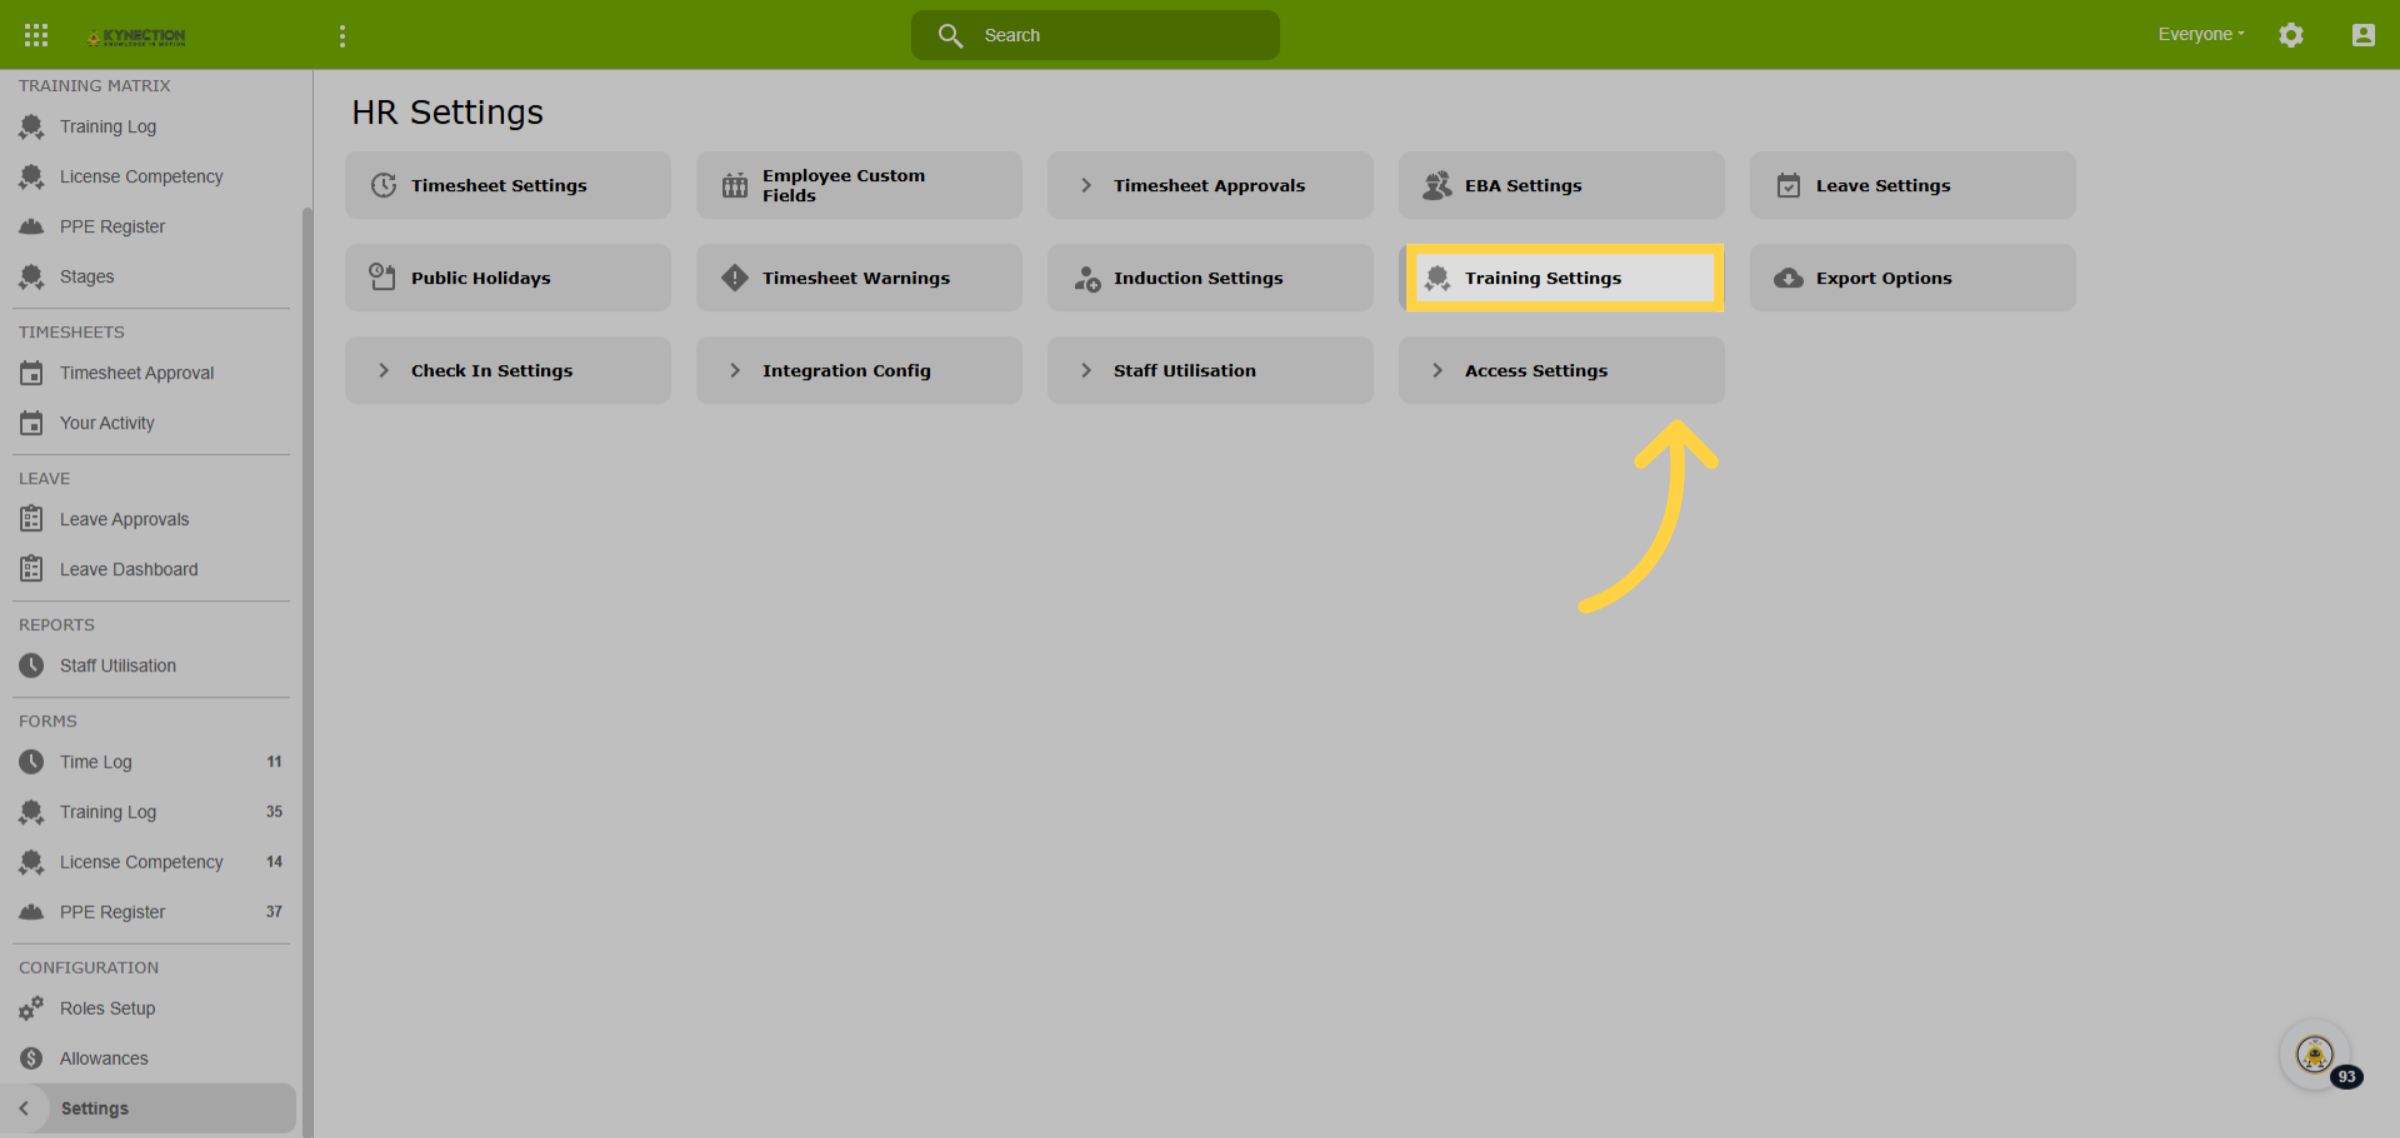
40. Training Settings
Select Settings from the left pane menu, then select Training Settings.
41. License Forms
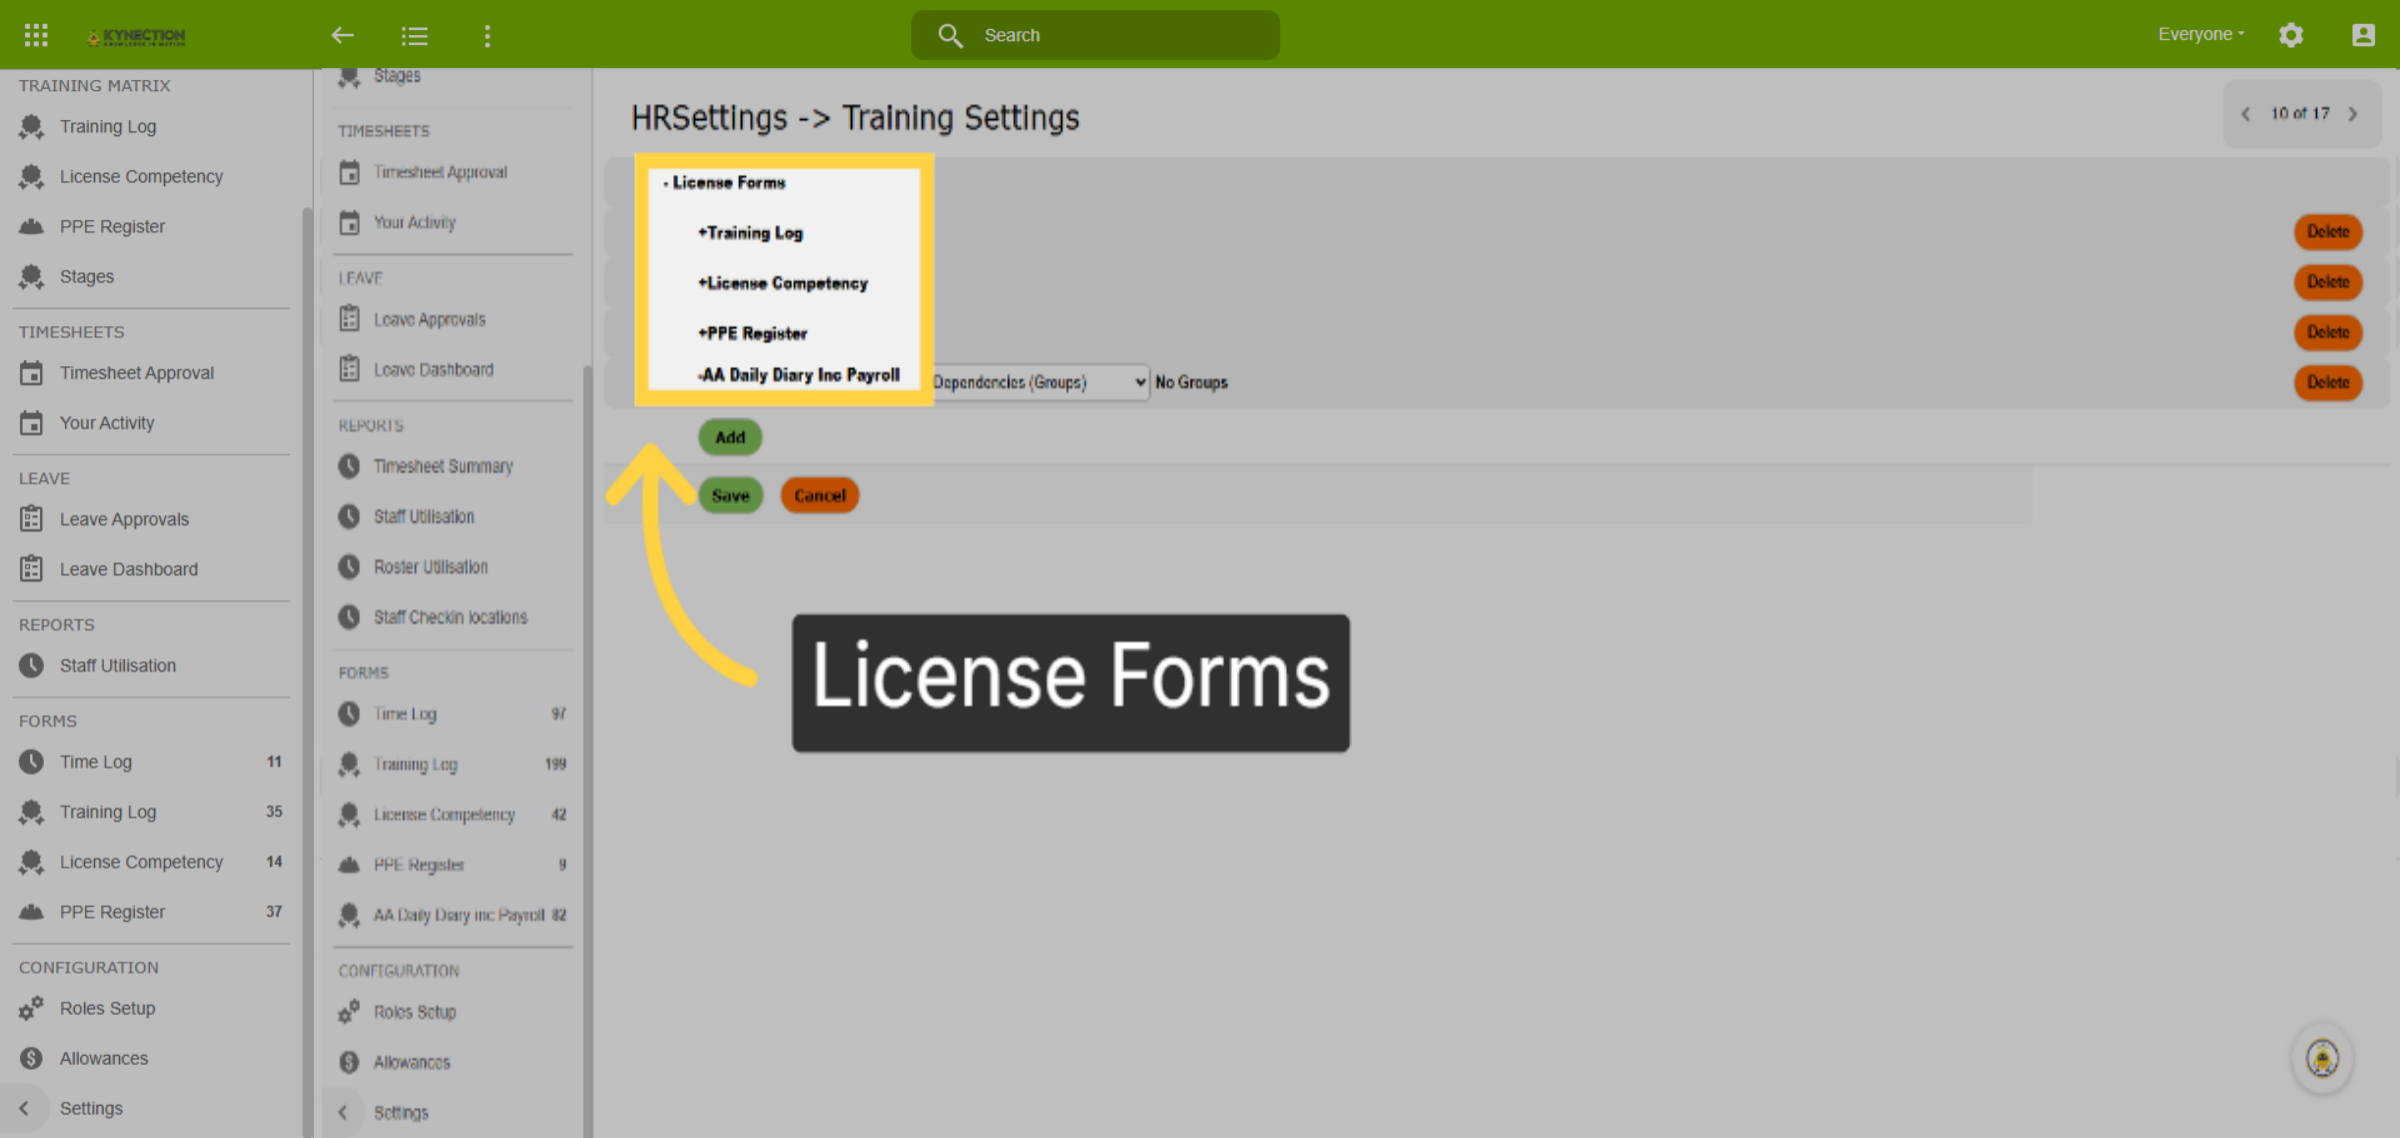
In this section, you will configure the requirements for the training matrix. Please expand the category for License Forms to reveal the following sub-menus: Training Logs, License Competency, PPE Register, and Daily Diary.
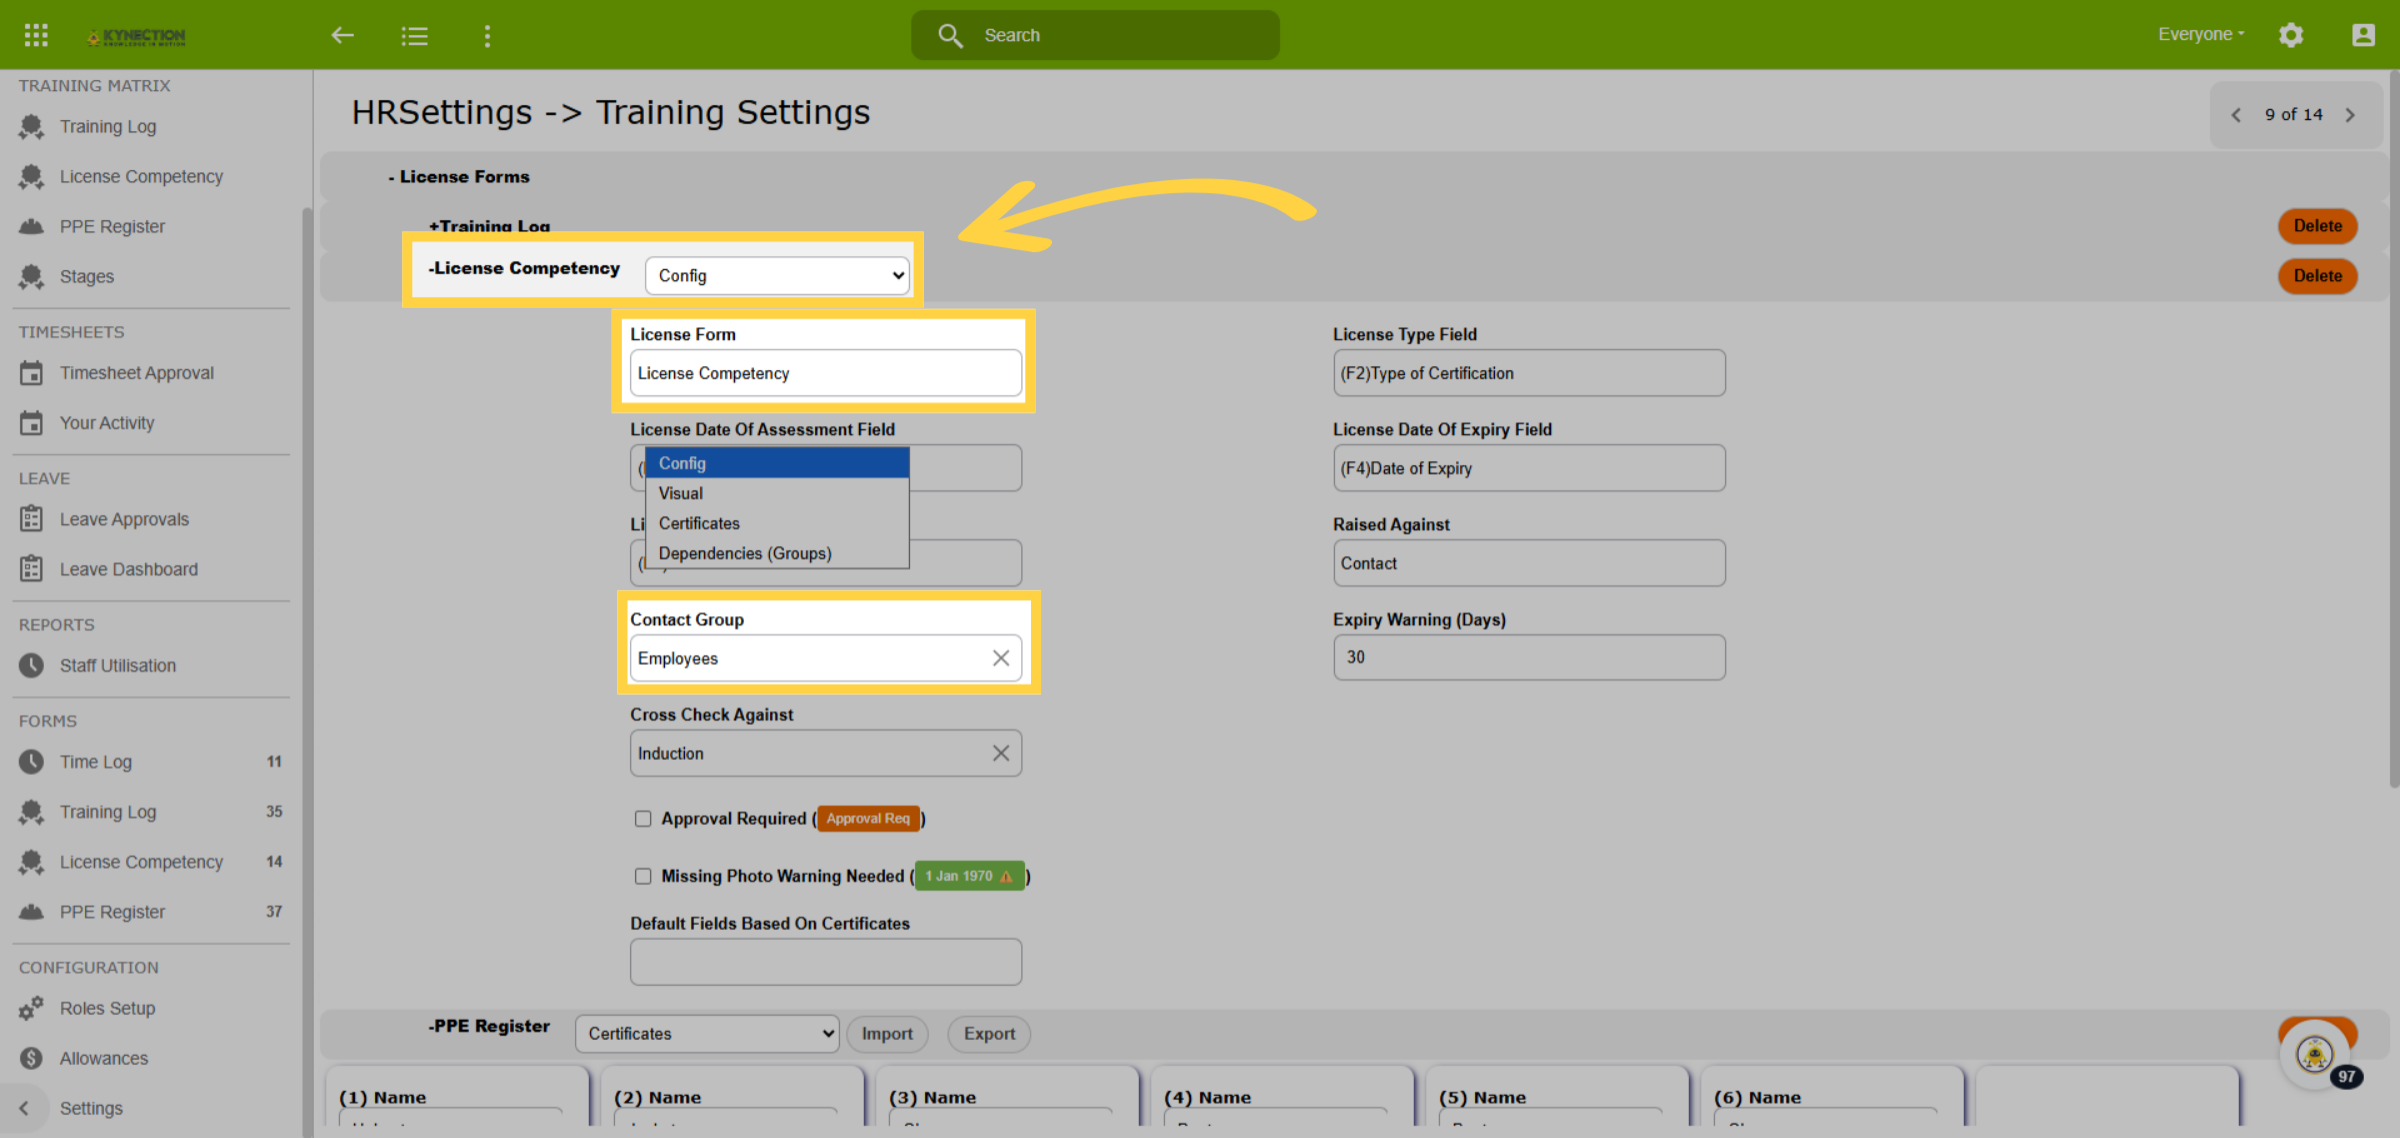
42. License Compentency - Config
Let's look at License Competency configuration and how the process can be applied to all licence forms. Expand License Competency. The drop-down list offers four different settings. The Config option allows for customising items such as selection of the form and the contact group being used.
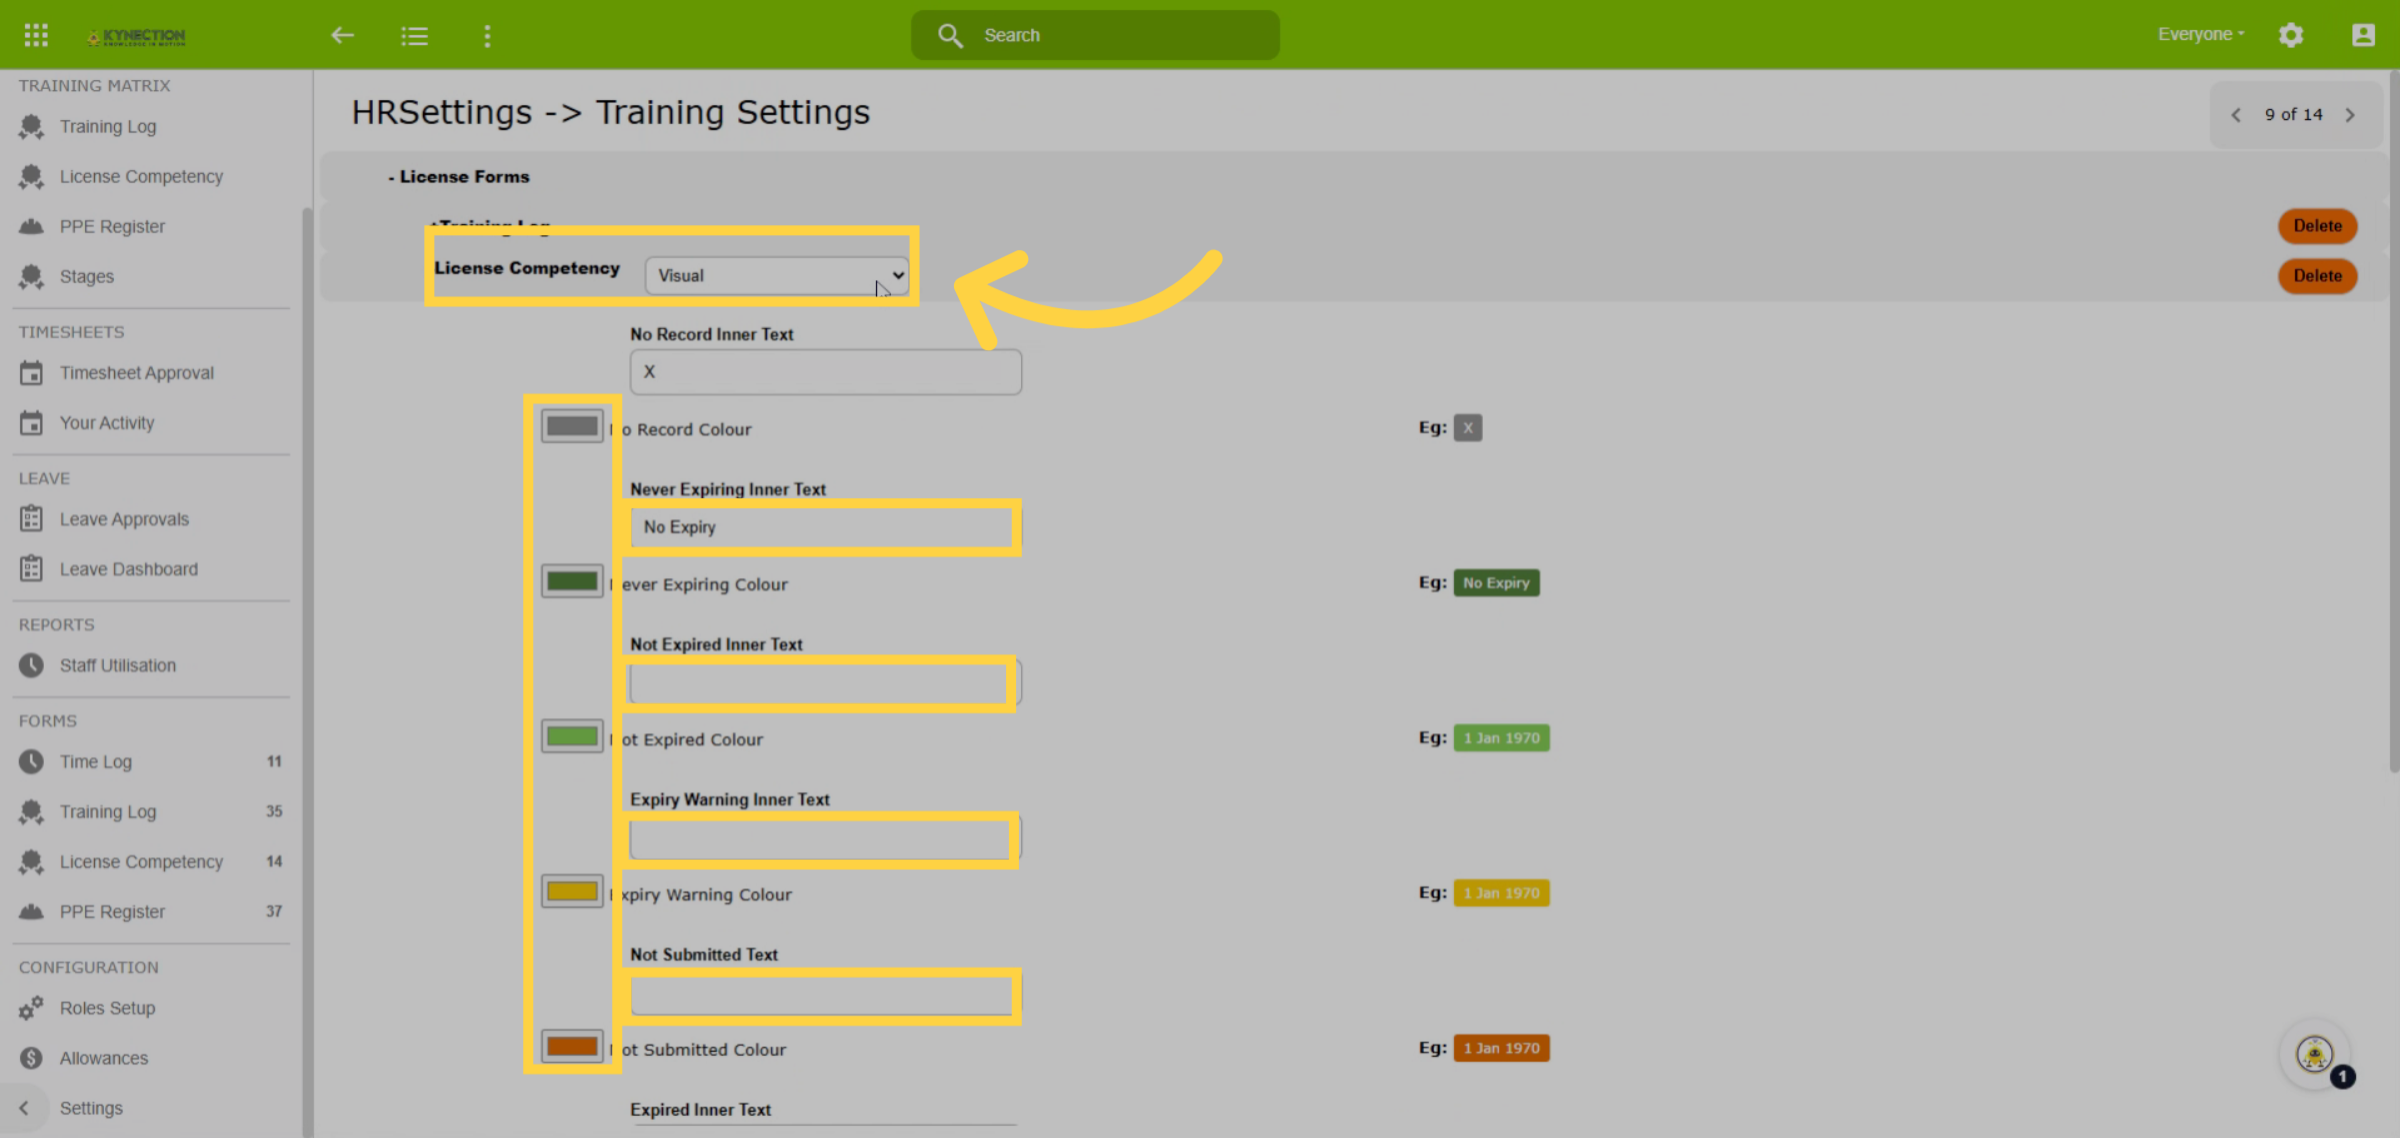
43. Visual Options
Change the drop-down menu to the Visual setting to find the colour and naming key . Click the colour box to the left of the name to change the colour, or click the name field box to change the name.
44. Certificates
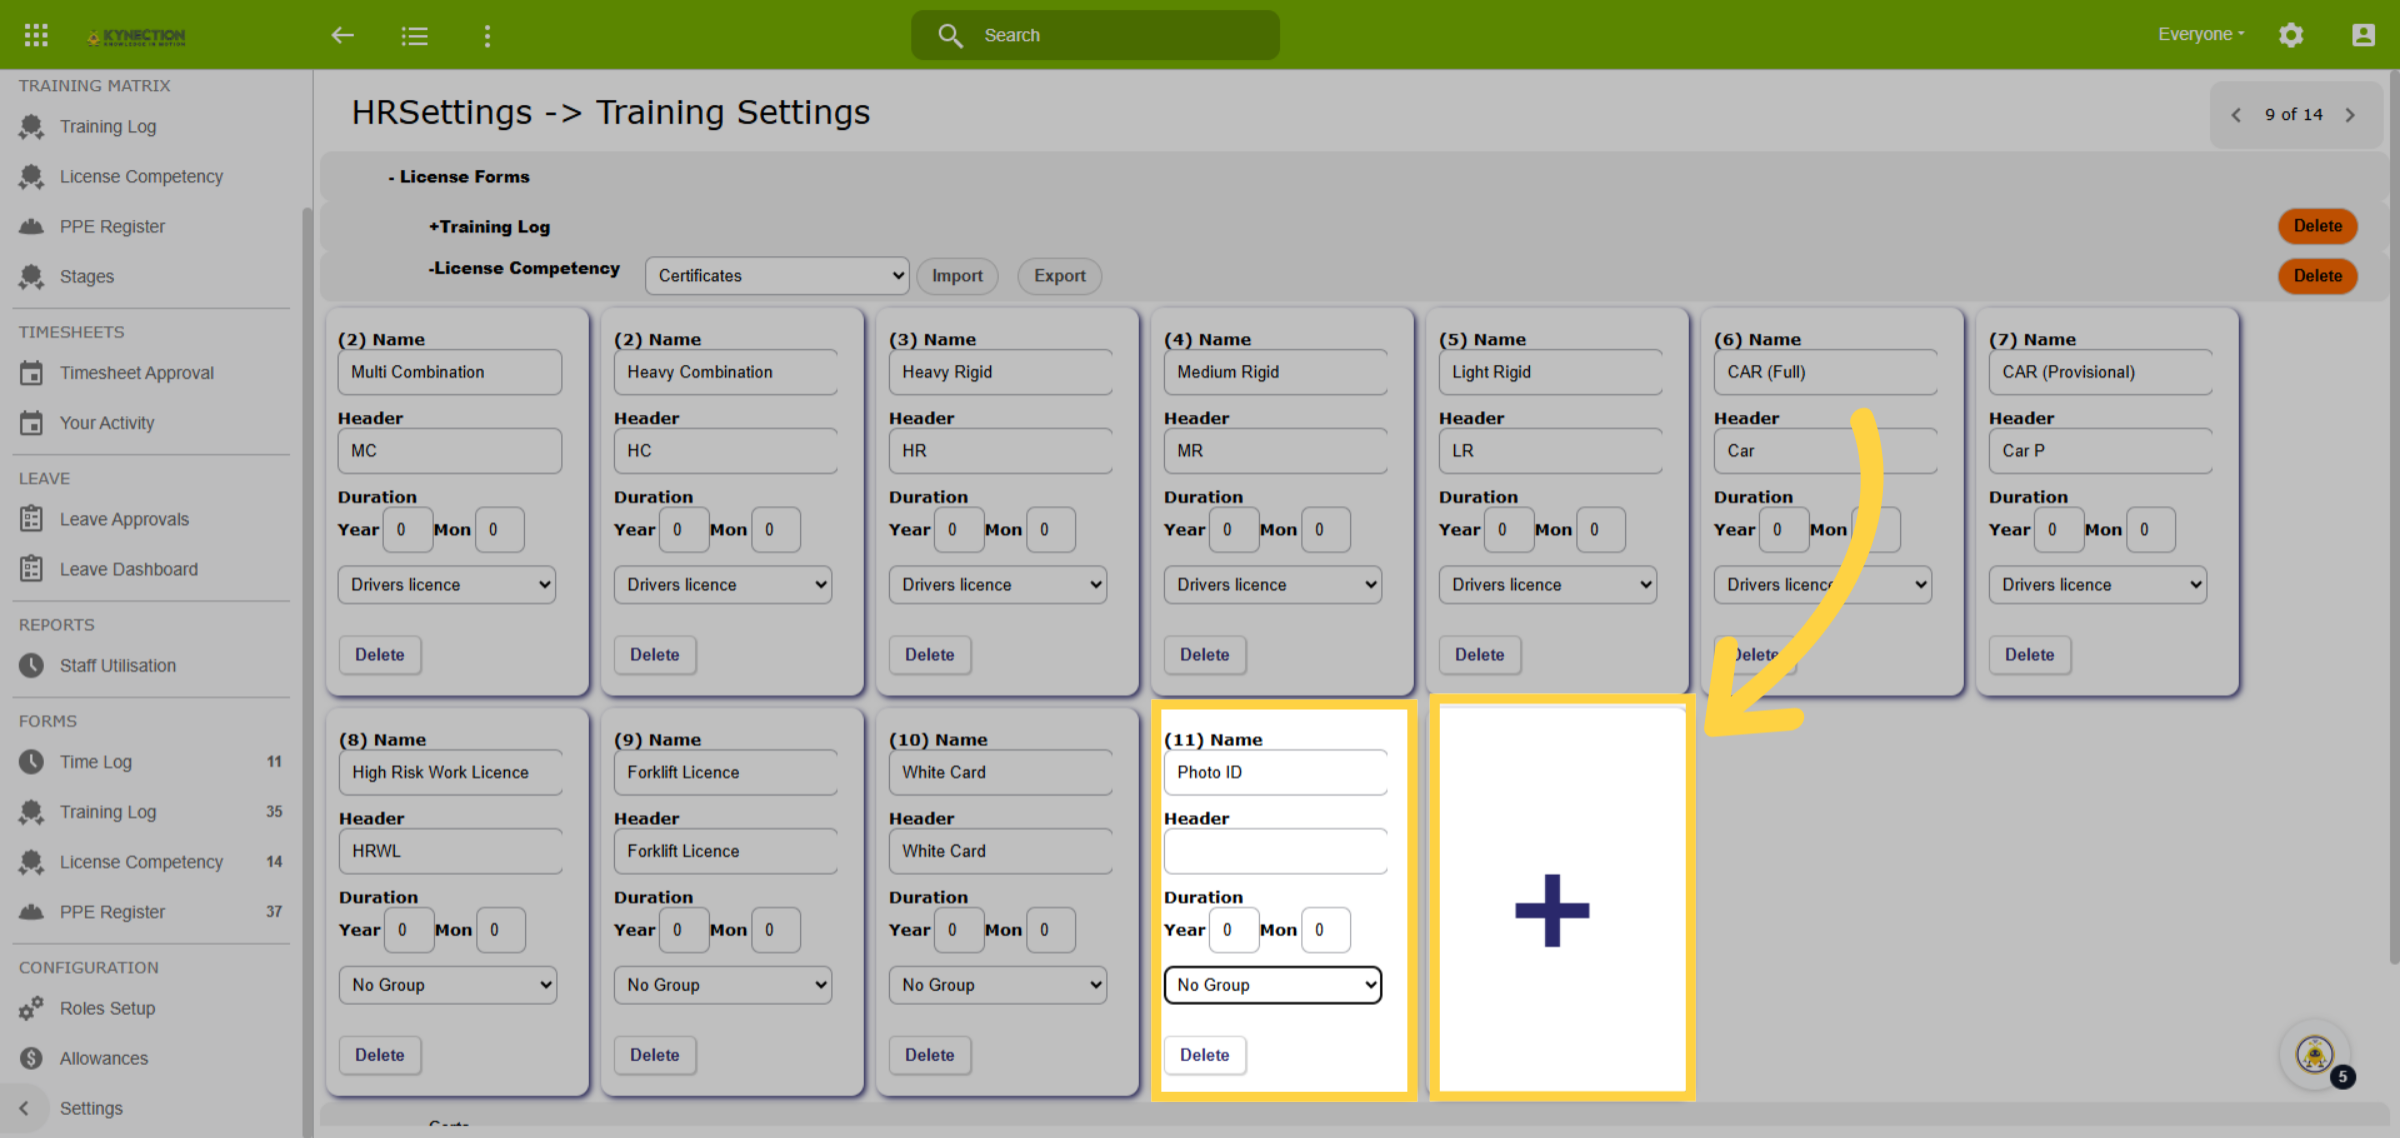
The third option in the drop-down list is 'Certificates.' This section is dedicated to recording qualifications and competencies, which will serve as the column headers in the Training Matrix tables, recording the status of forms of the same name. To create a new Certificate, simply scroll to the bottom of the page and click on the plus sign.
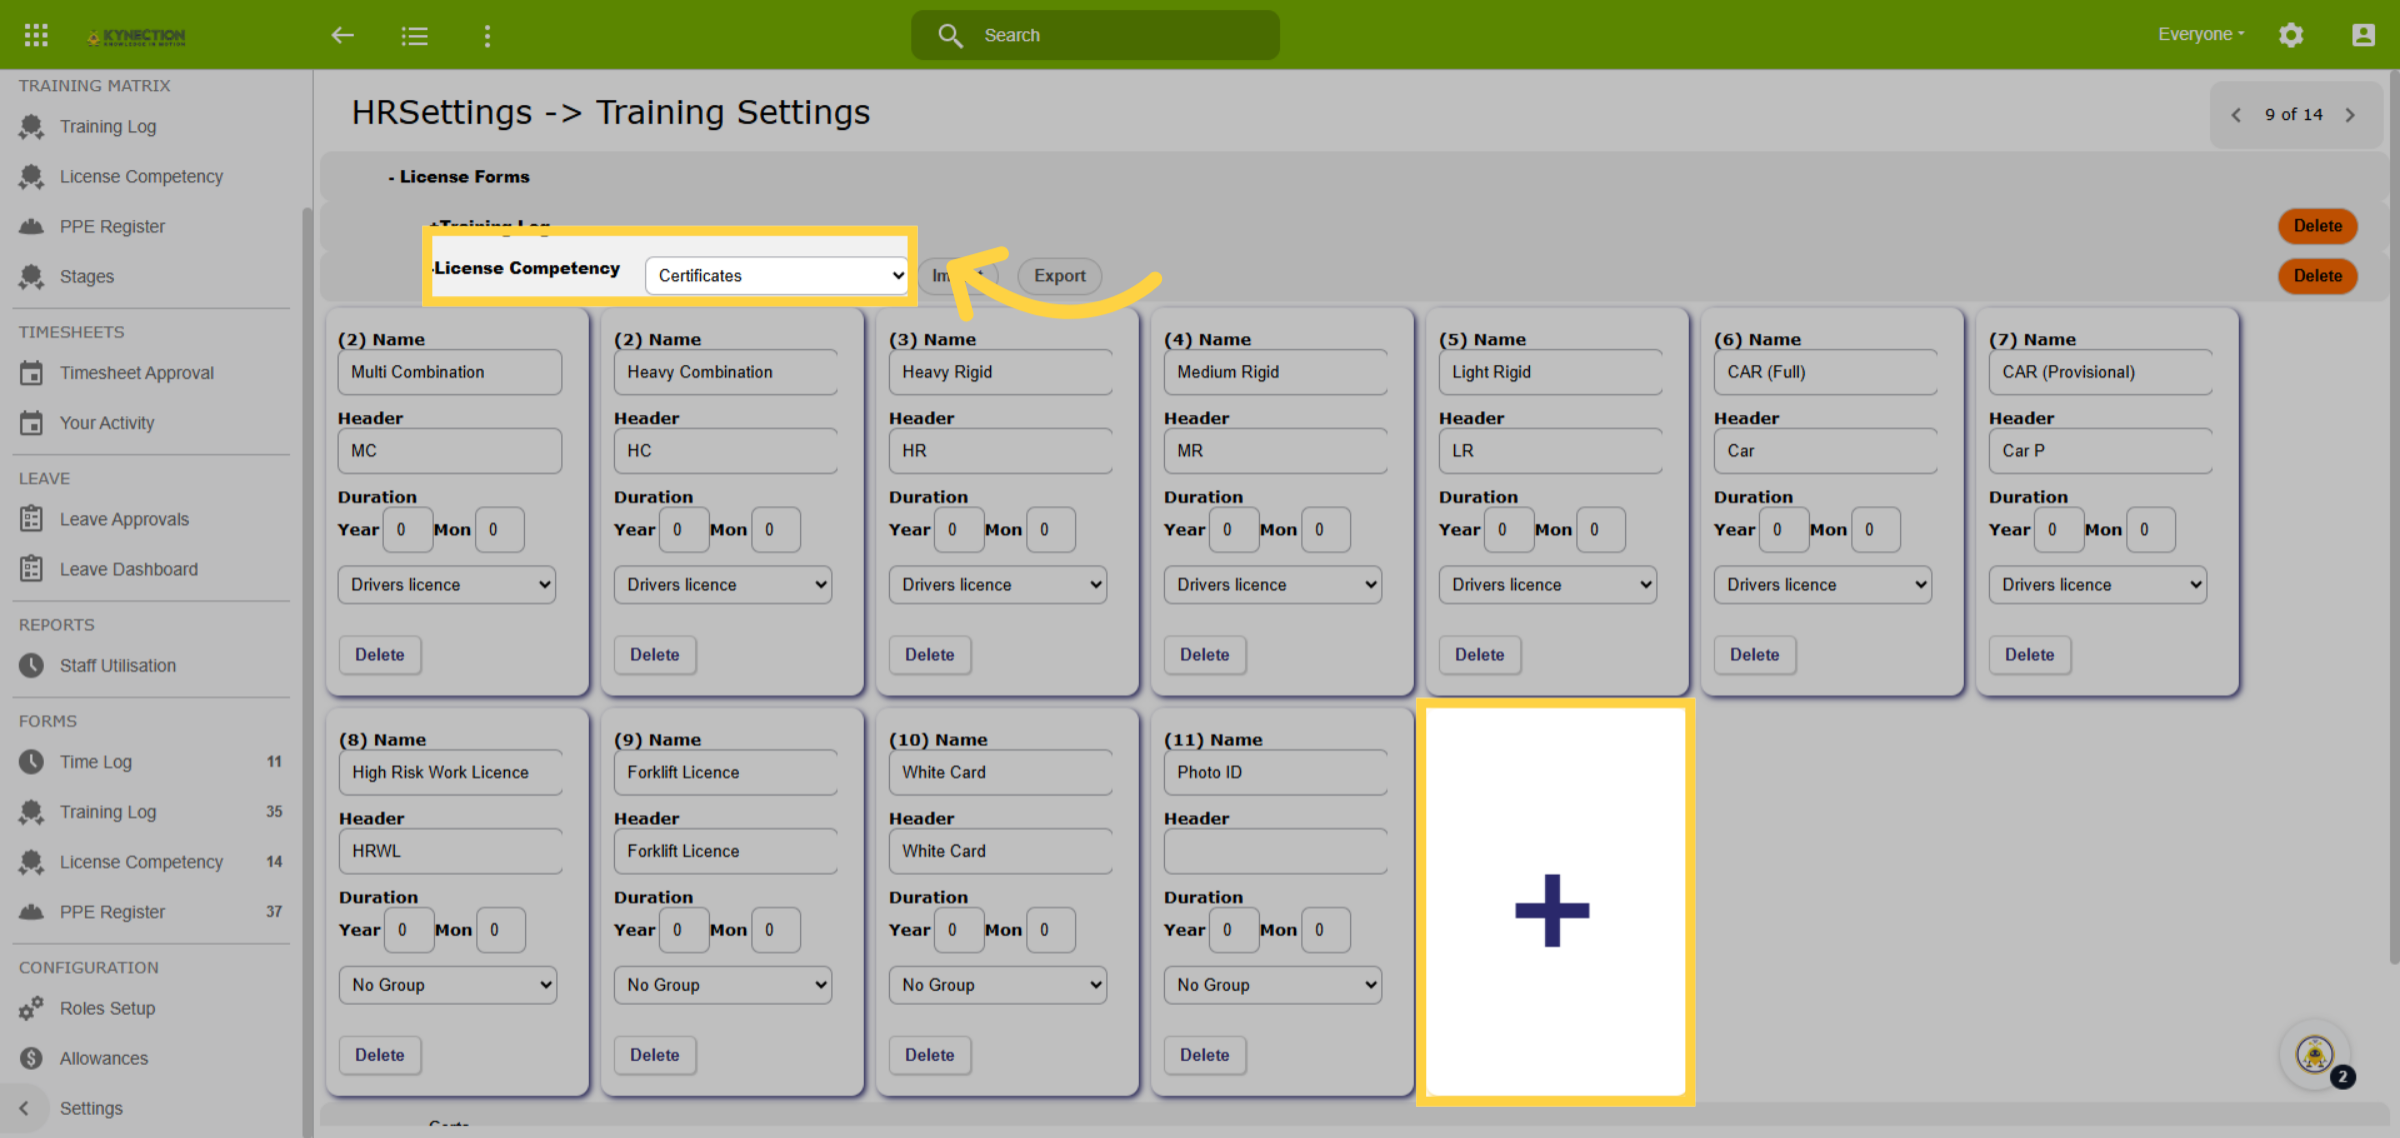
45. Add New Certificate
Complete the Certificate Details: Name (must be identical to the Training Log Form), Duration (how long the certificate is valid), and Group (add to existing or create new). Grouping certificates allows for dependencies (for example, Level 4 requiring Level 3) and single-column viewing in the Training Matrix. Save before exiting.
46. Dependencies
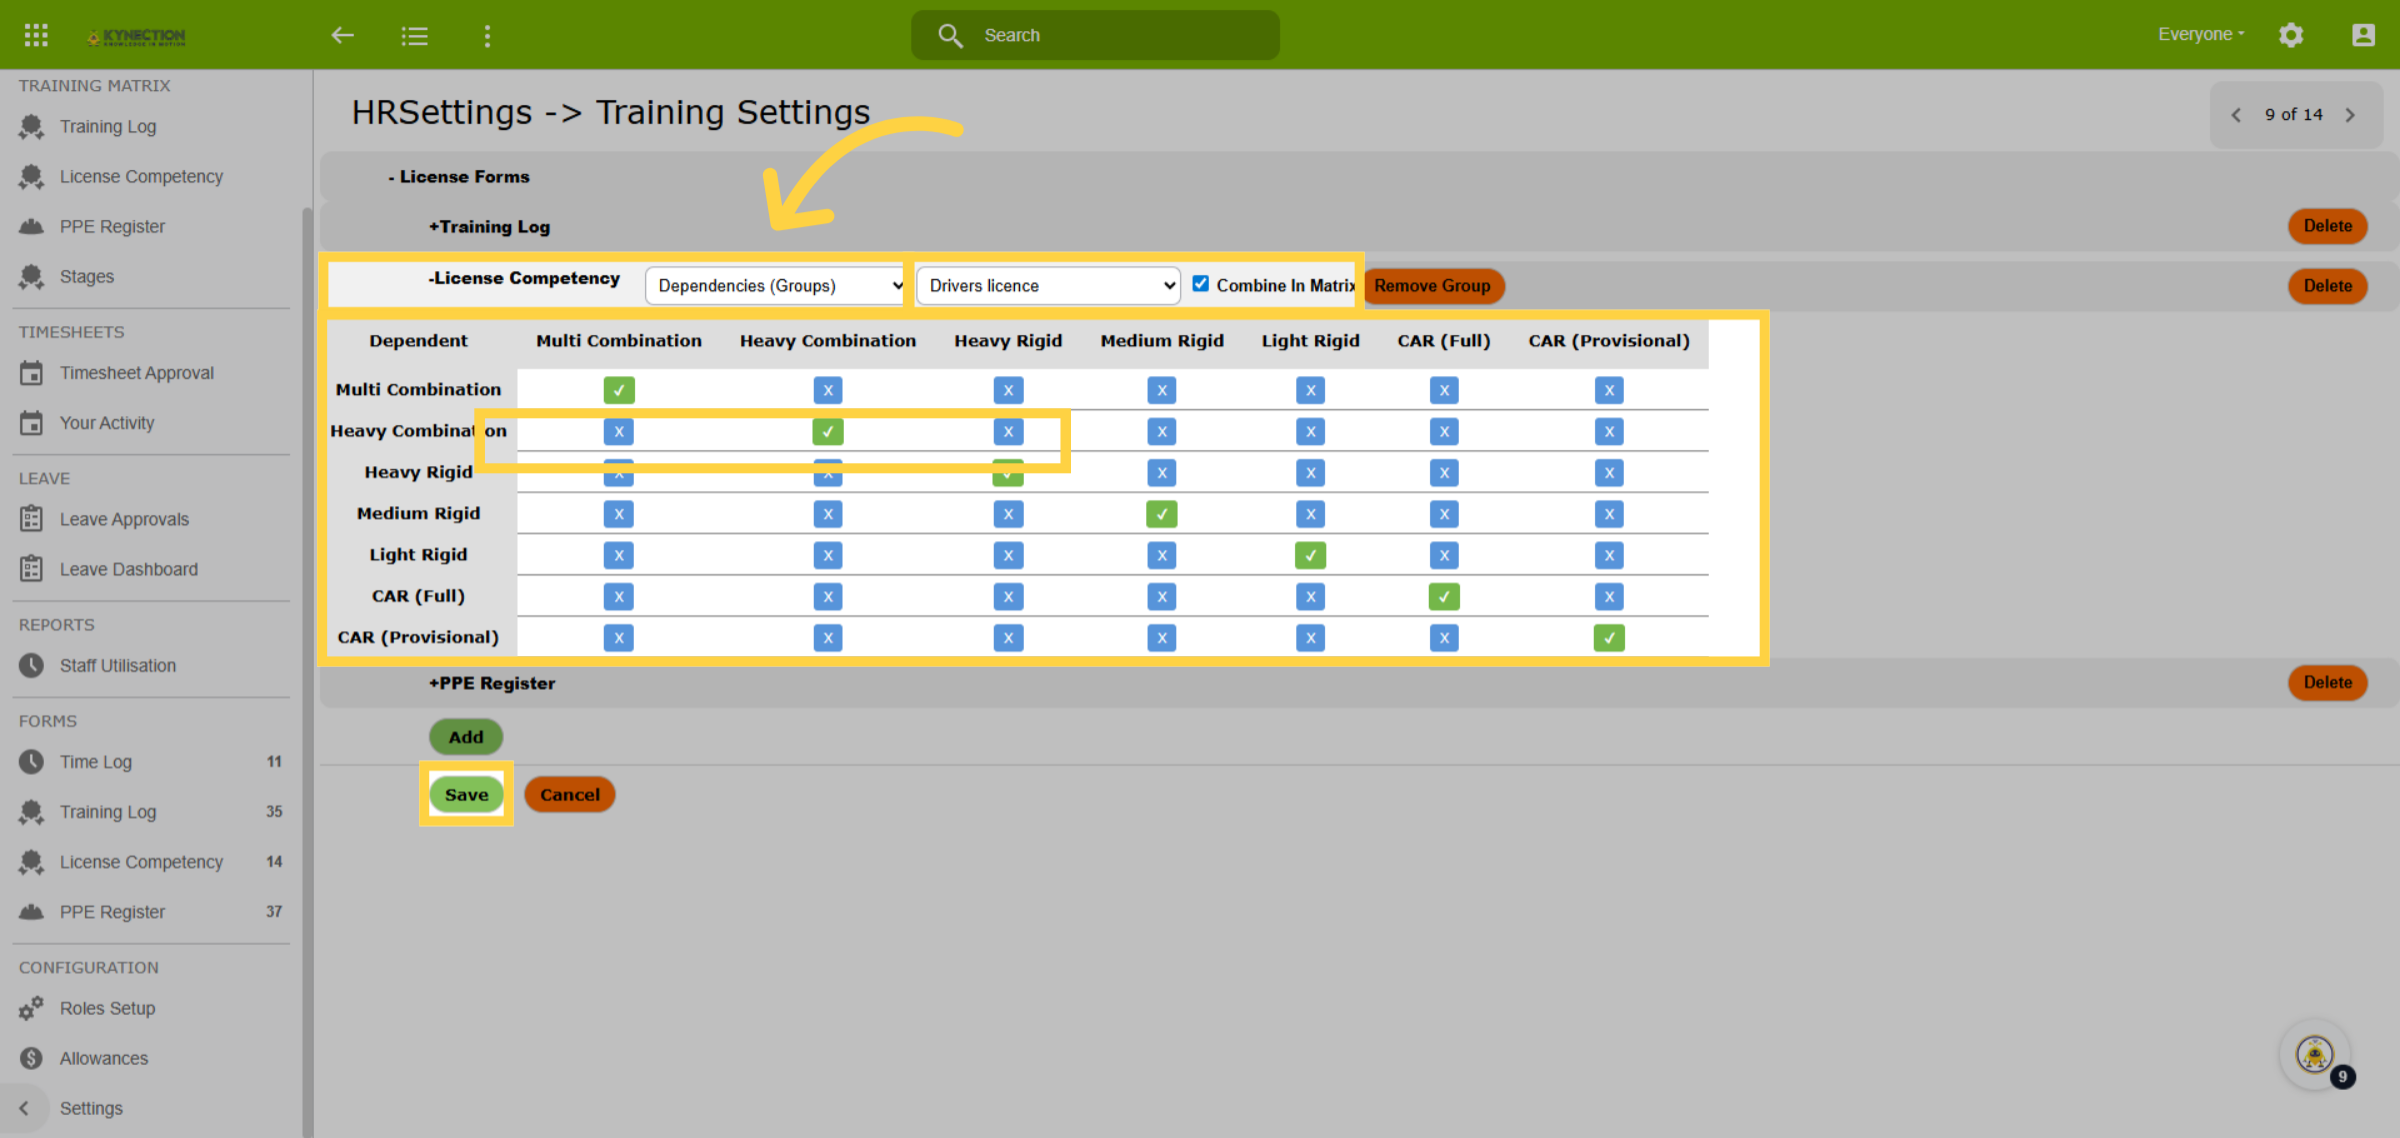
The final setting is Dependencies, which relate to the groups created in Certificates. Enter the group name in the second drop-down filter box. Enable the tickbox next to the group drop-down to combine the group into one column in the Training Matrix. Create dependencies by clicking the blue X to change it to a green tick if one certificate depends on another. Select Save when done.
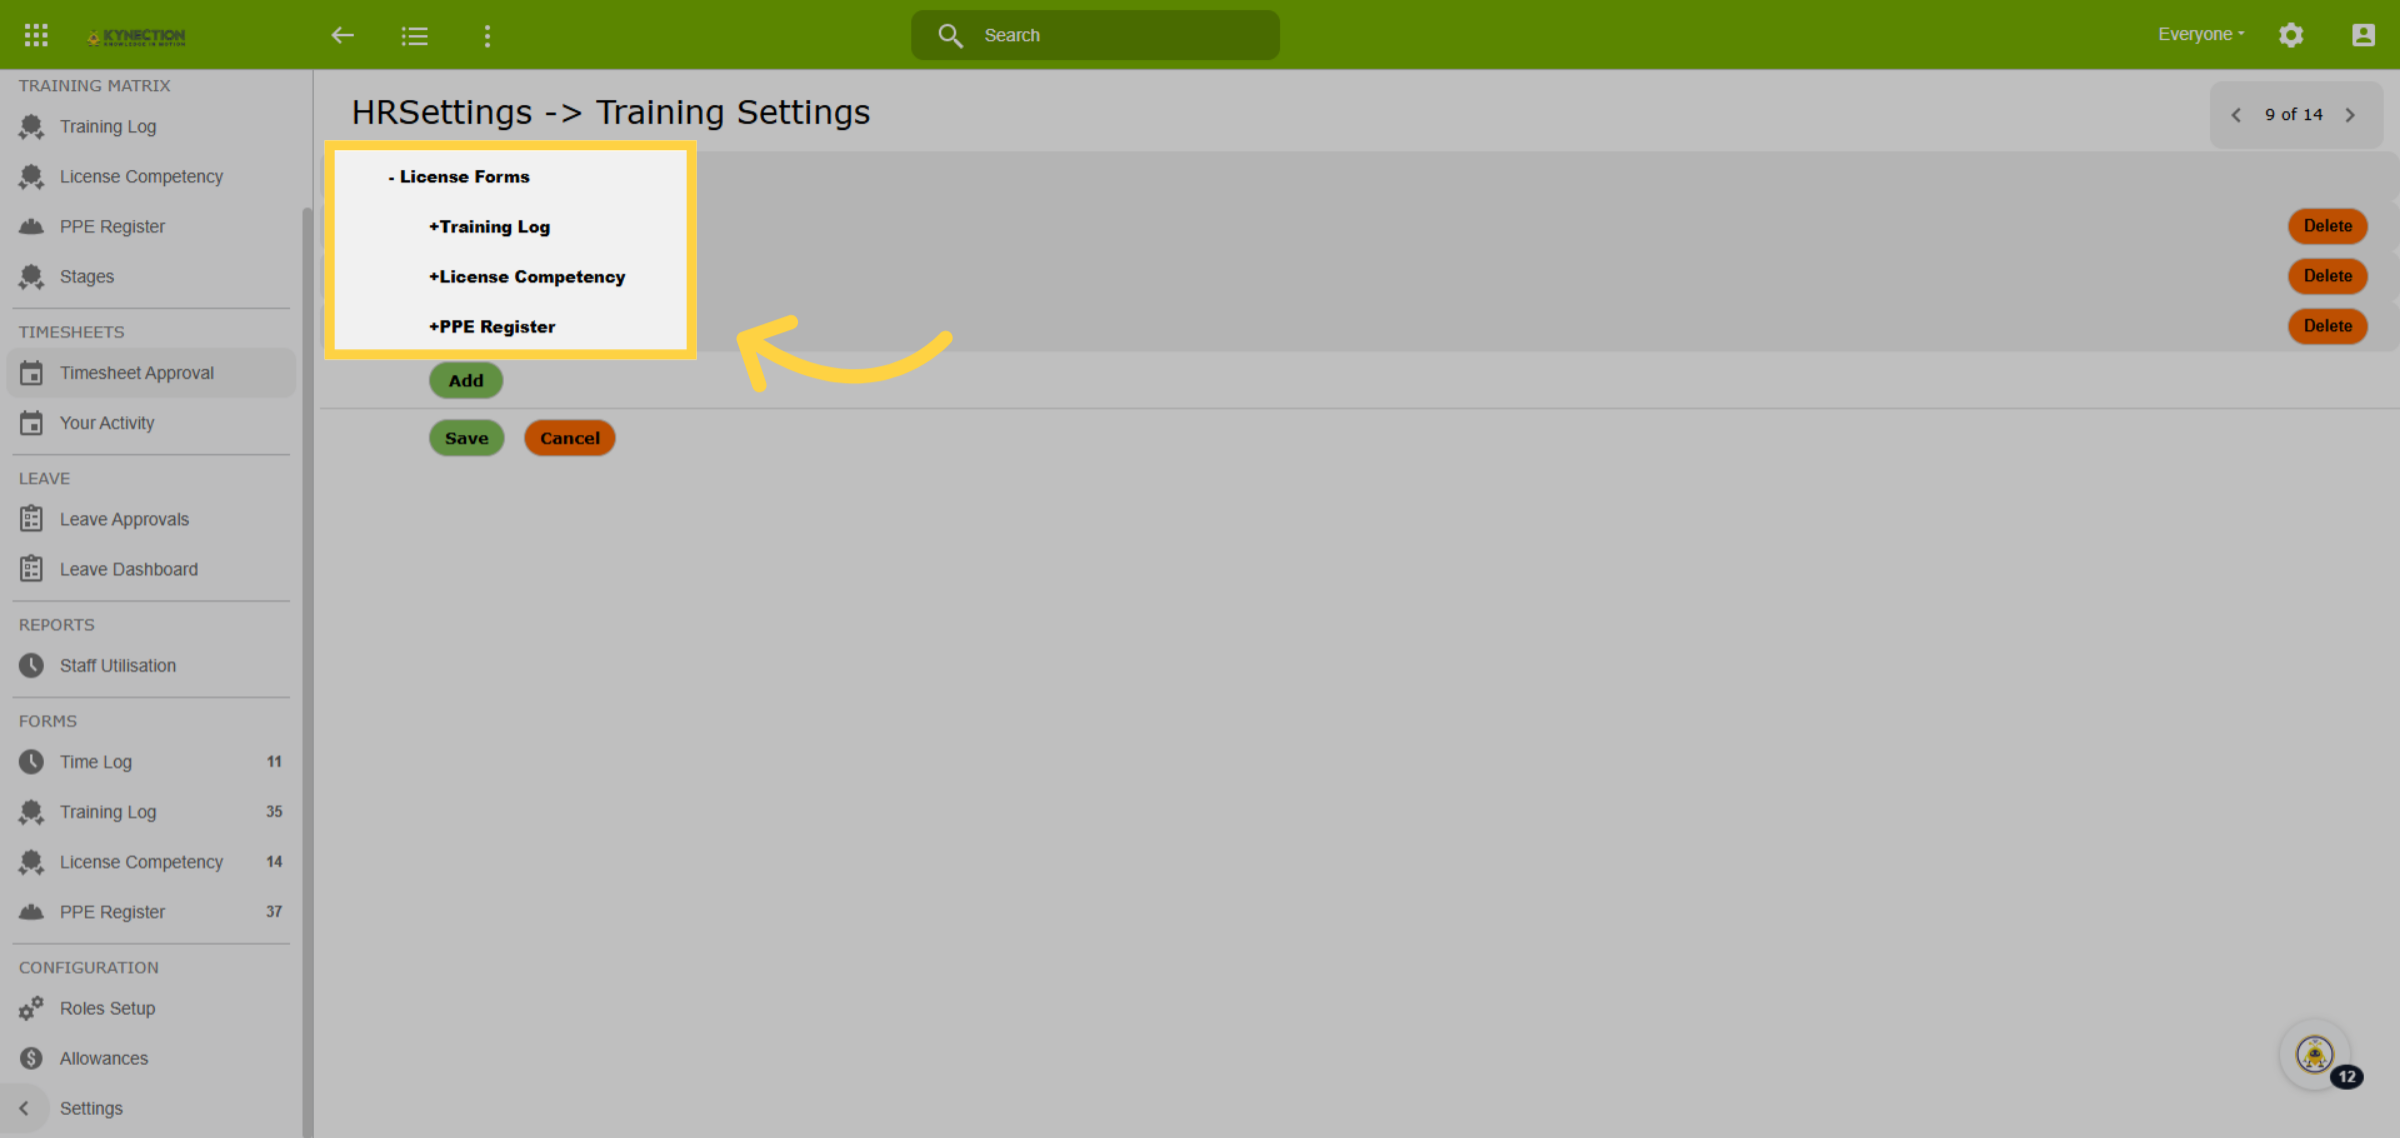
47. License Forms
The remaining items for License Forms, Training Log, PPE Register, and Daily Diary all follow the same format as License Competency. Expand each item and then select the subcategory of Config, Visual, Certificate, or Dependencies.
48. Open Timesheet Approval UI
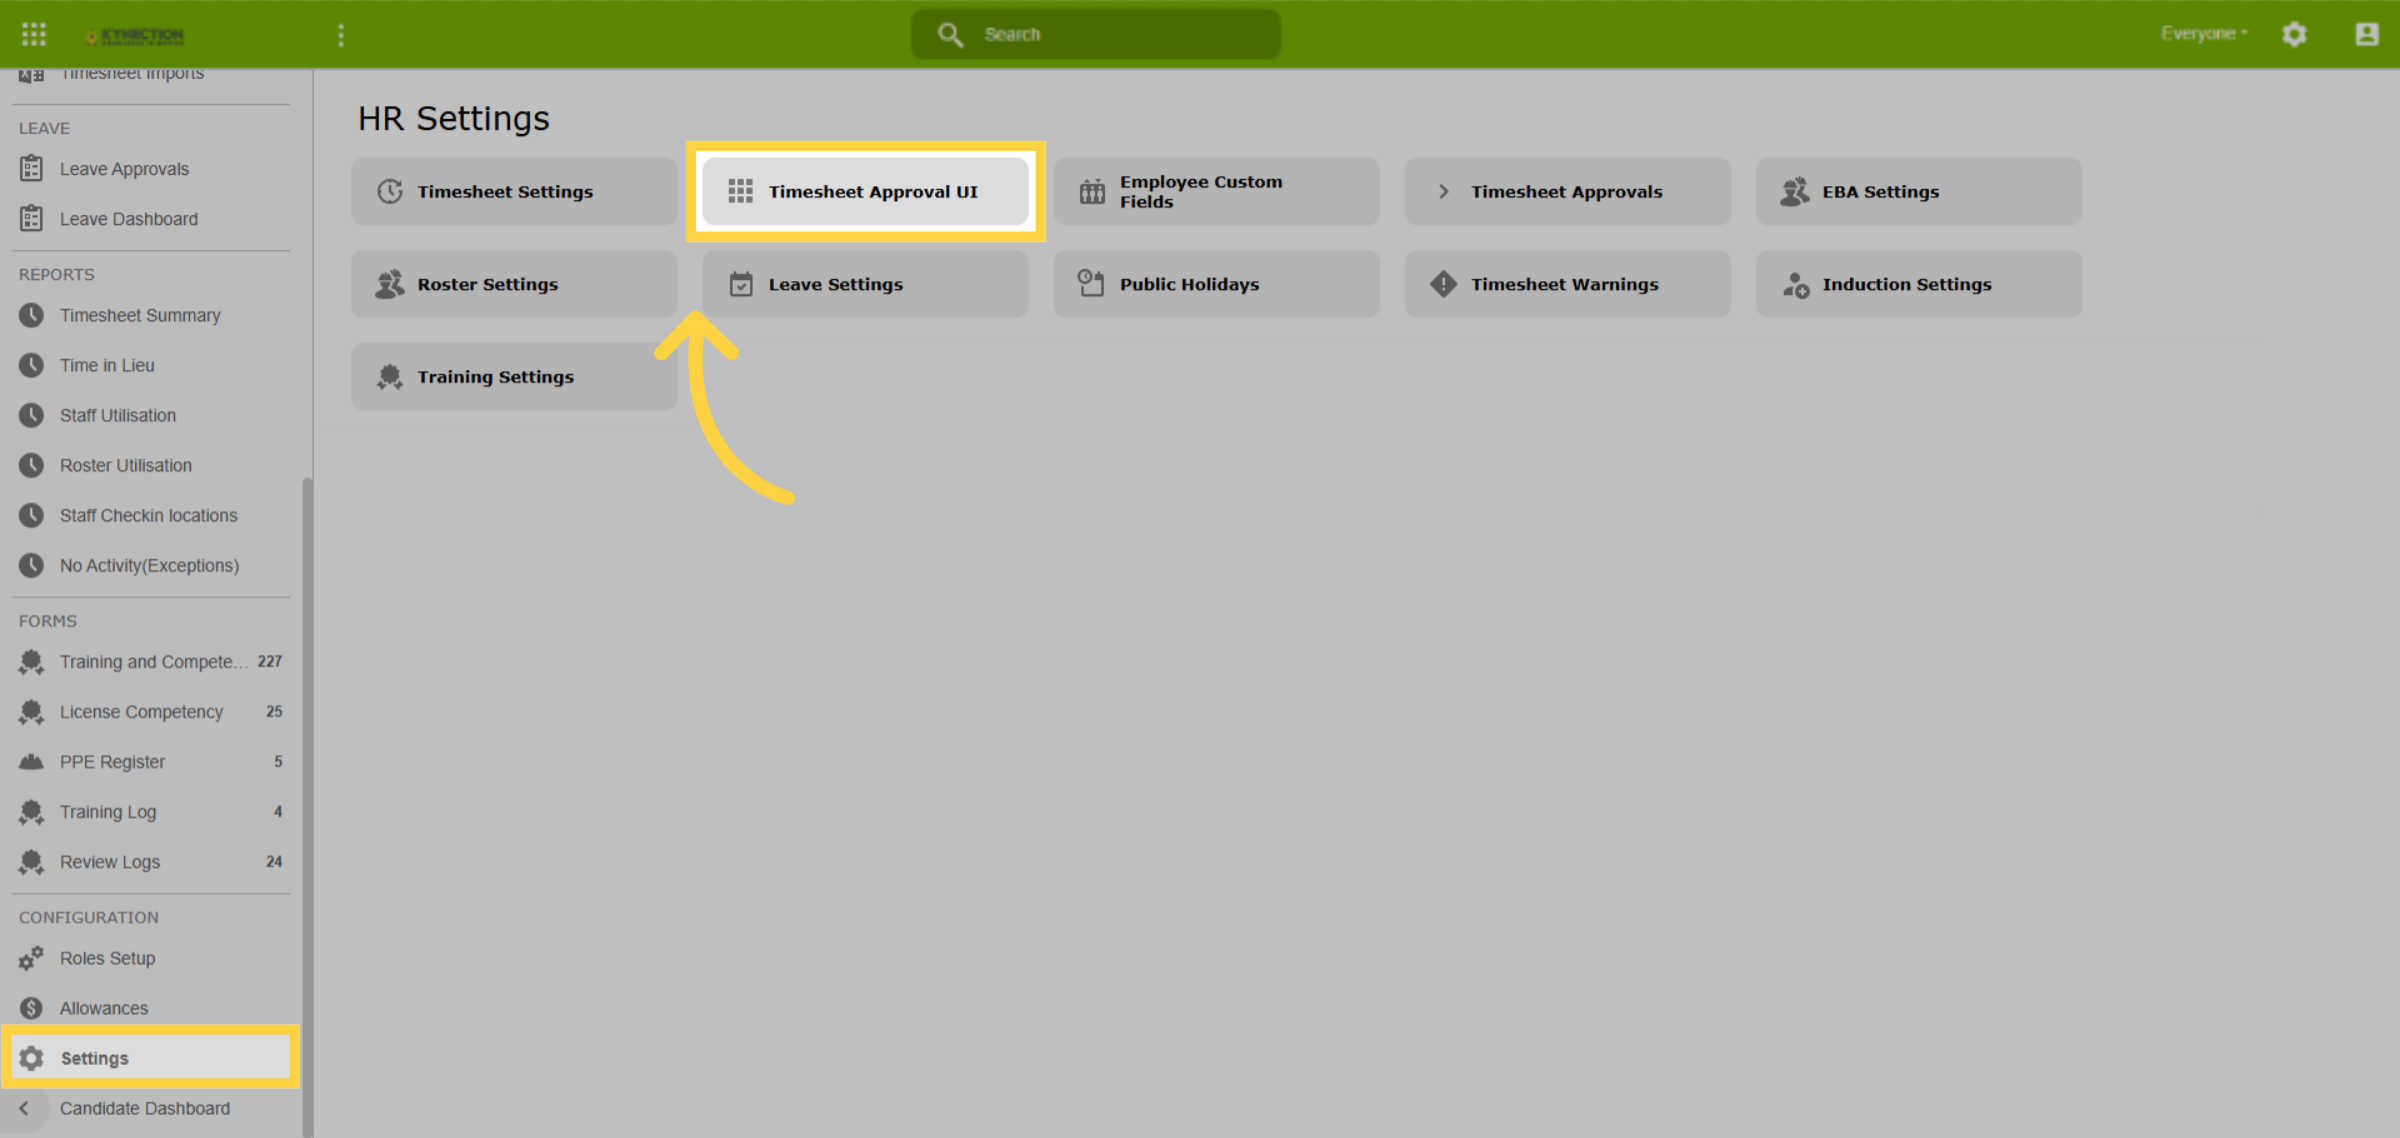
Open "Settings" in the Team HR module and select "Timesheet Approval UI."
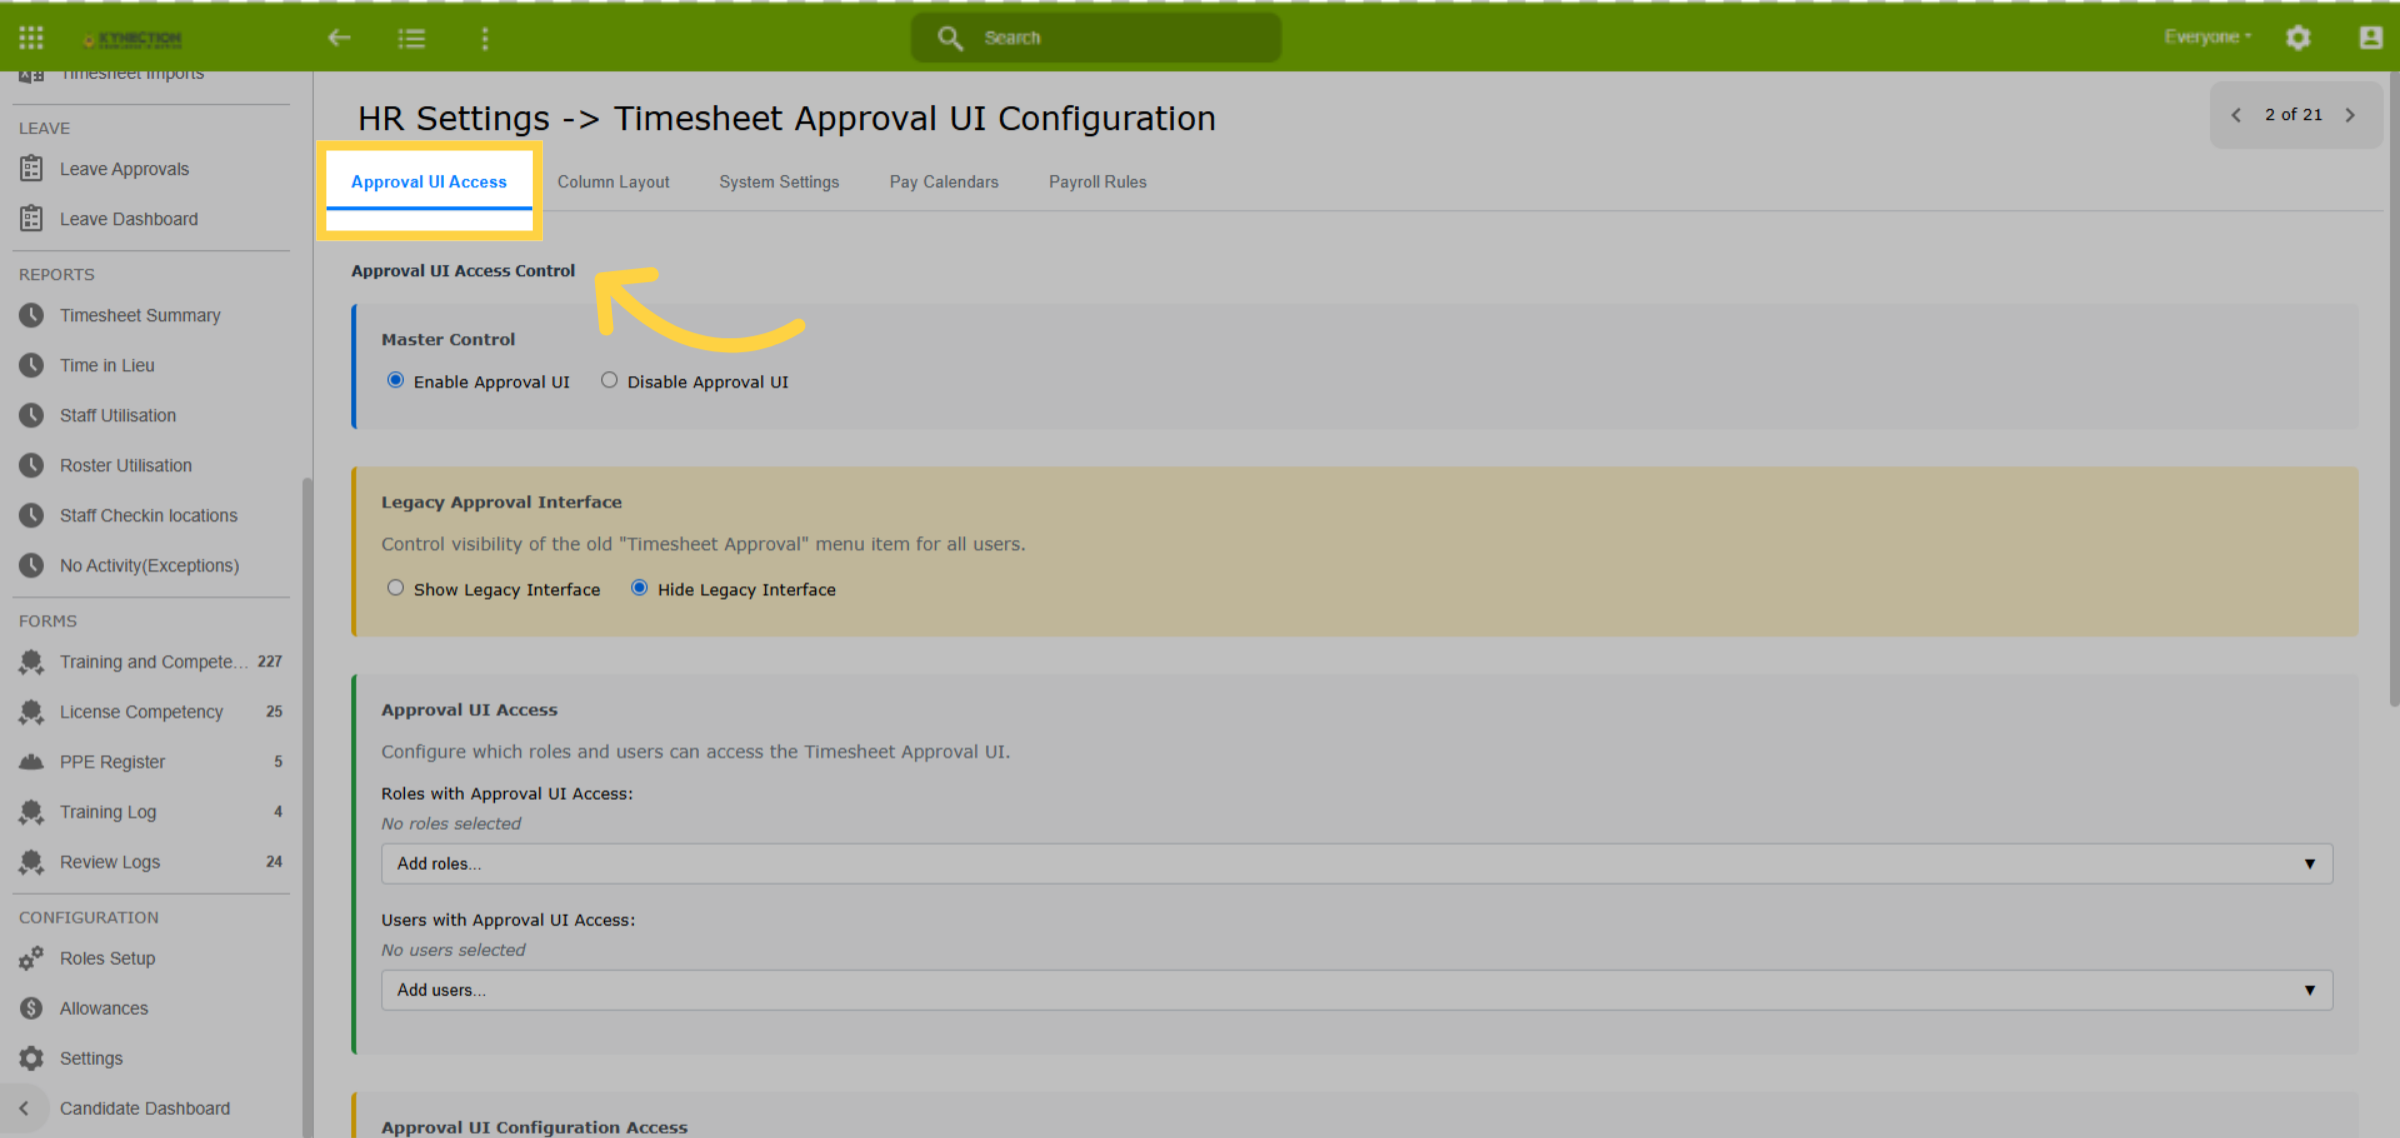
49. Approval UI Access
Manage timesheet approval access rights through the "Approval UI Access" tab. Permissions can be assigned by role, or by individual user.
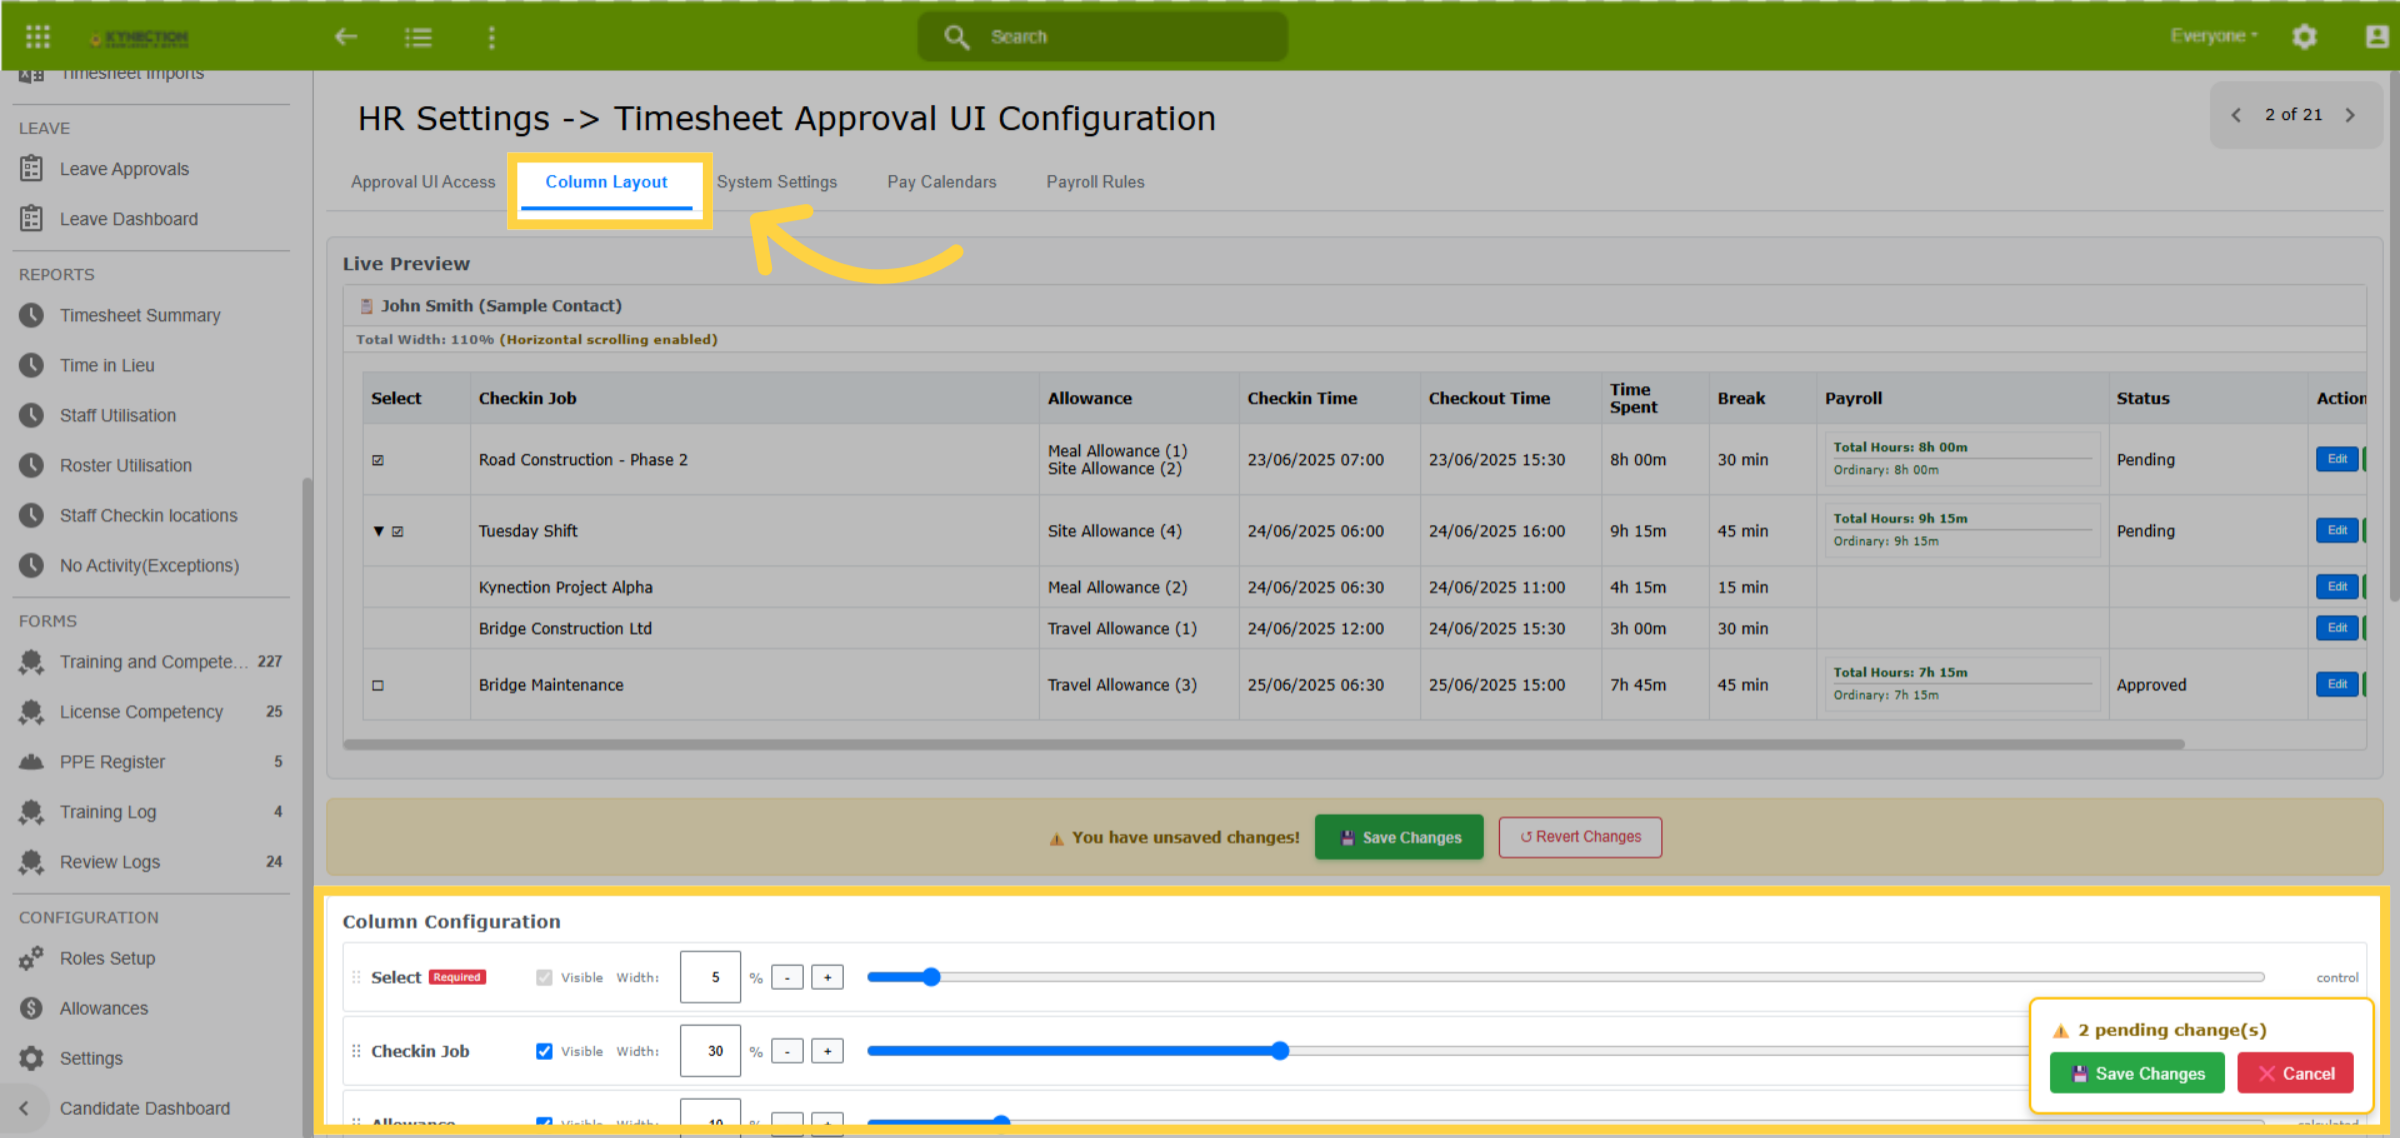
50. Column Layout
To configure the columns for Timesheet Approval, go to the Column Layout tab. In the Column Configuration section, choose the columns you want to display by selecting the checkboxes. You can also adjust the column width using the percentages field,or the plus and minus buttons.
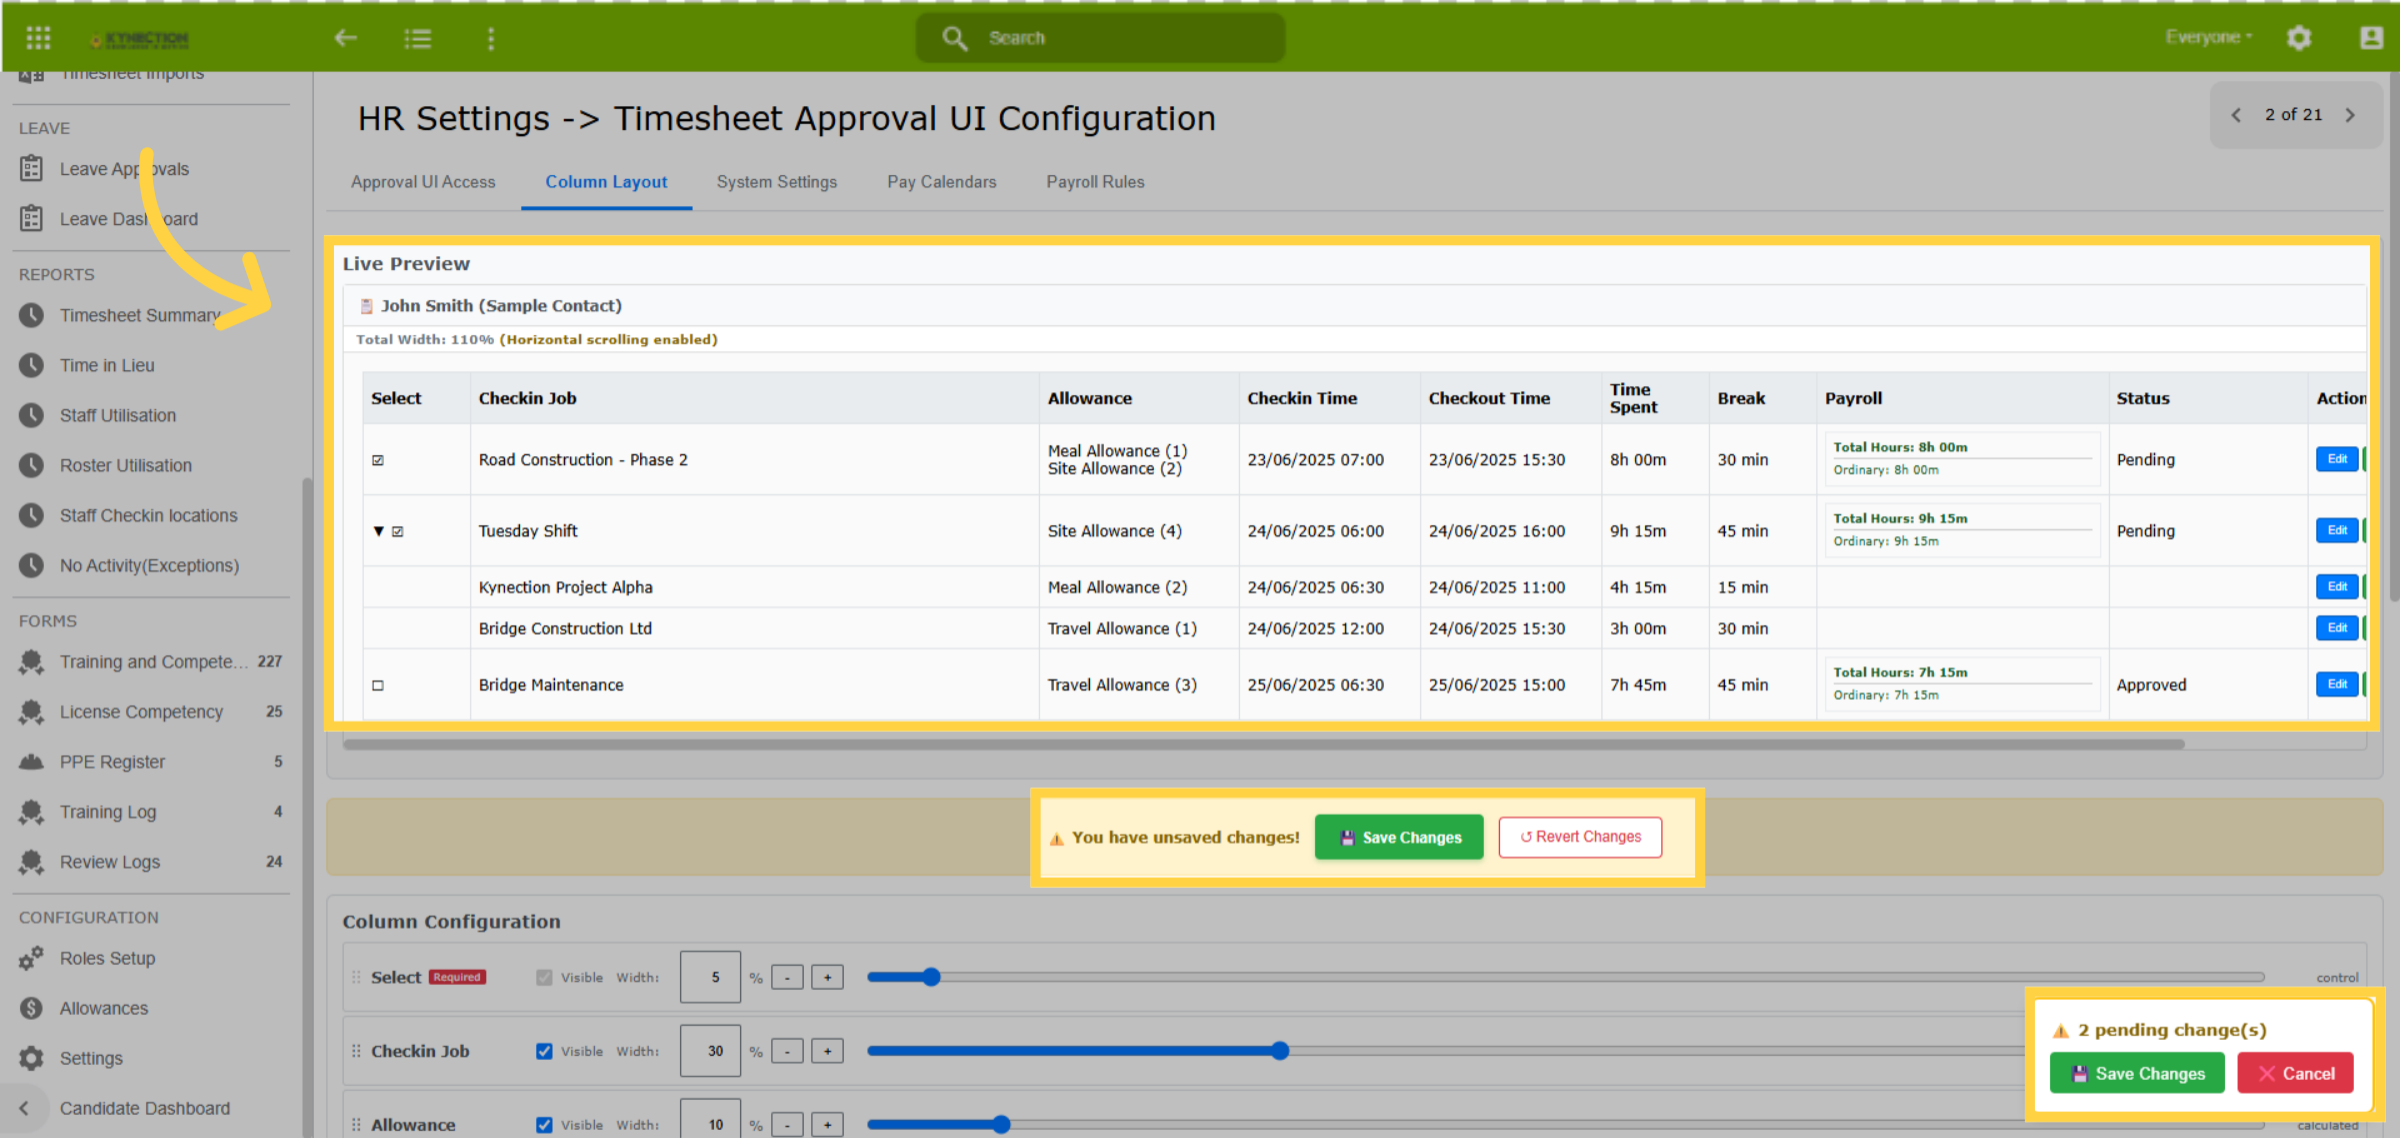
51. Column Layout Preview
The Column Layout tab has a "Live Preview" feature demonstrating the updates to column settings. Horizontal scrolling will be enabled if the total column width exceeds 100%, as indicated in the section header of Live Preview. Save your changes before you exit.
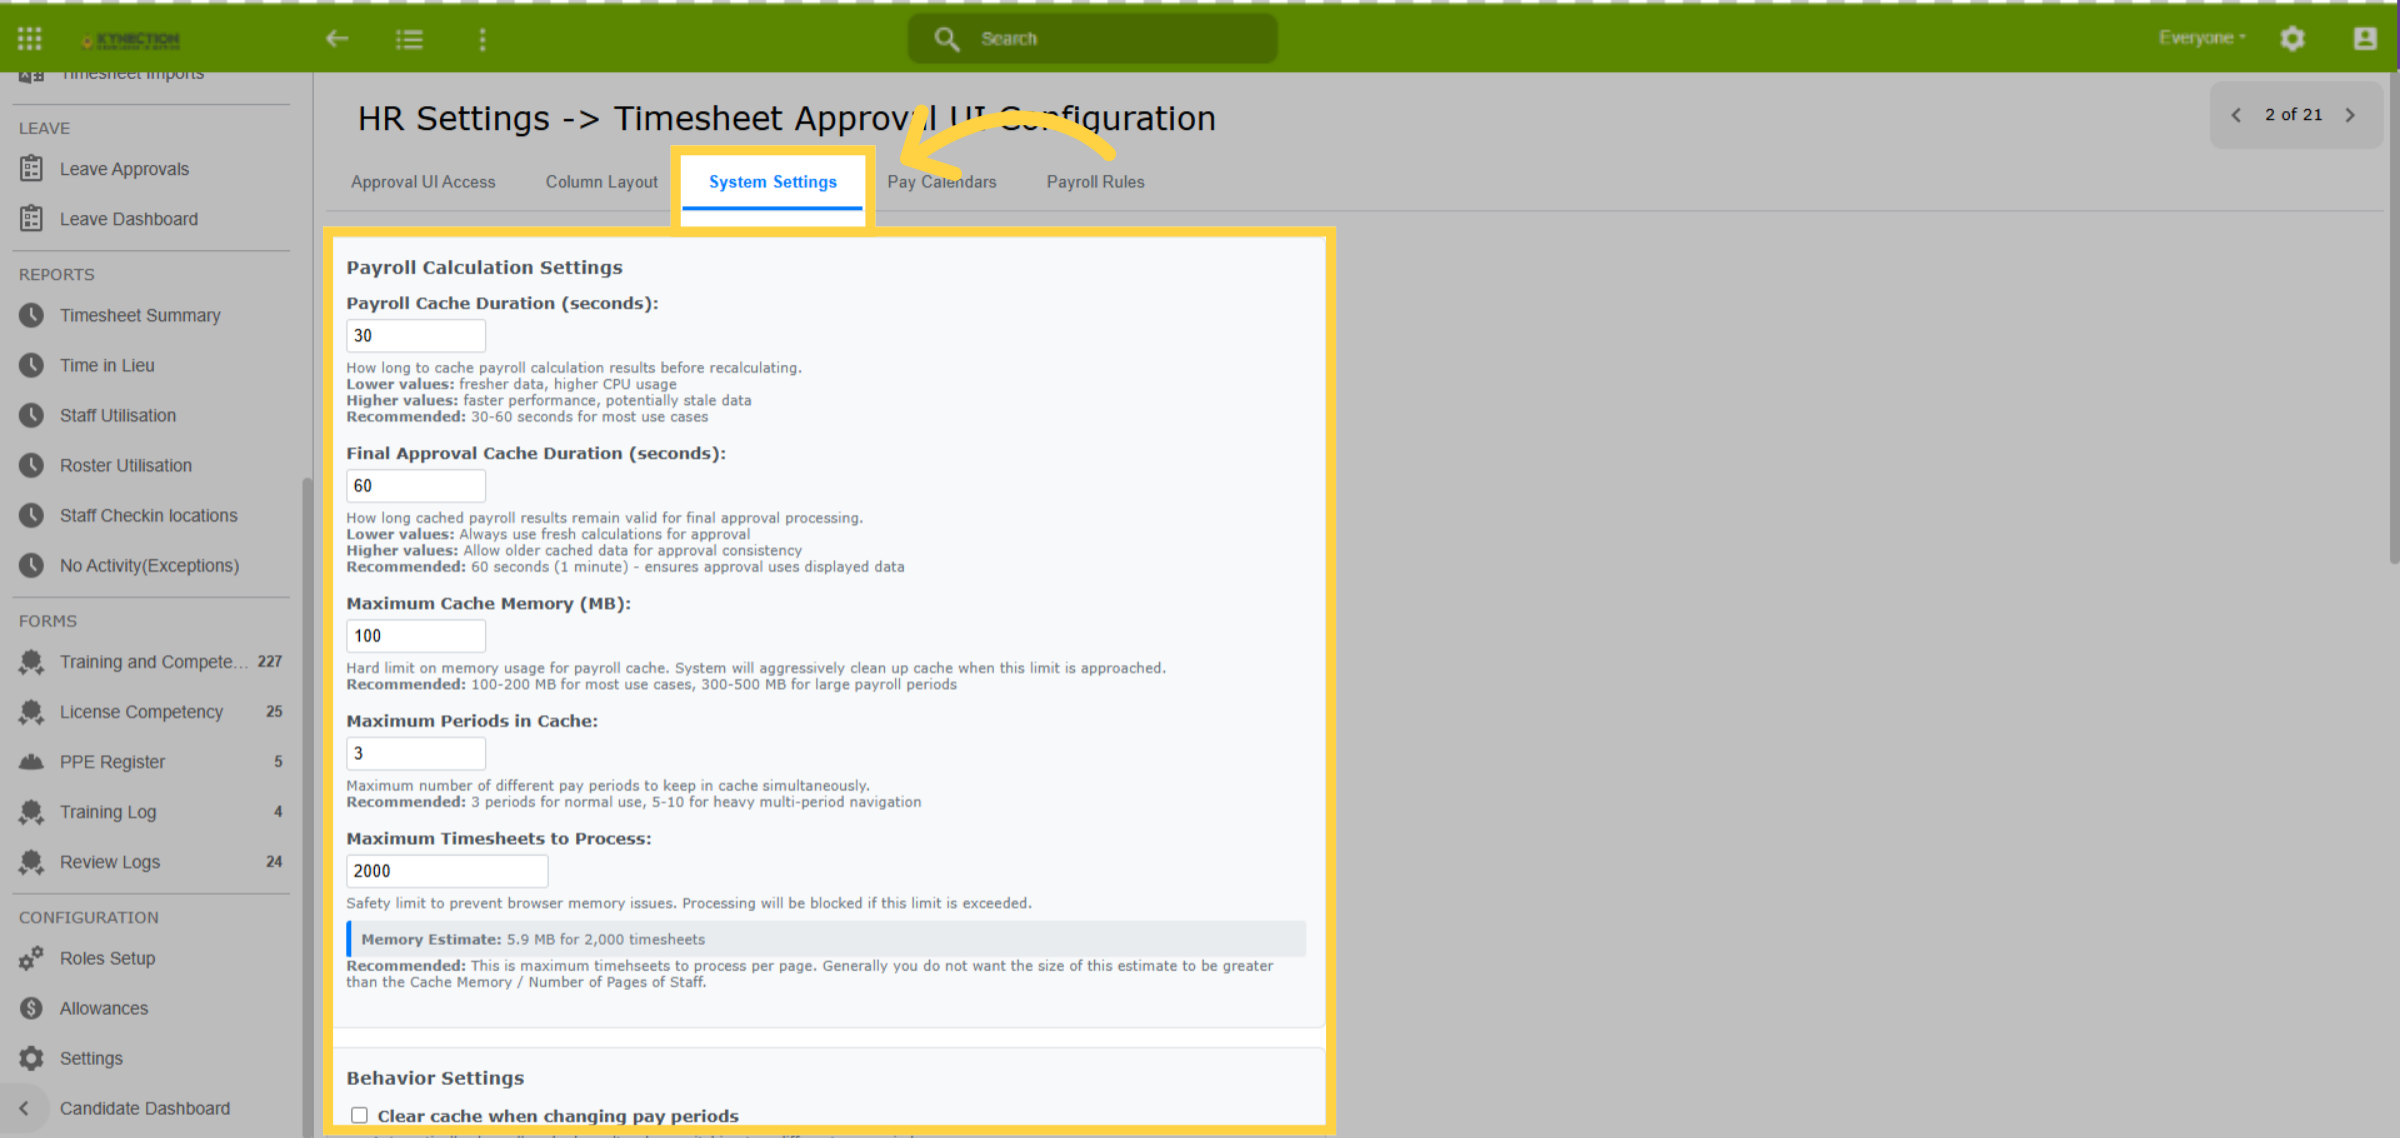
52. System Settings
System Settings should only be modified by Kynection, as these configurations are optimised for peak performance and to minimize caching issues.
53. Pay Calendar
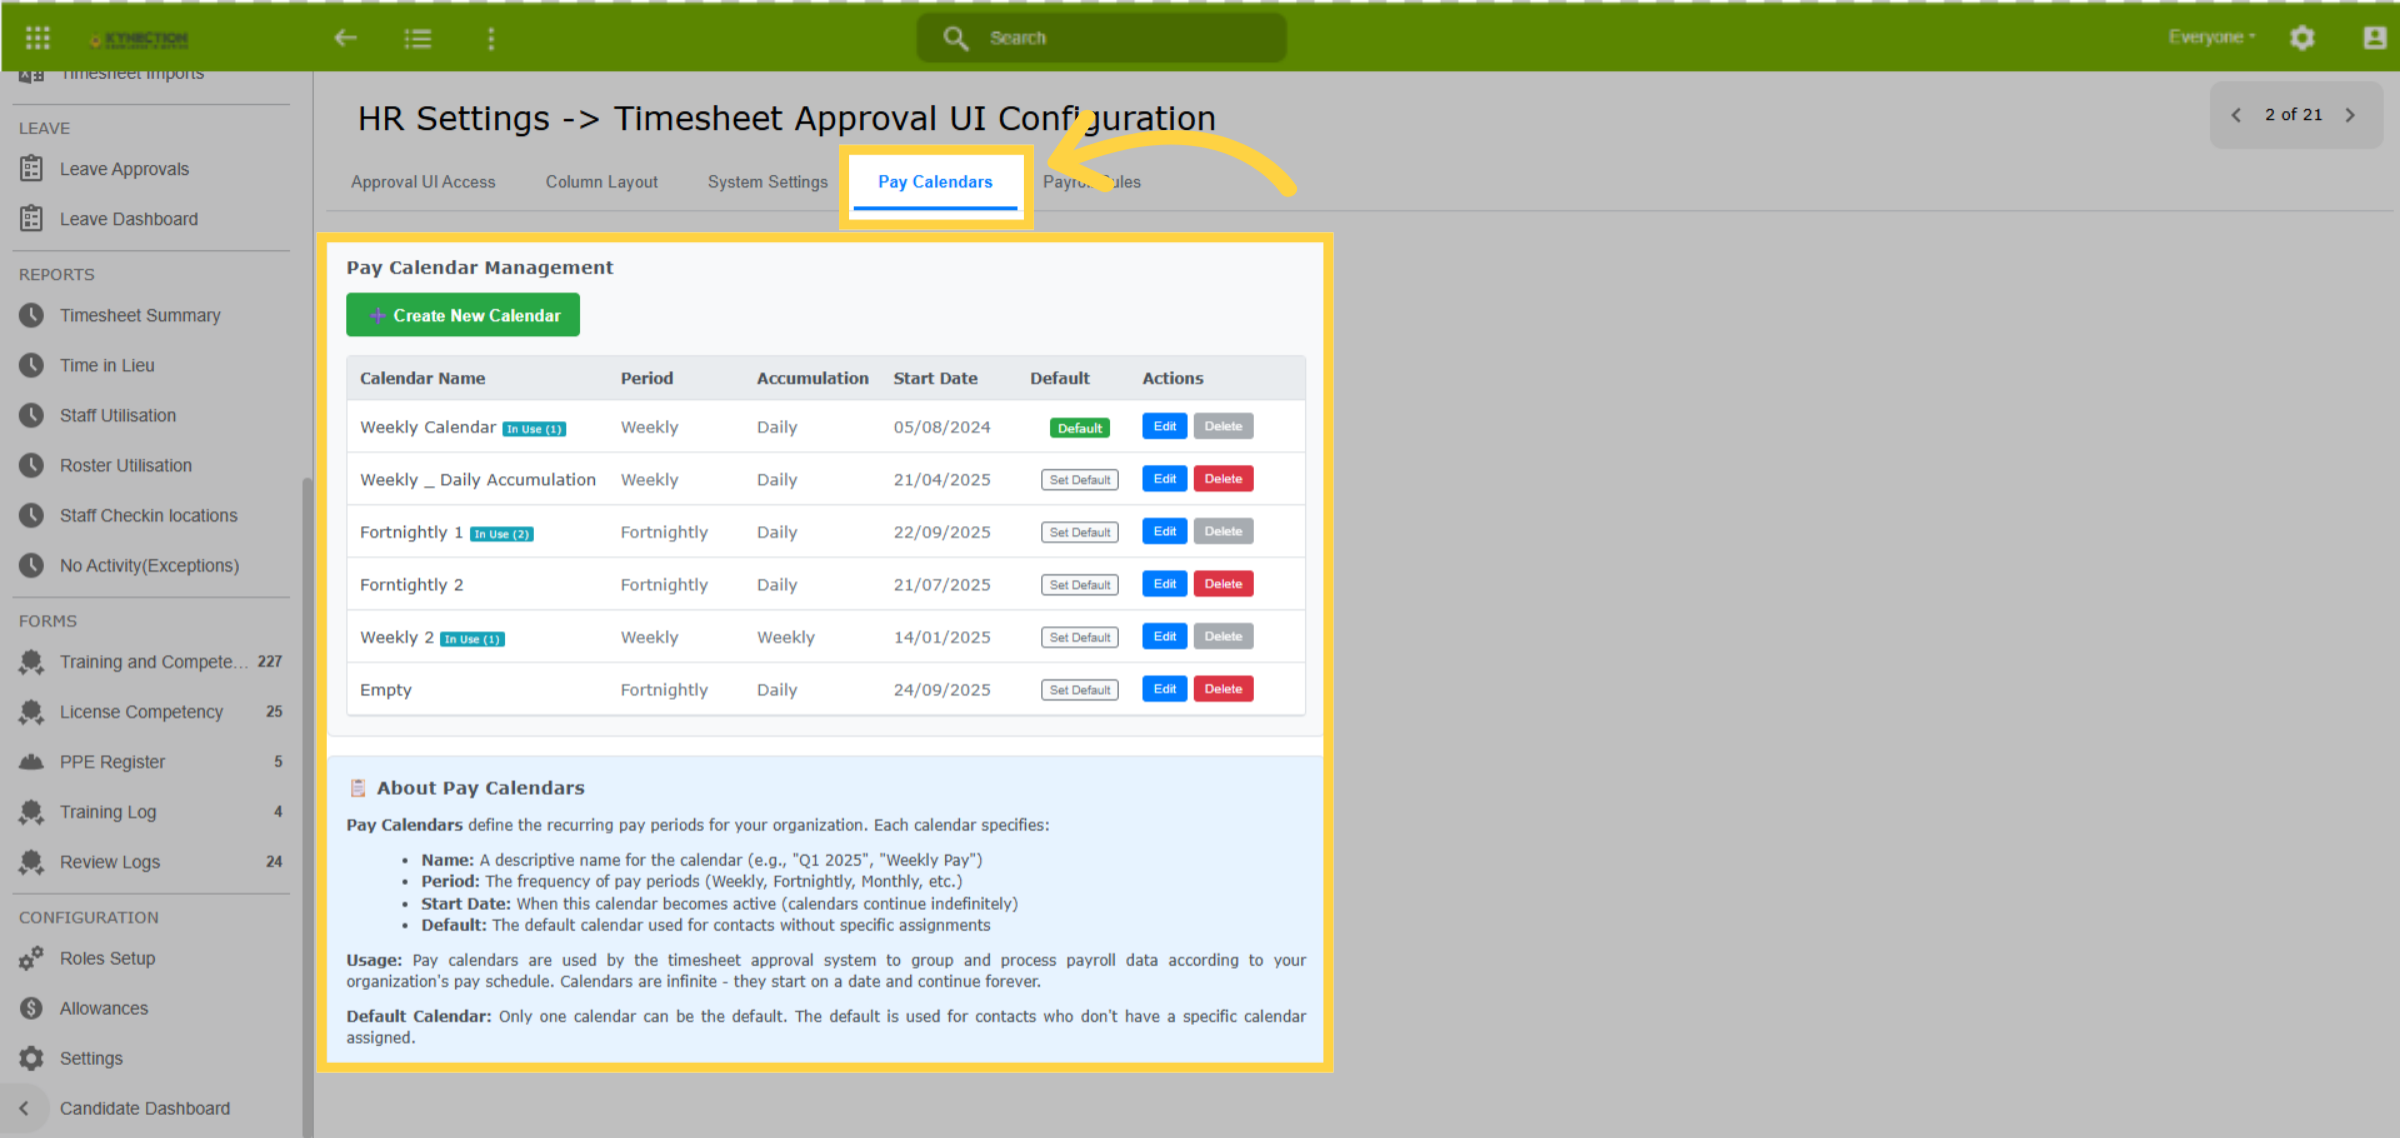
Pay Calendar captures details of pay periods and allows for the addition of multiple calendars. Timesheet Approval can simultaneously display several calendars, provided the pay periods align.
54. Edit Pay Calendar
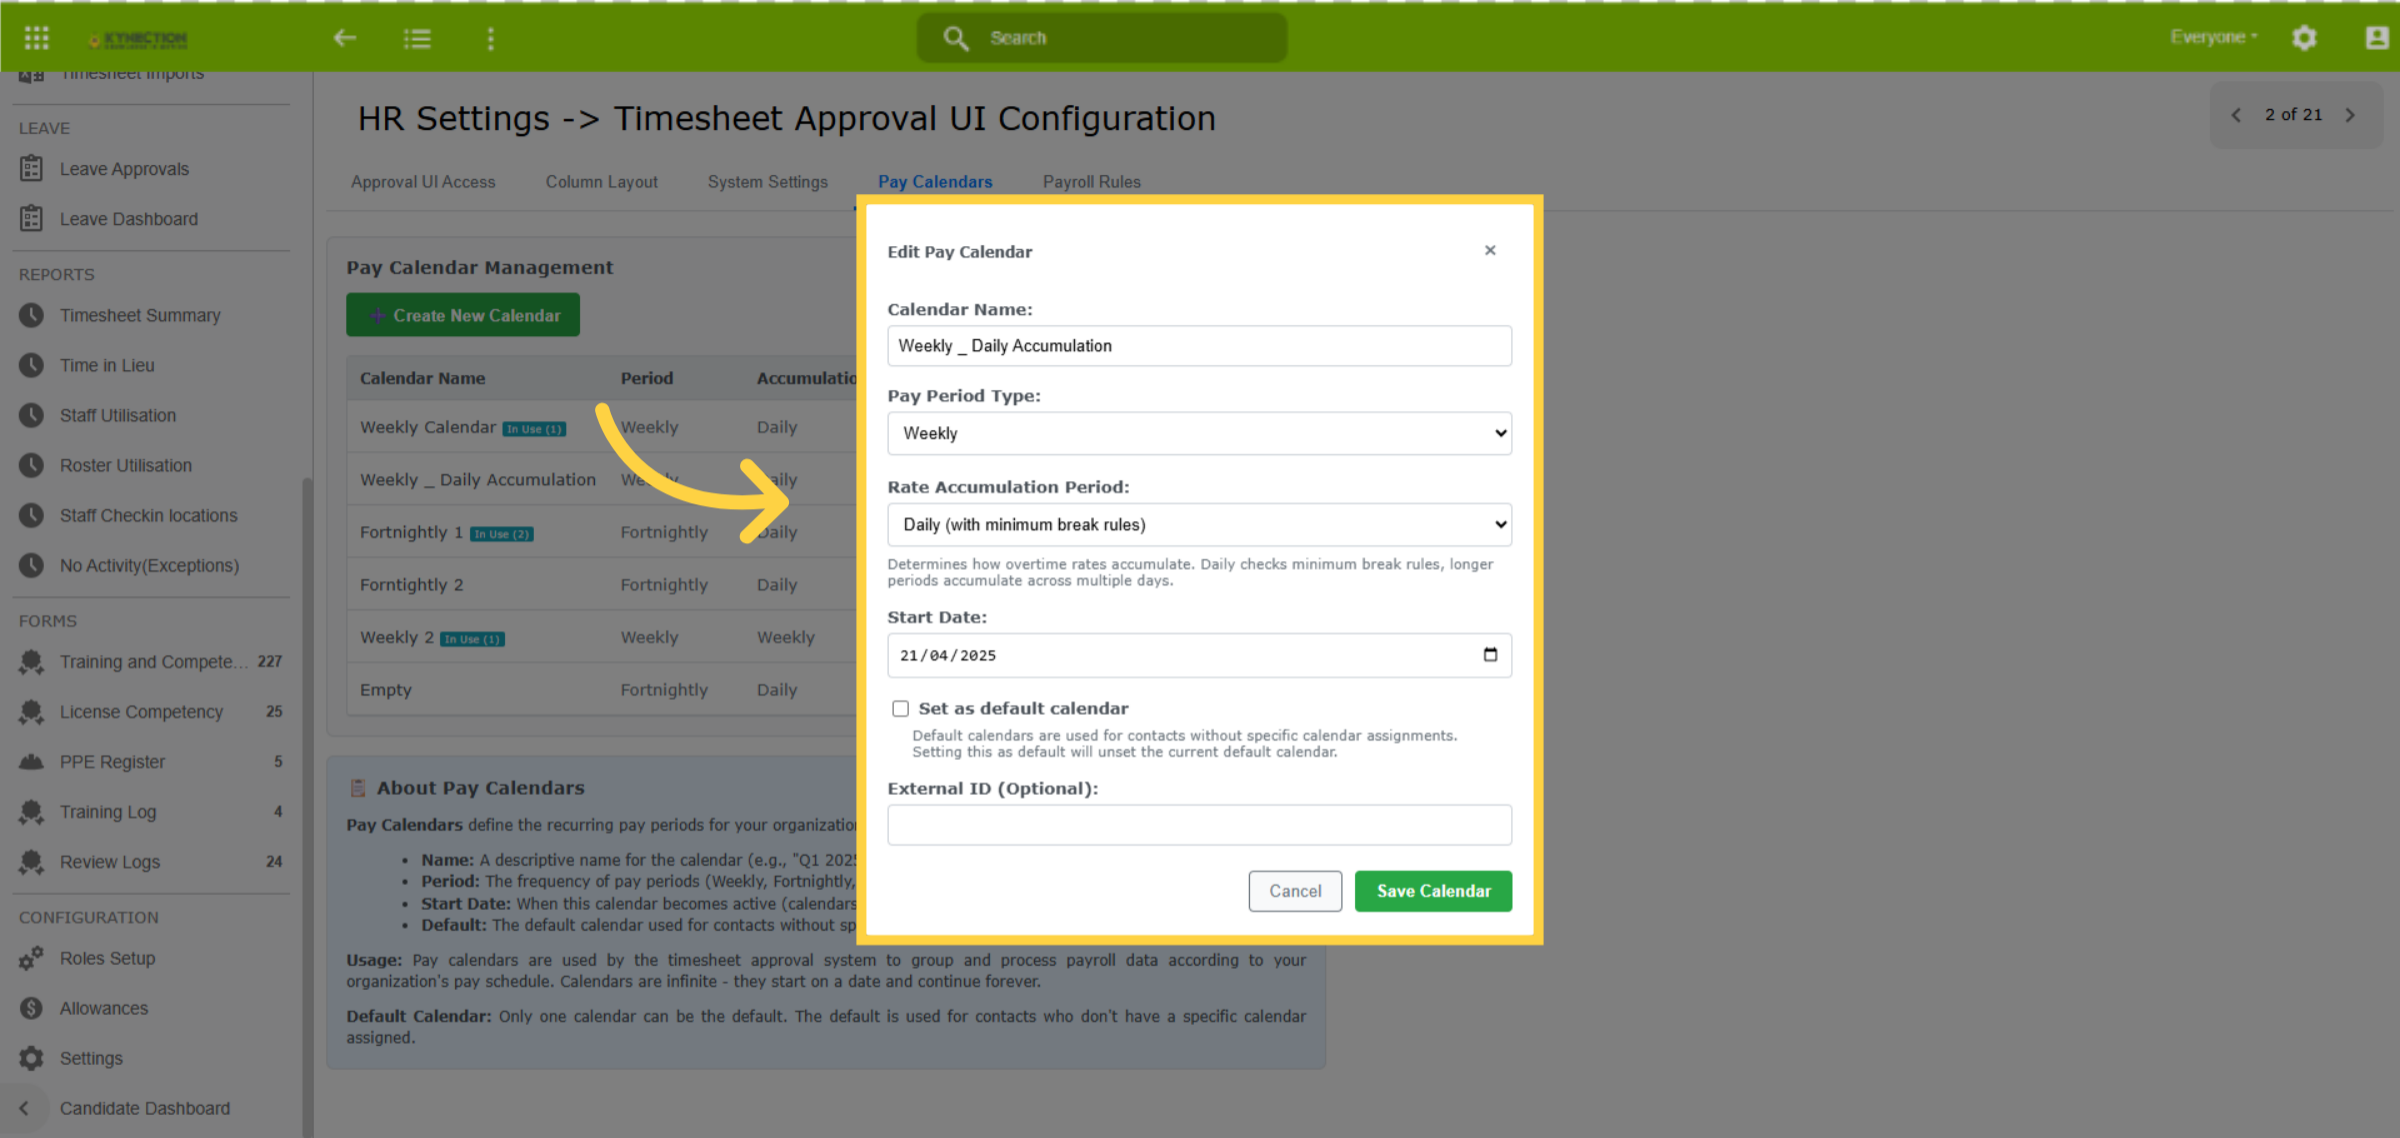
Edit Pay Calendar details, or create new calendars, as required. If overtime rates are based on exceeding the specified weekly hours, set the Rate Accumulation Period to weekly and configure the EBA shift accordingly.
55. Payroll Rules
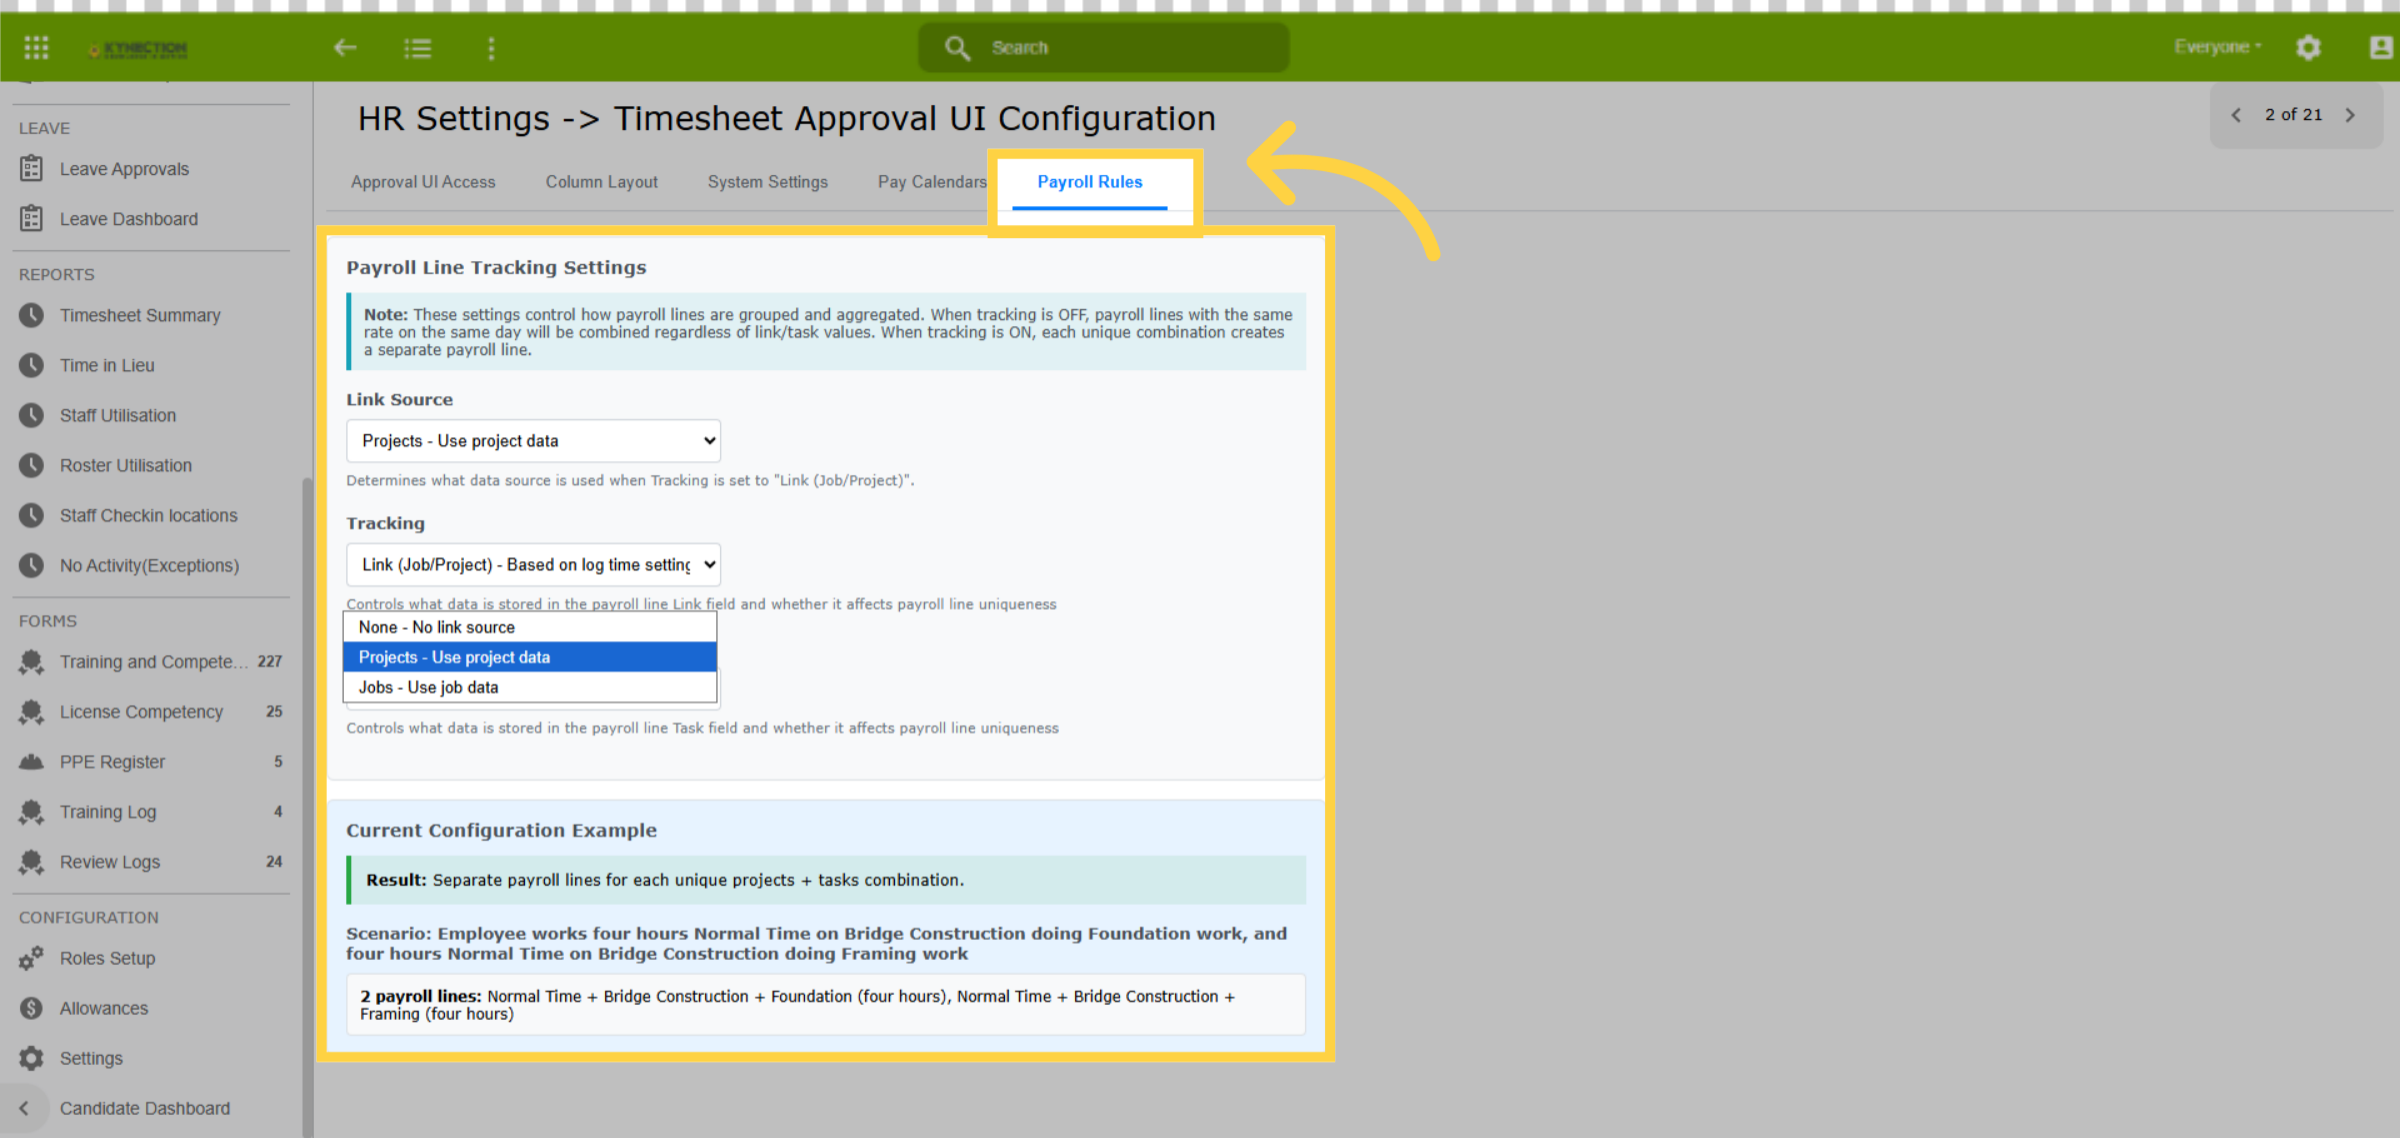
You can find the Tracking Settings for Payroll in the "Payroll Rules" tab. Payroll lines are organised by shift and summarised based on your selections. Here, you can configure Link Source, Tracking, and Sub-tracking options.
56. Timesheet Approval Section
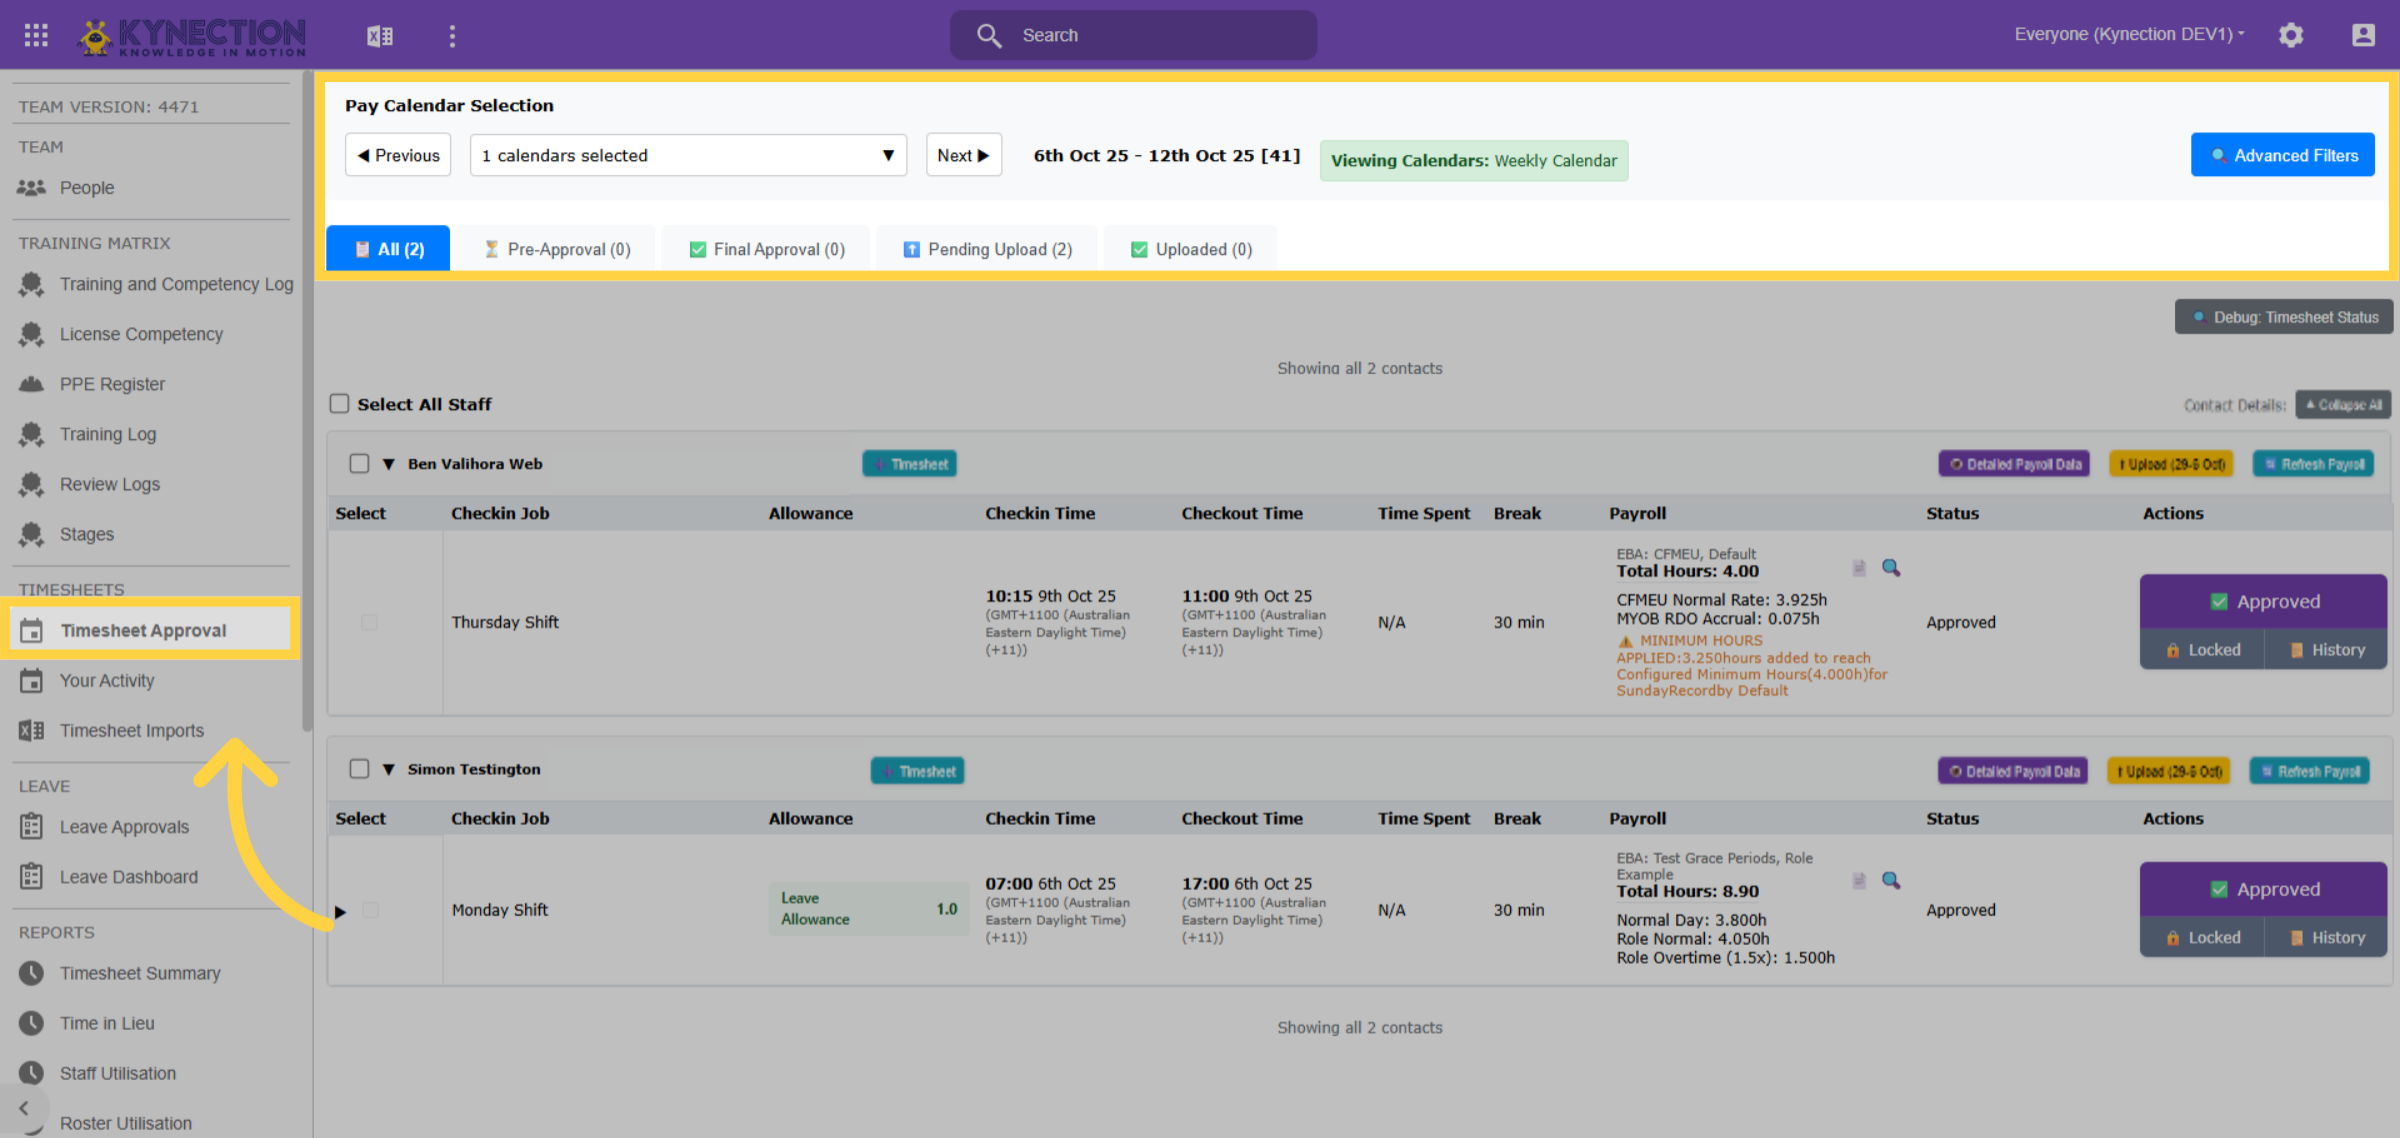
"Timesheet Approval" displays the Pay Calendar, pay period, and filters, at the top of the screen. Select the pay calendar from the dropdown menu, and use the "previous" and "next" buttons to view different pay periods. Timesheets can be viewed by approval categoryusing the top menu or "advanced filters" can also be applied.
57. Advanced Filters
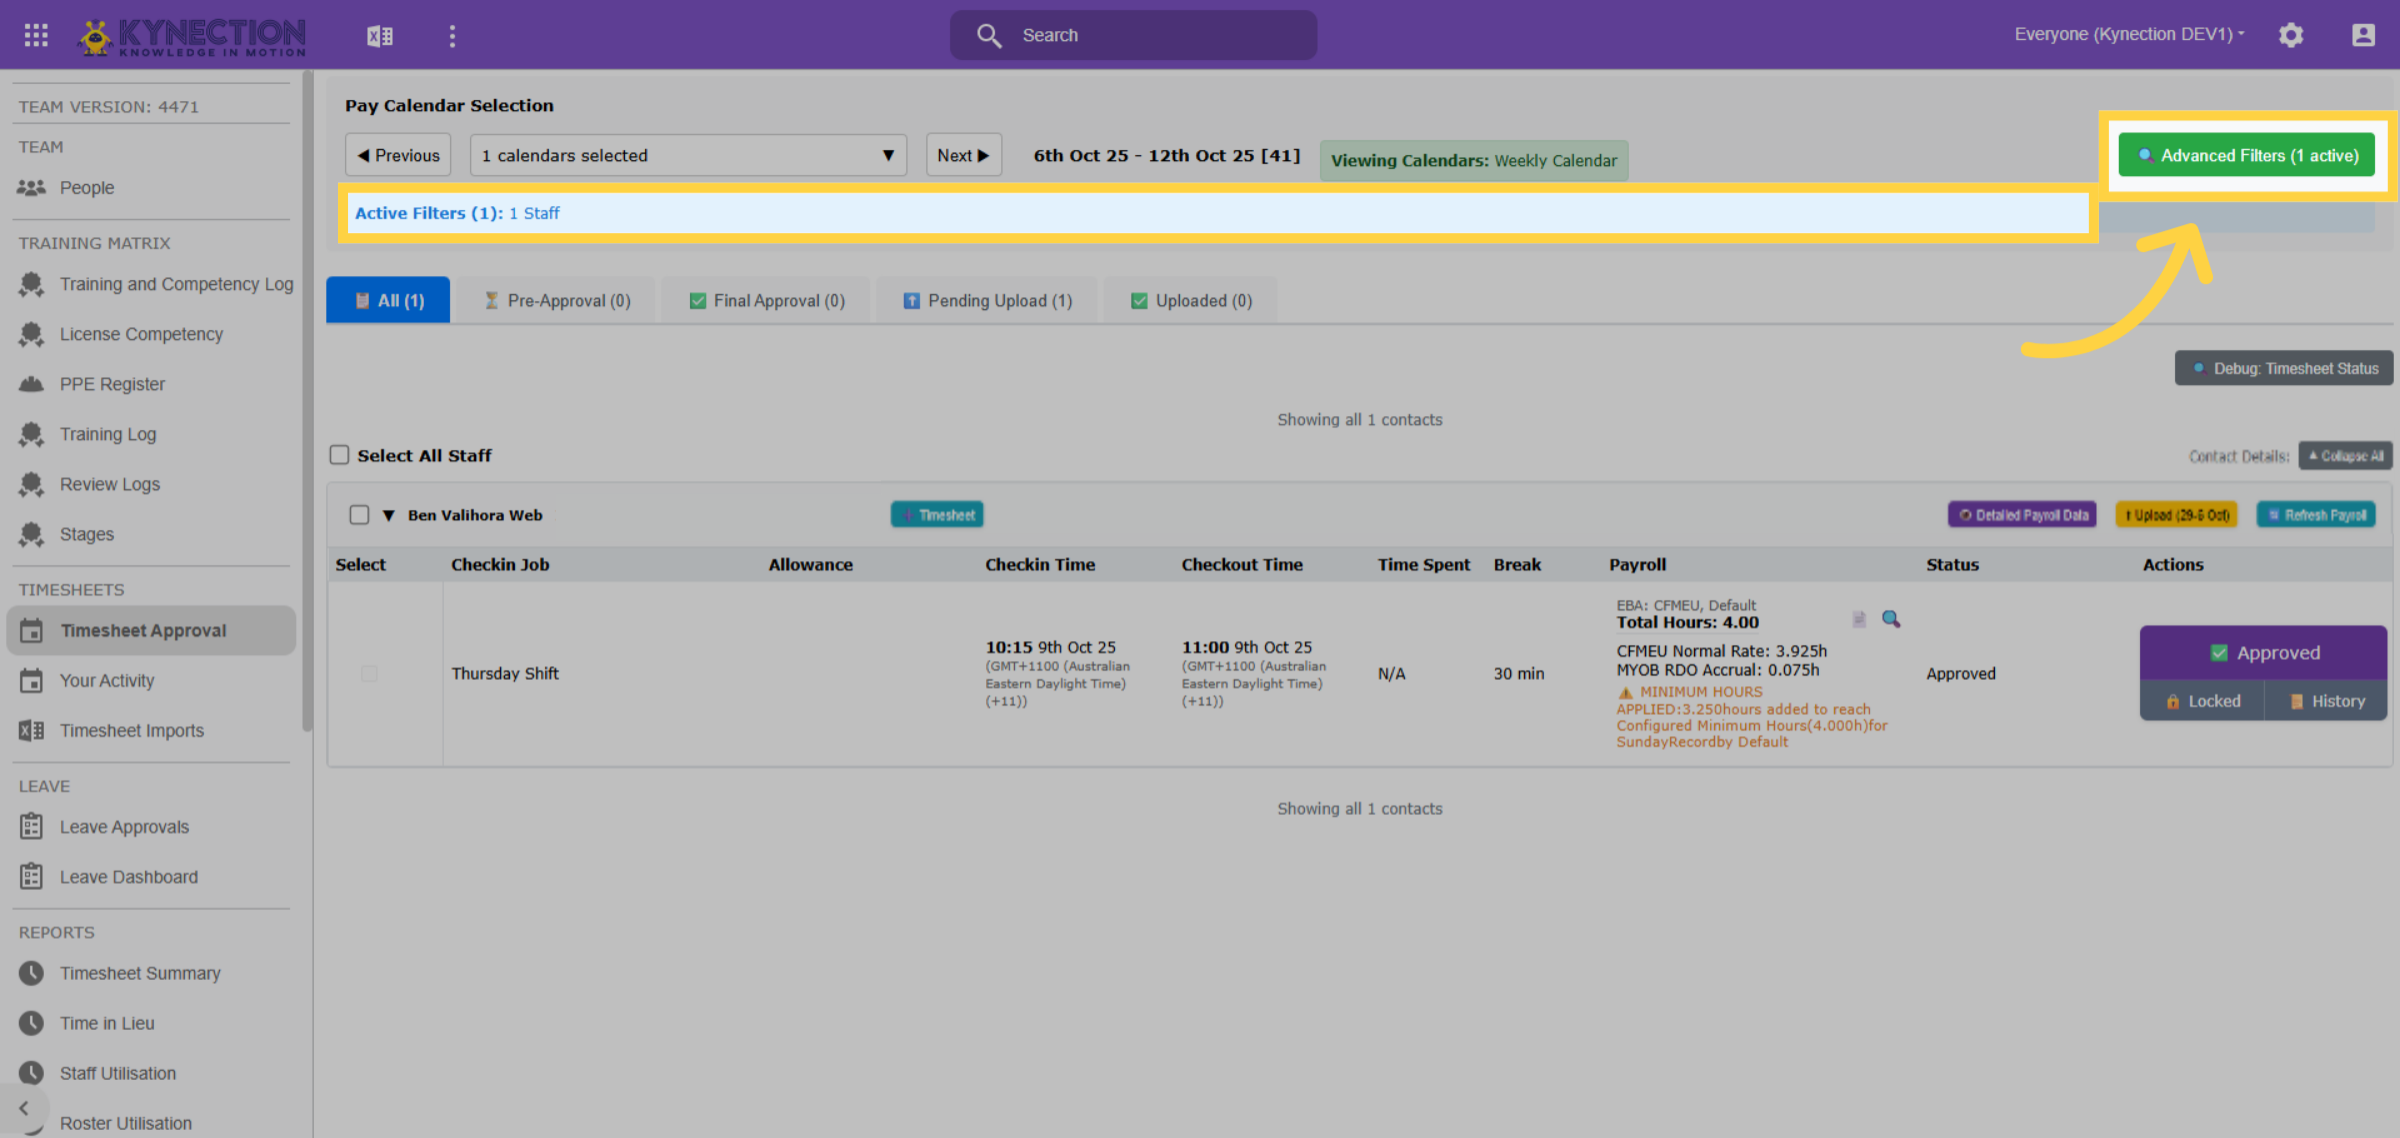
Advanced Filters provides filtering options such as Staff, Project, and EBA Group, with active filters shown beneath the pay calendar. Additionally, the "Advanced Filter" tab changes color and indicates the number of filters applied. Click the "Advanced Filters" tab to "Clear" filters.
58. Duplicates
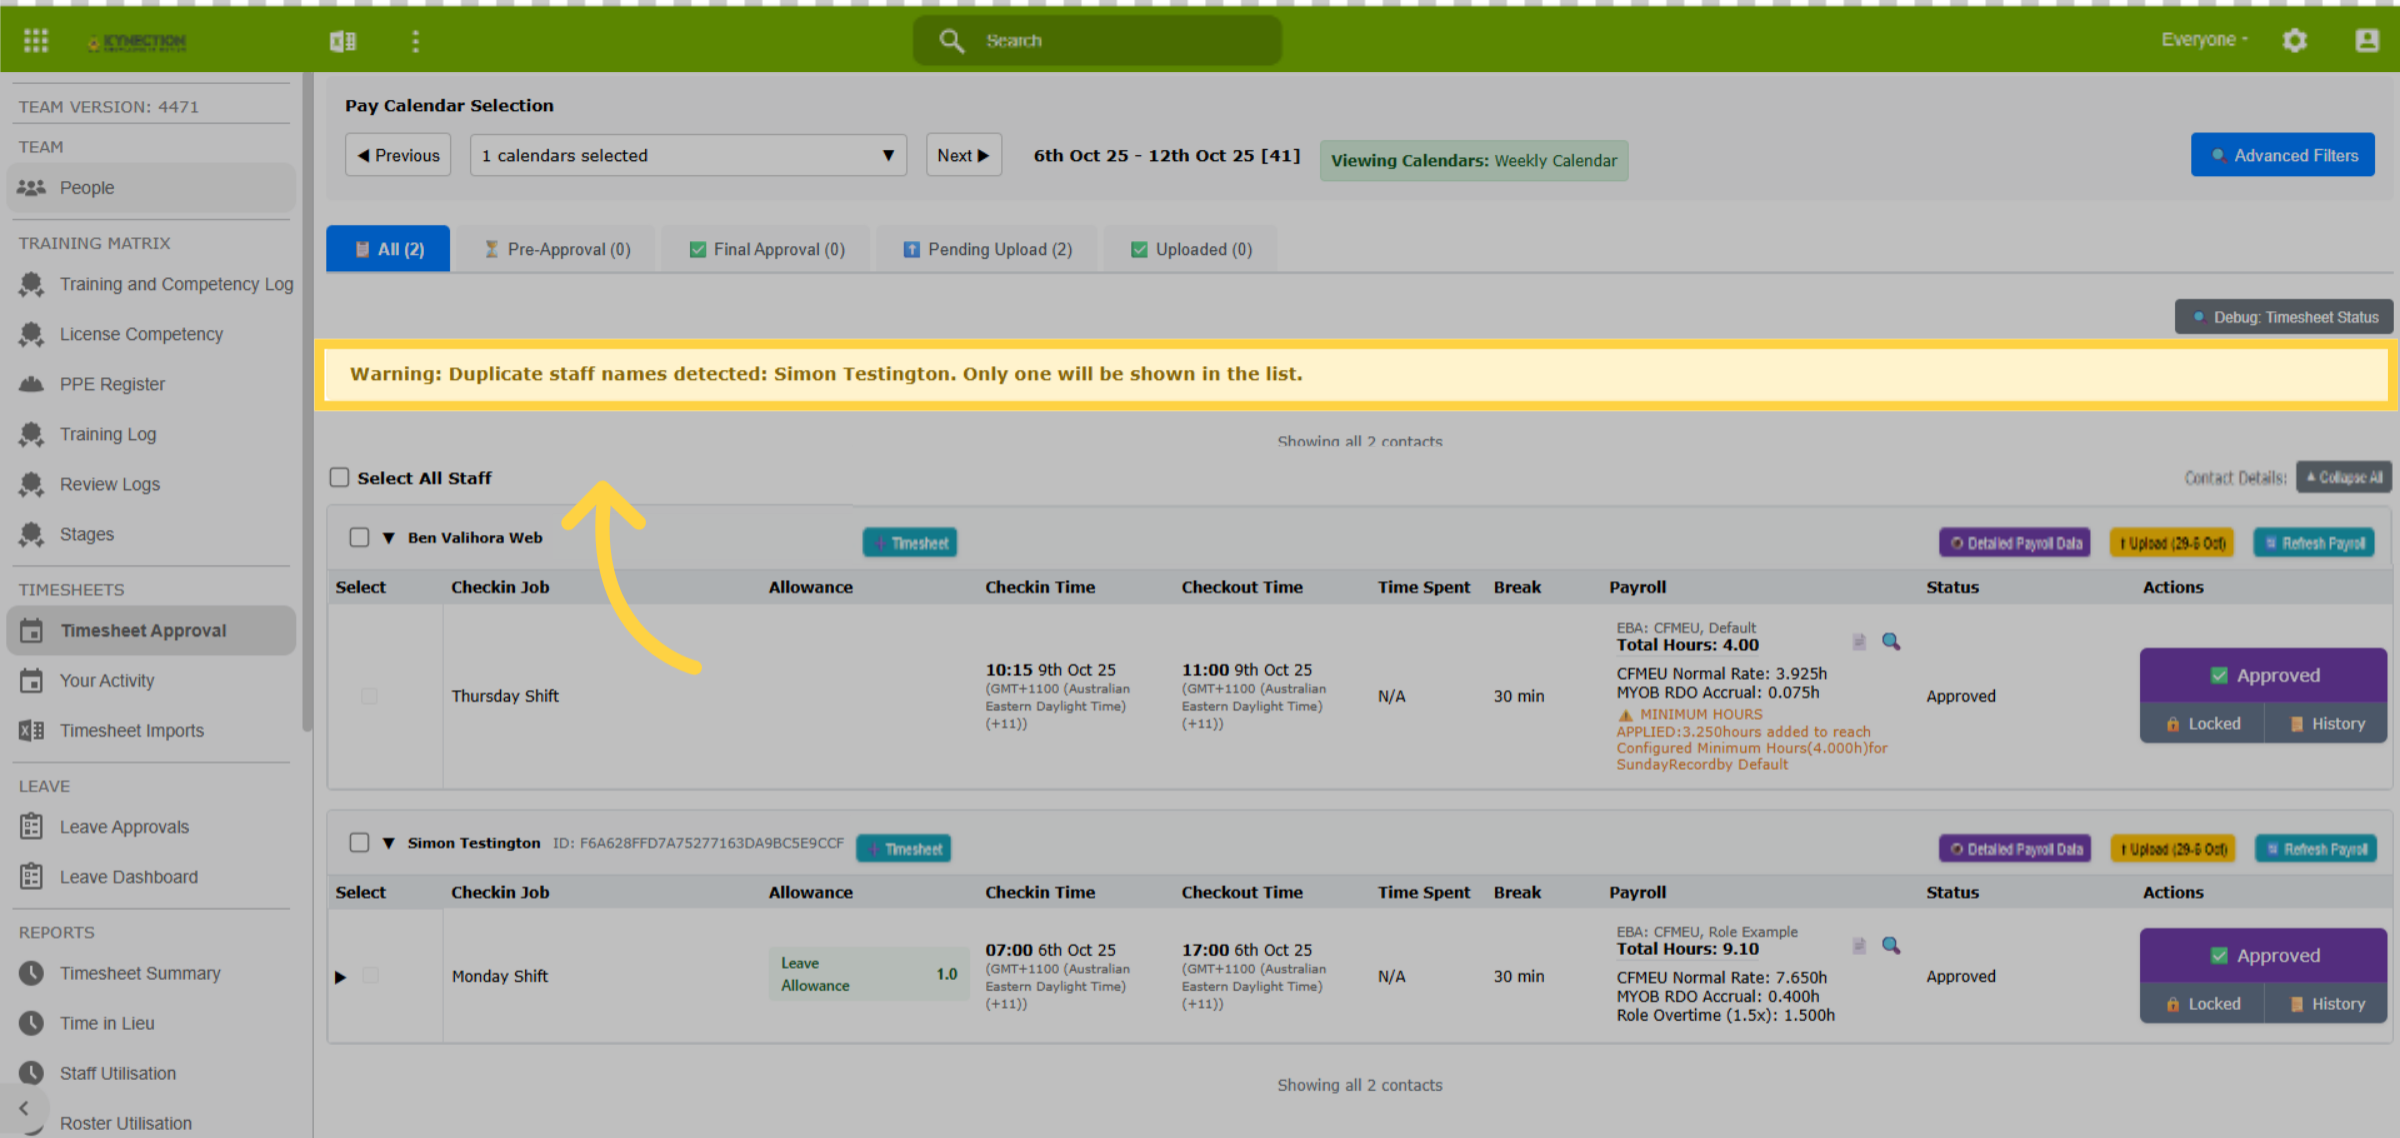
Duplicate staff contacts cause errors. If duplicates exist, a warning will appear. Additionally, if duplicate shift or job data is present, an error message will populate, and the records will be locked until the issue is resolved.
59. Timesheet Records
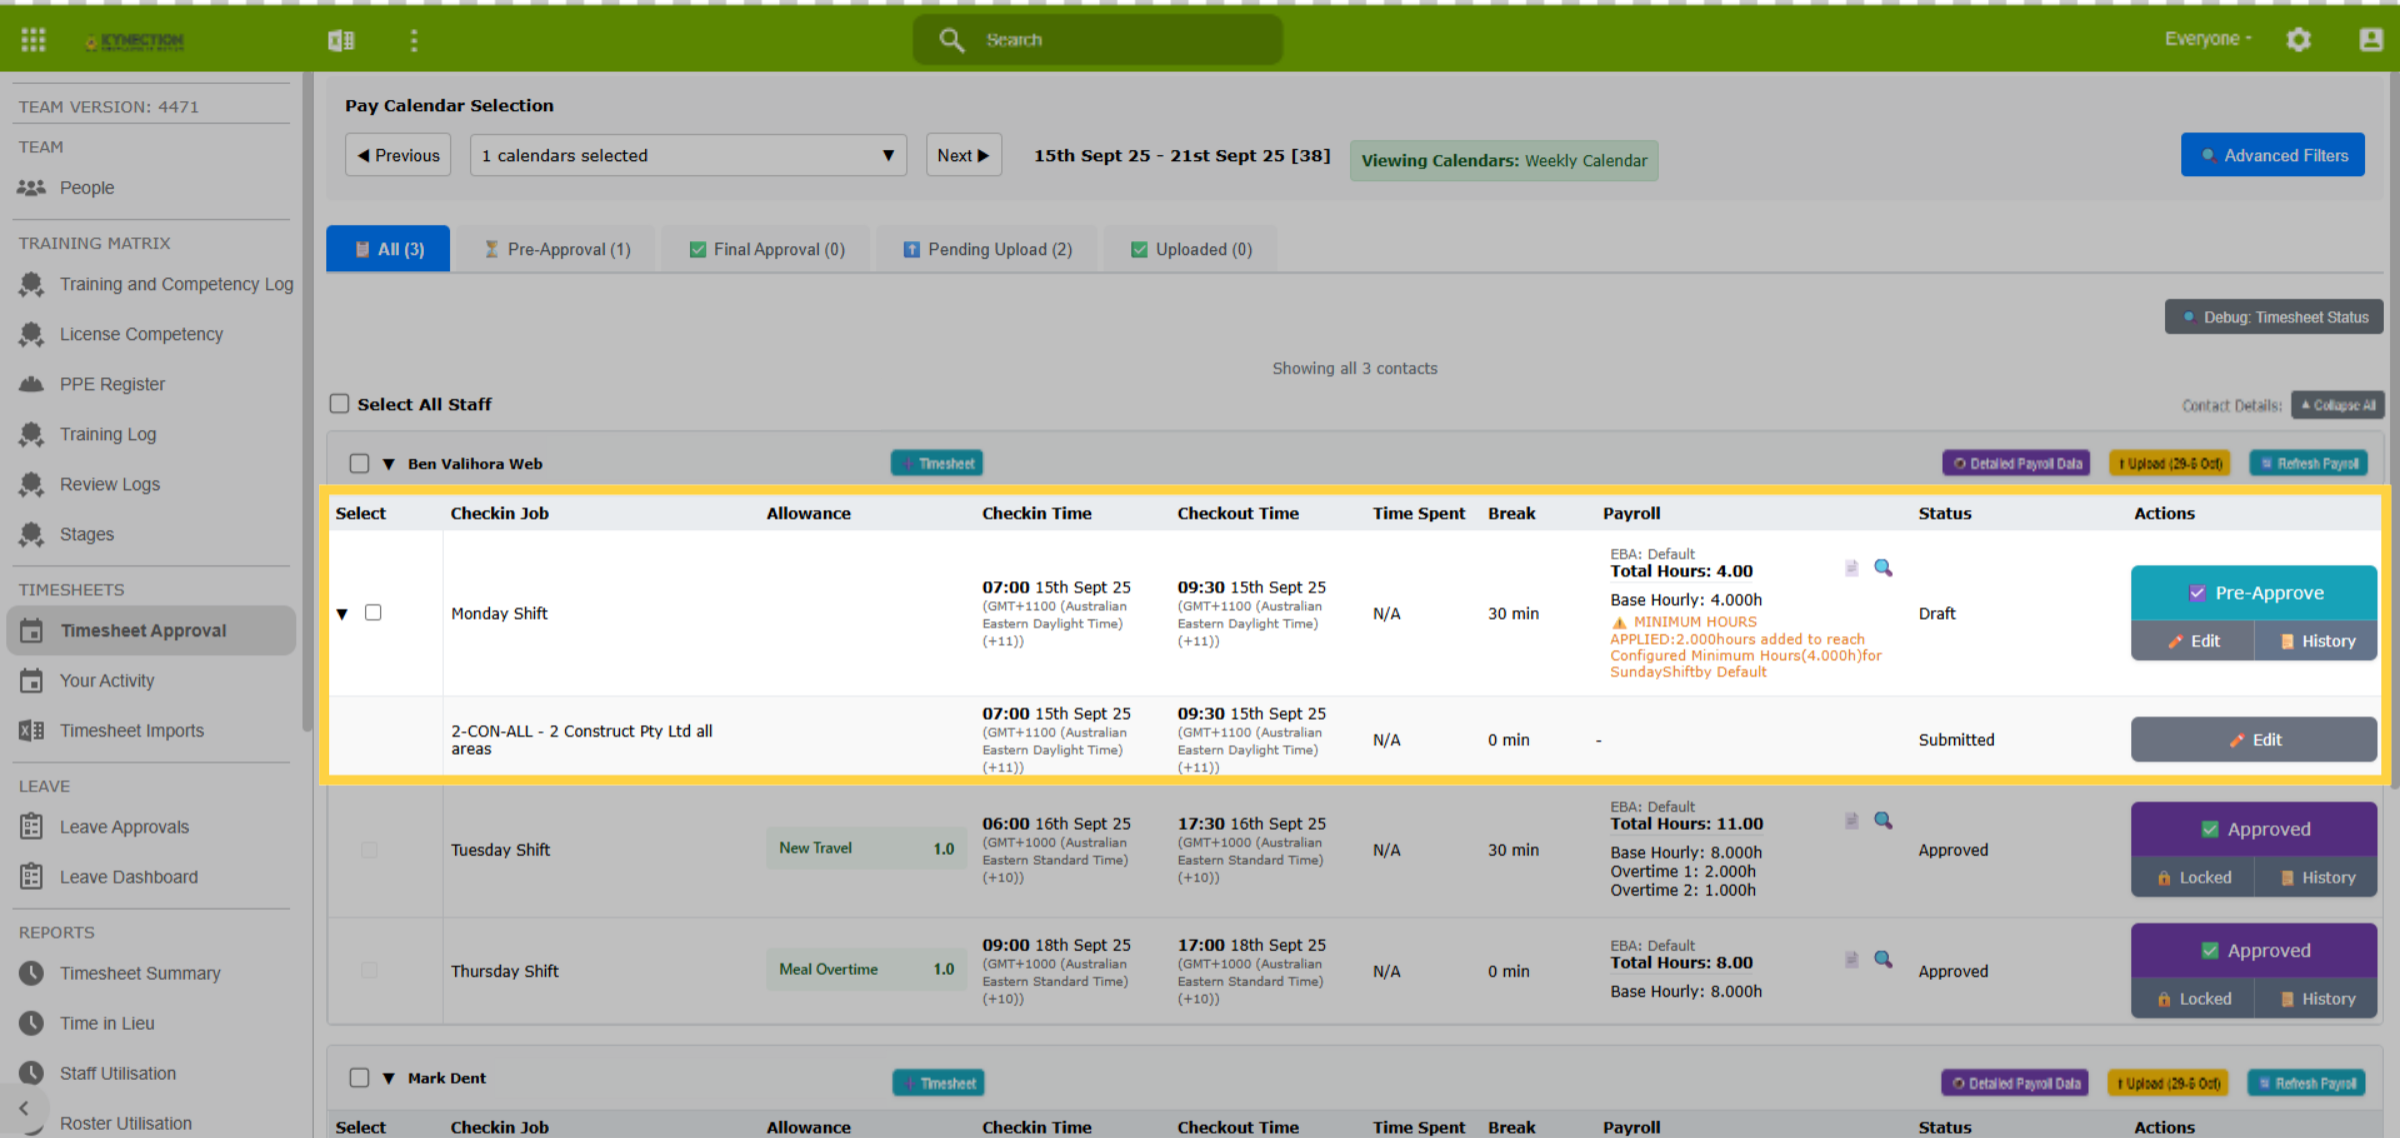
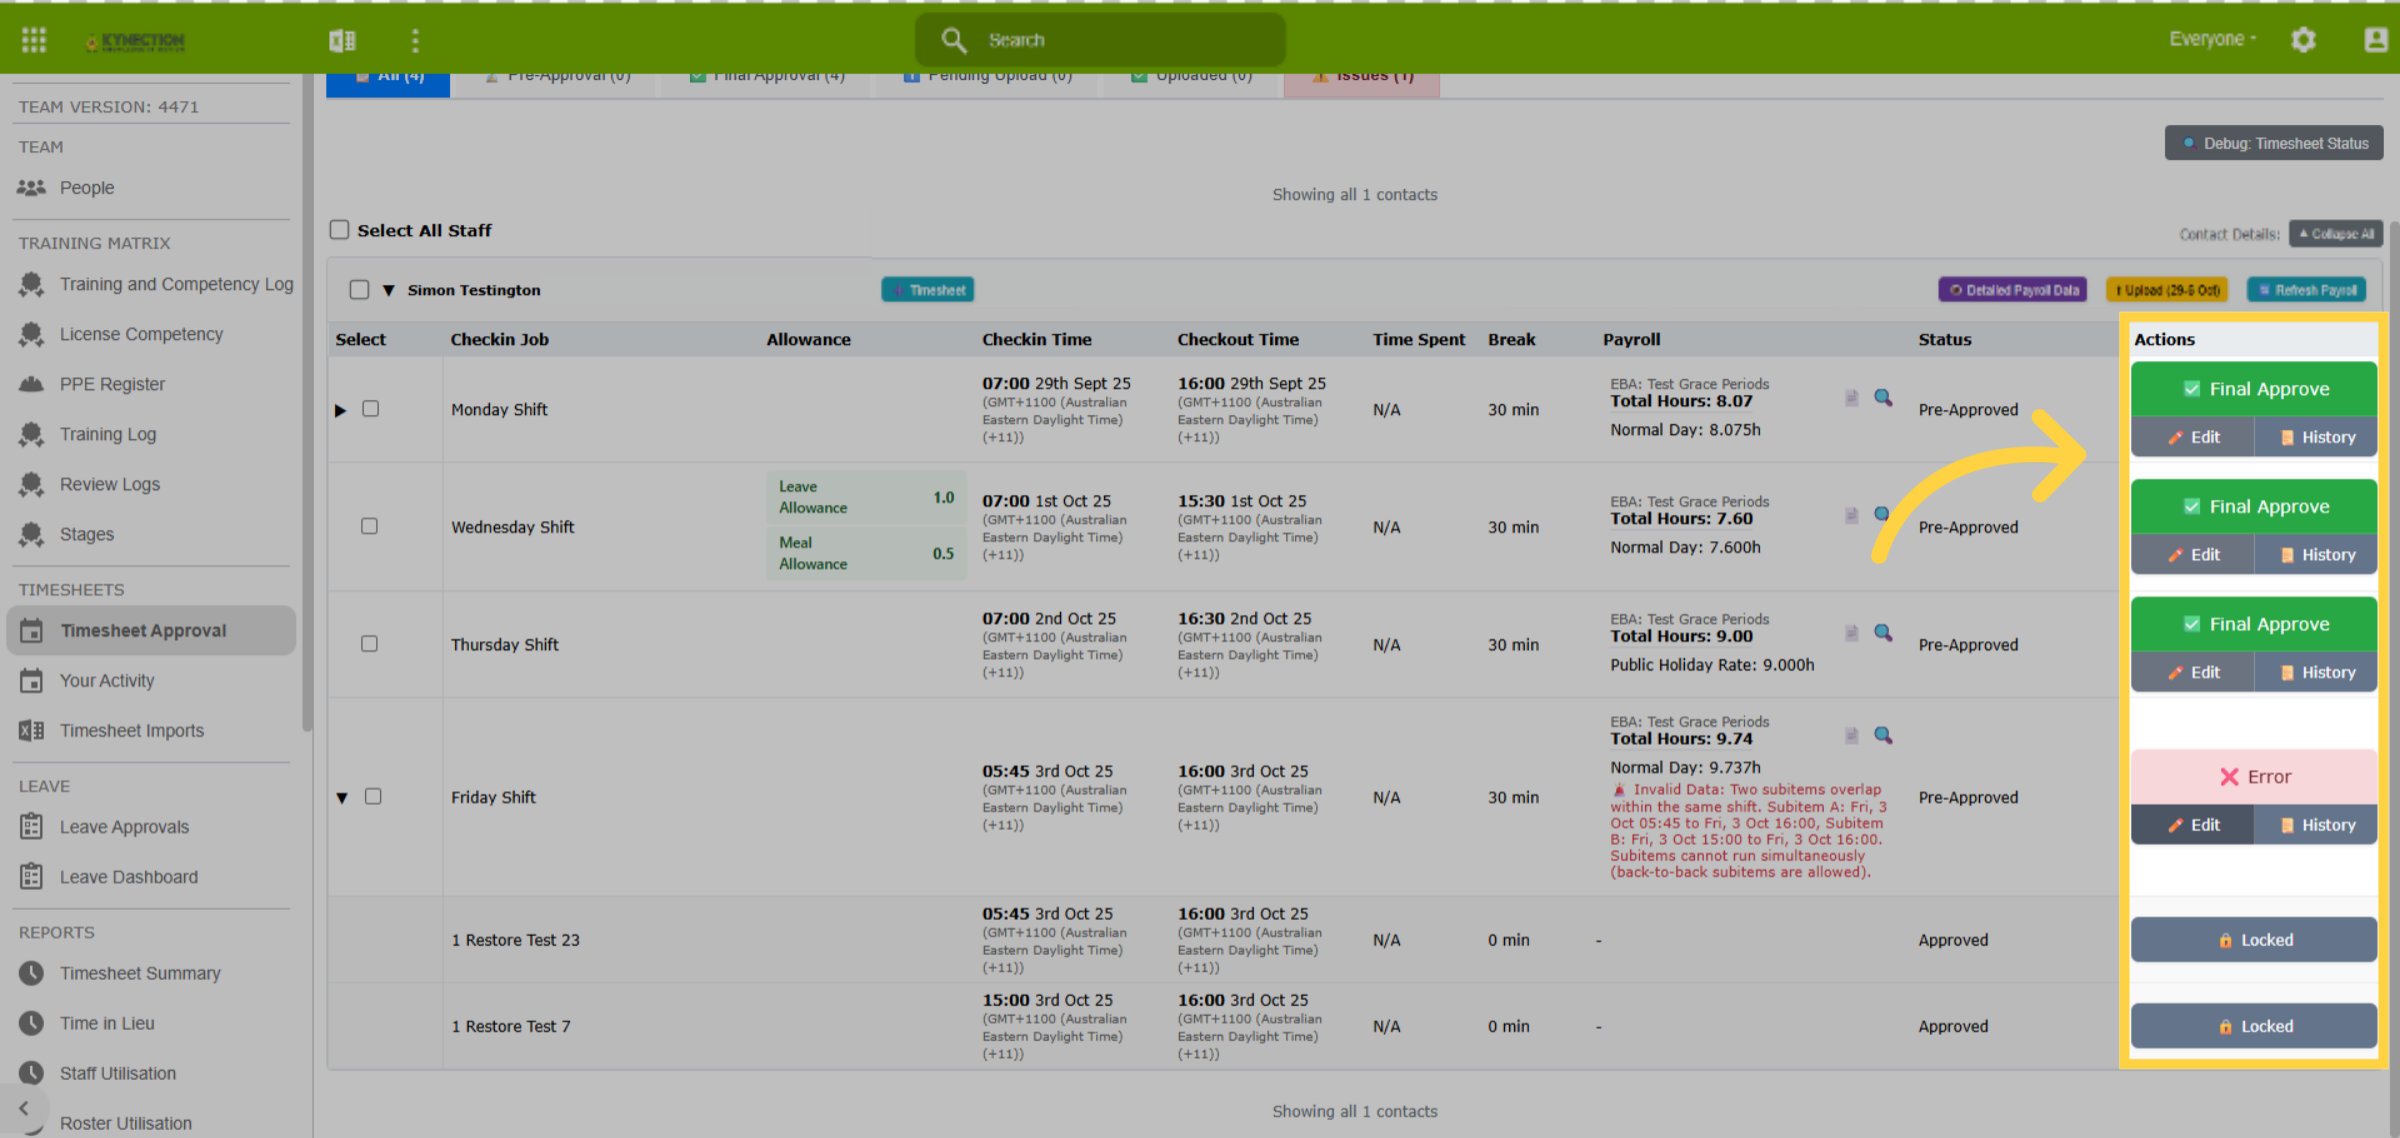
Black arrows, to the left of the shift data, signify the availability of linked job information. Click the arrow to expand and view the details. Warnings are highlighted in orange text for easy identification. Shifts with warnings can still be approved.
60. Timesheet Errors
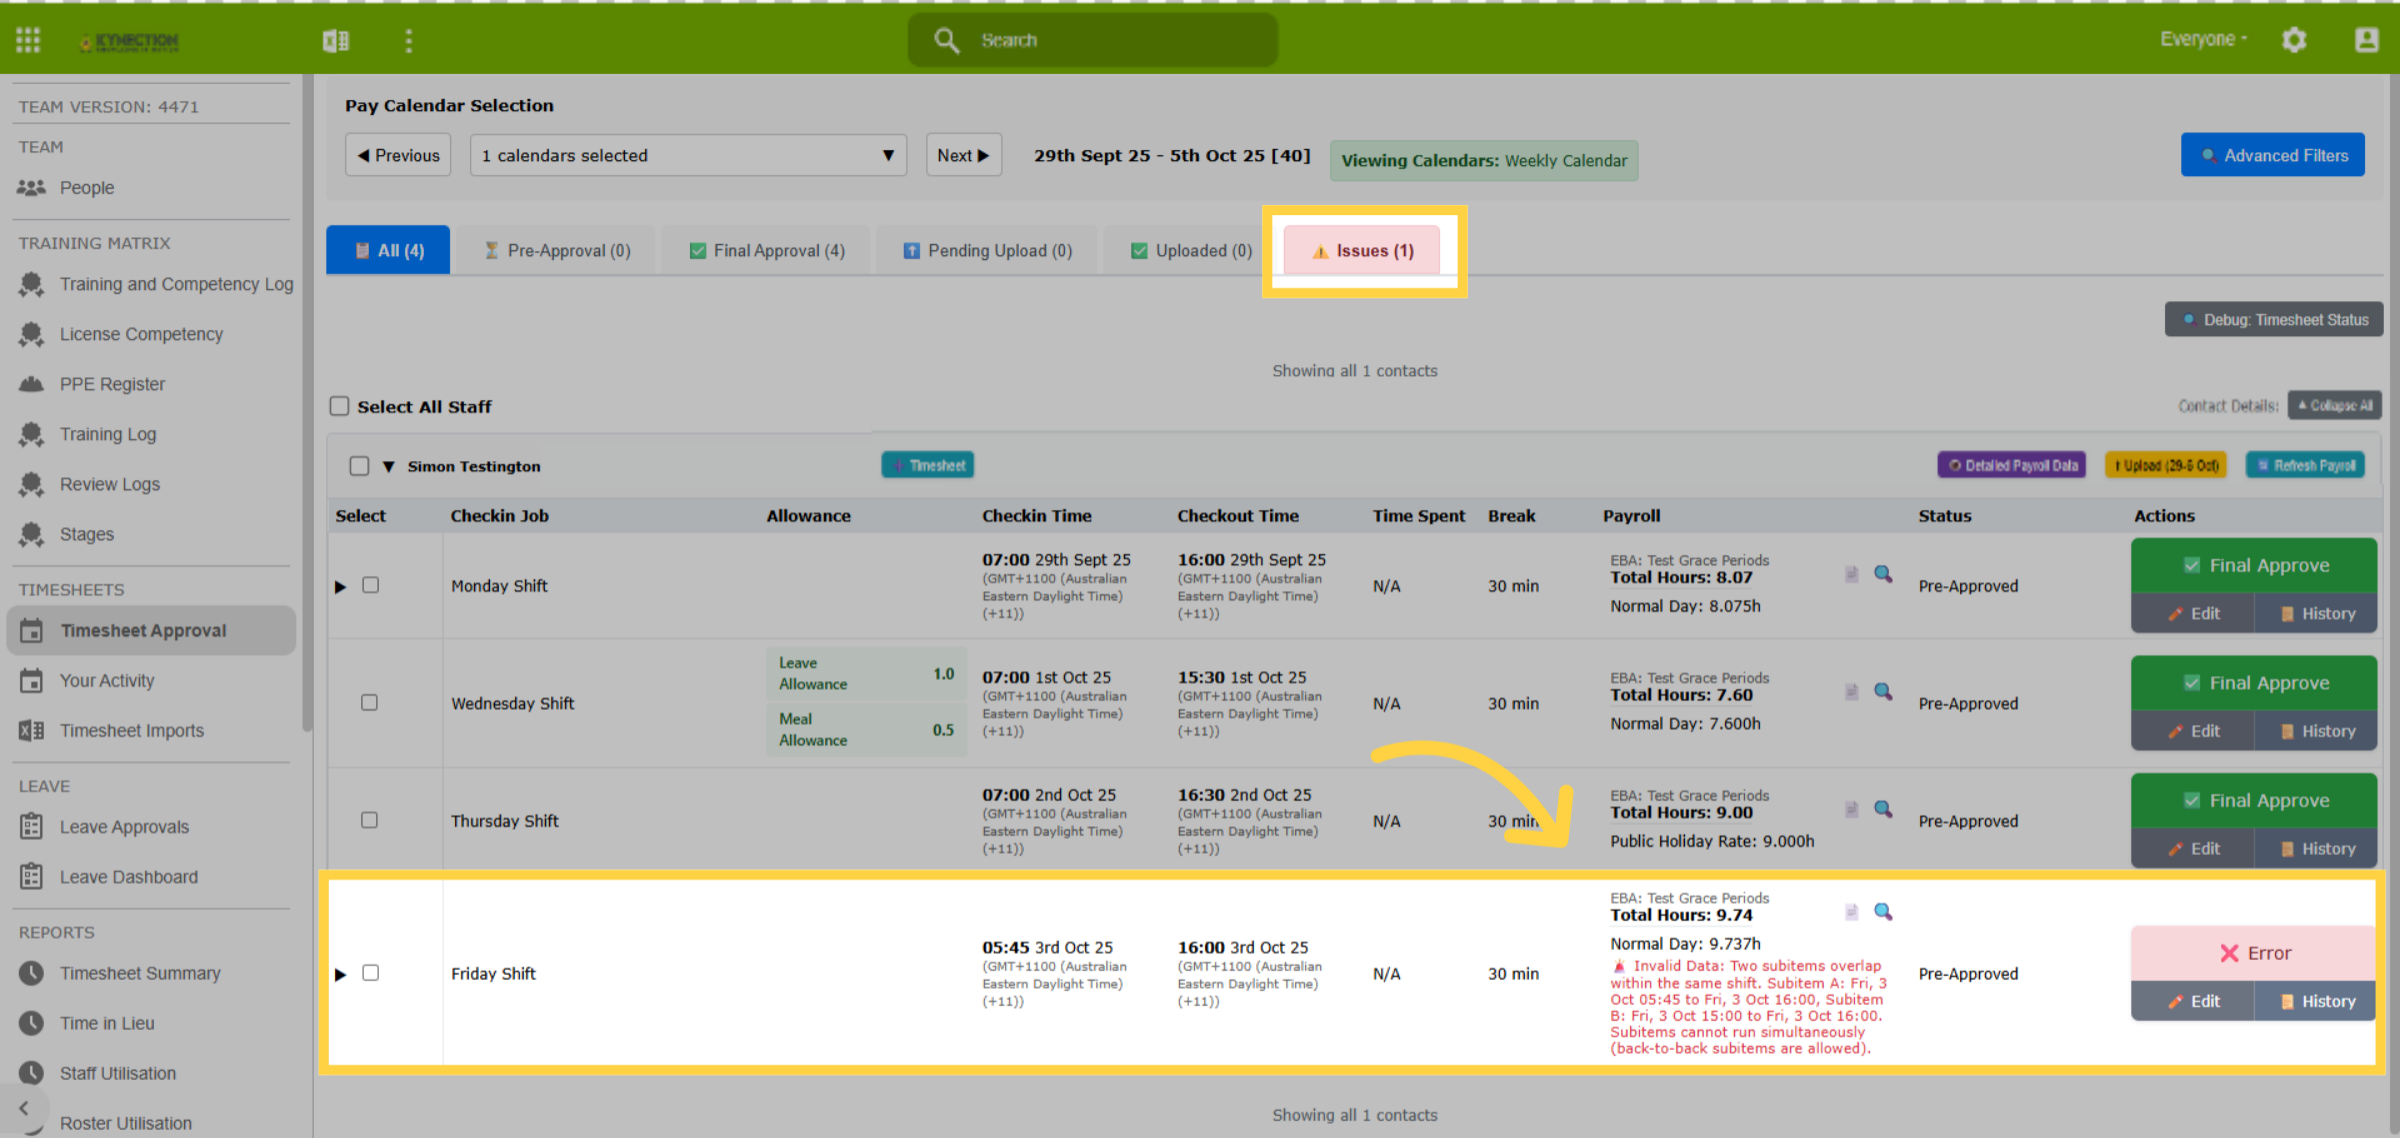
Timesheet errors prevent records from being approved. The action column displays an error if one is present, and details of the error appear in red text. Easily identify and rectify errors using the filter tab for "Issues," which consolidates errors on the current page of timesheets.
61. Actions Column
The "Actions" column provides options to Approve records by tapping the appropriate Pre-Approval or Final Approval buttons. The "Edit" button enables records to be modified, while the "History" button shows the timesheet tracking logs.
62. Actions Column - Edit
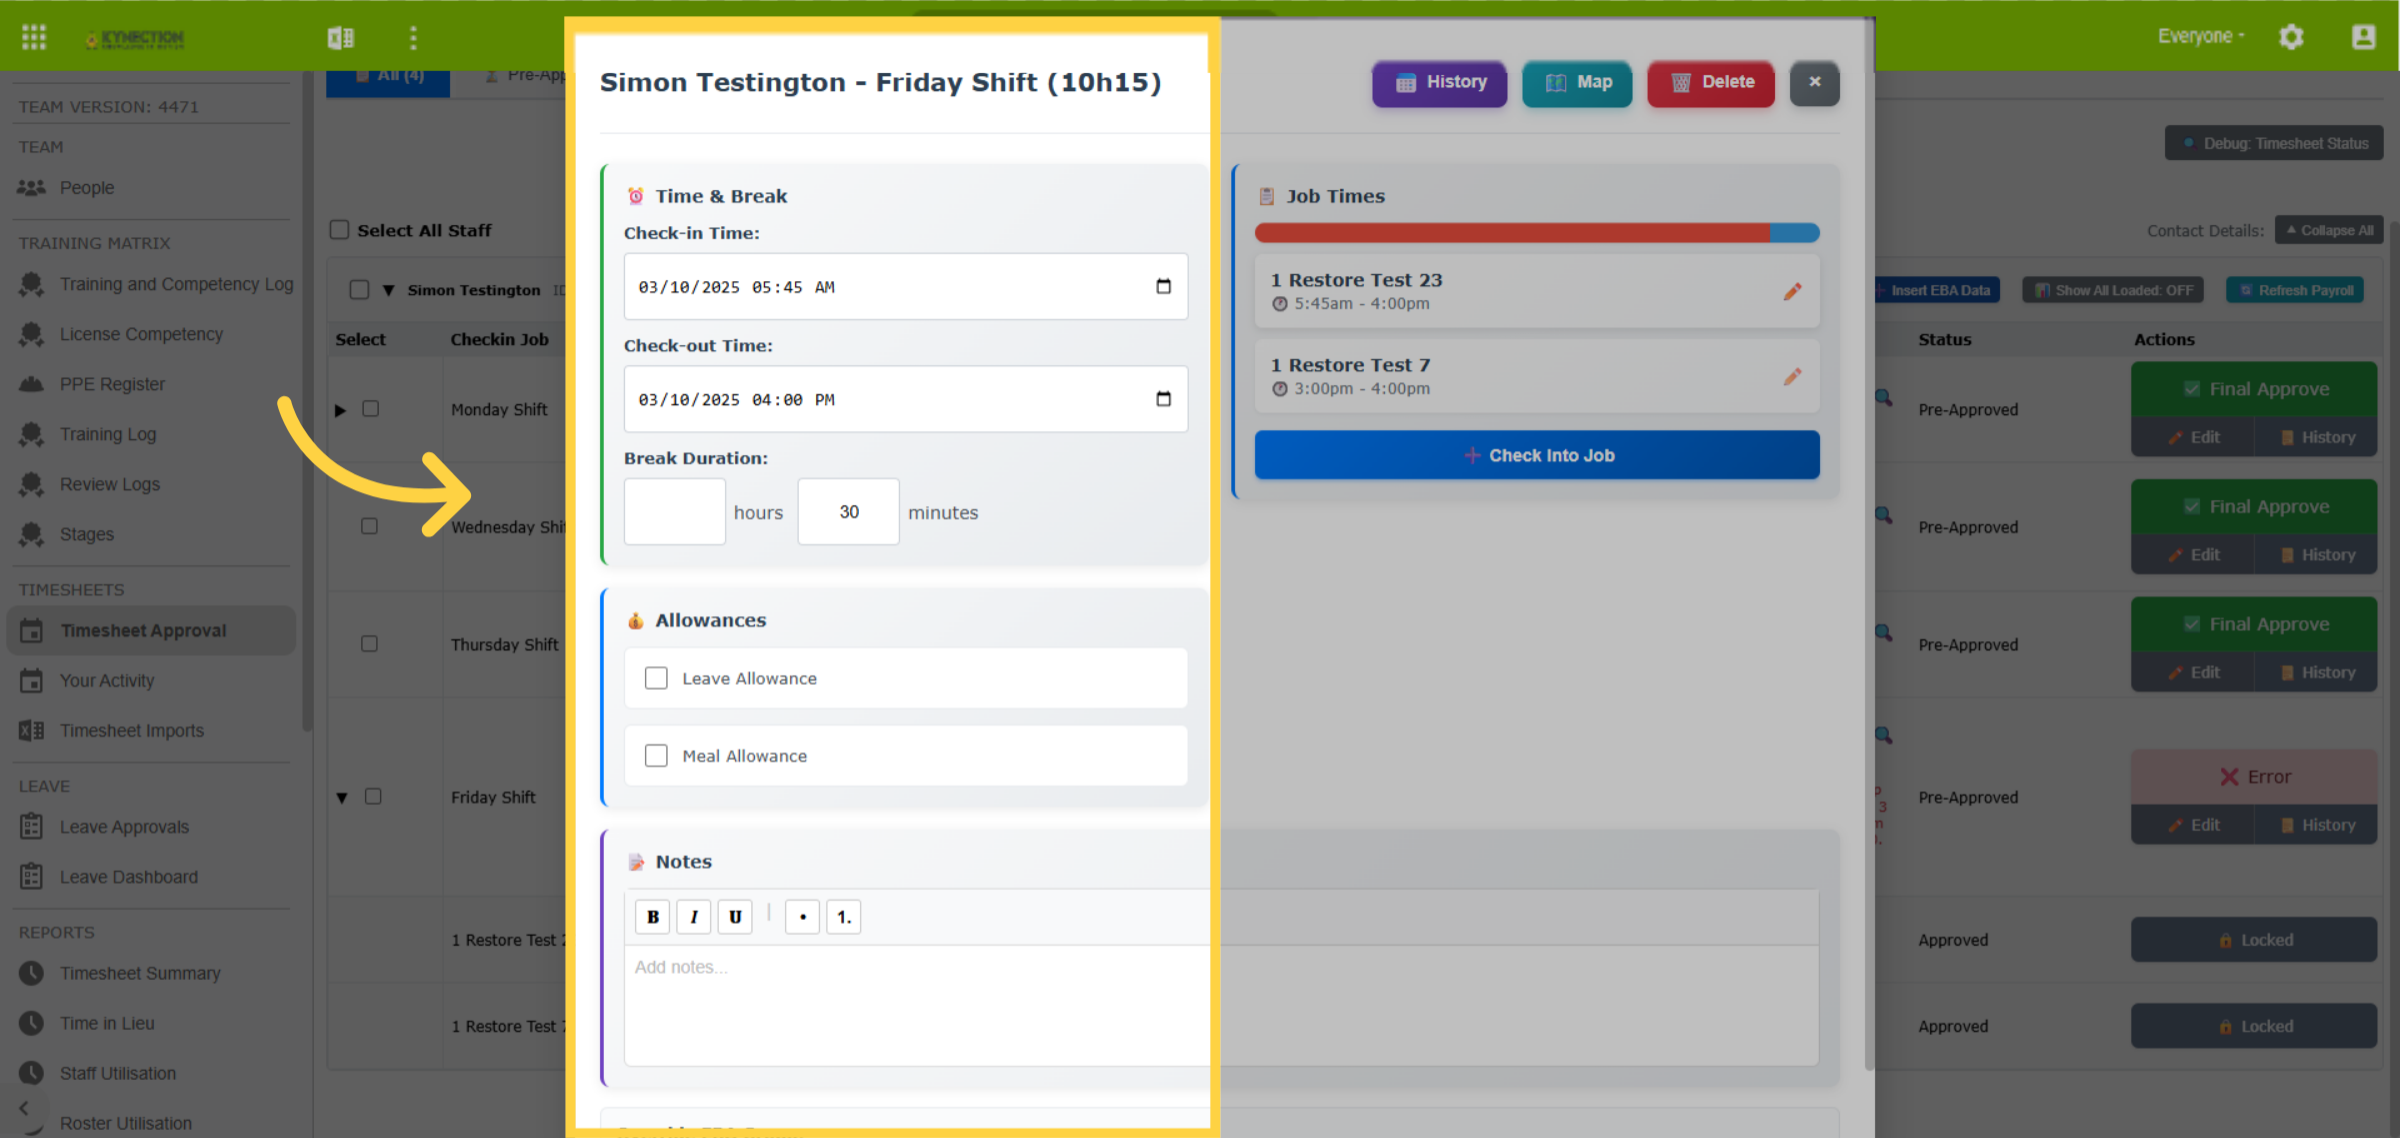
The "Edit" button, located in the "Action" column, displays shift data on the left and job data on the right. Shift data includes times, breaks, allowances, and the ability to override the EBA Group. Click on the job times for further details.
63. Job Data
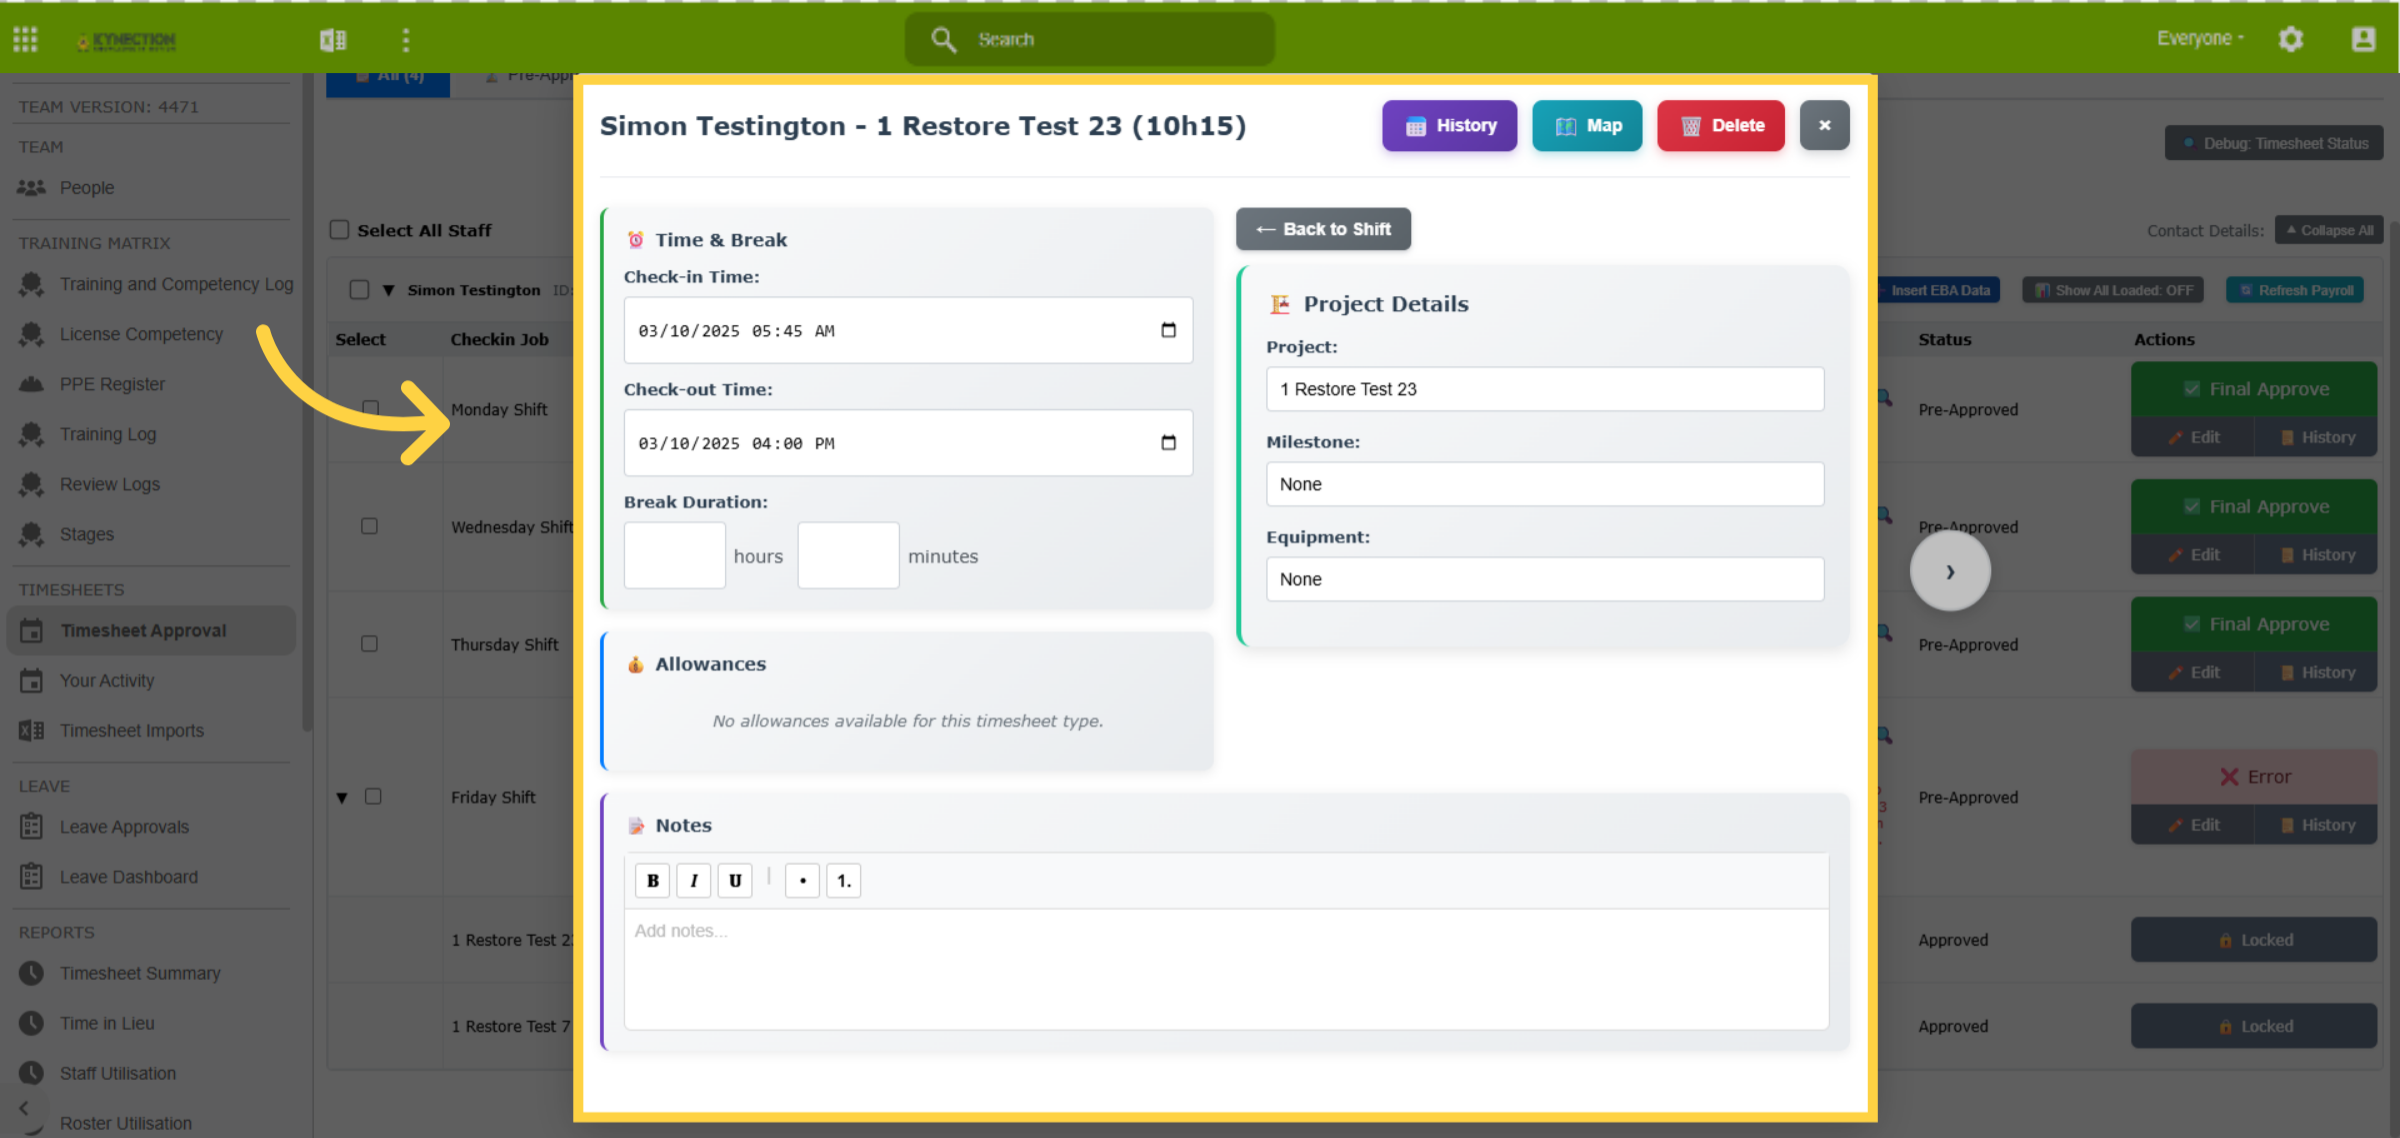
Job details, including times, breaks, allowances, and project alignment, can be viewed and edited. Any changes made to the hours against the job will only apply to timesheets and not the job itself. Arrow back to the shift to save changes.
64. Actions Column - History
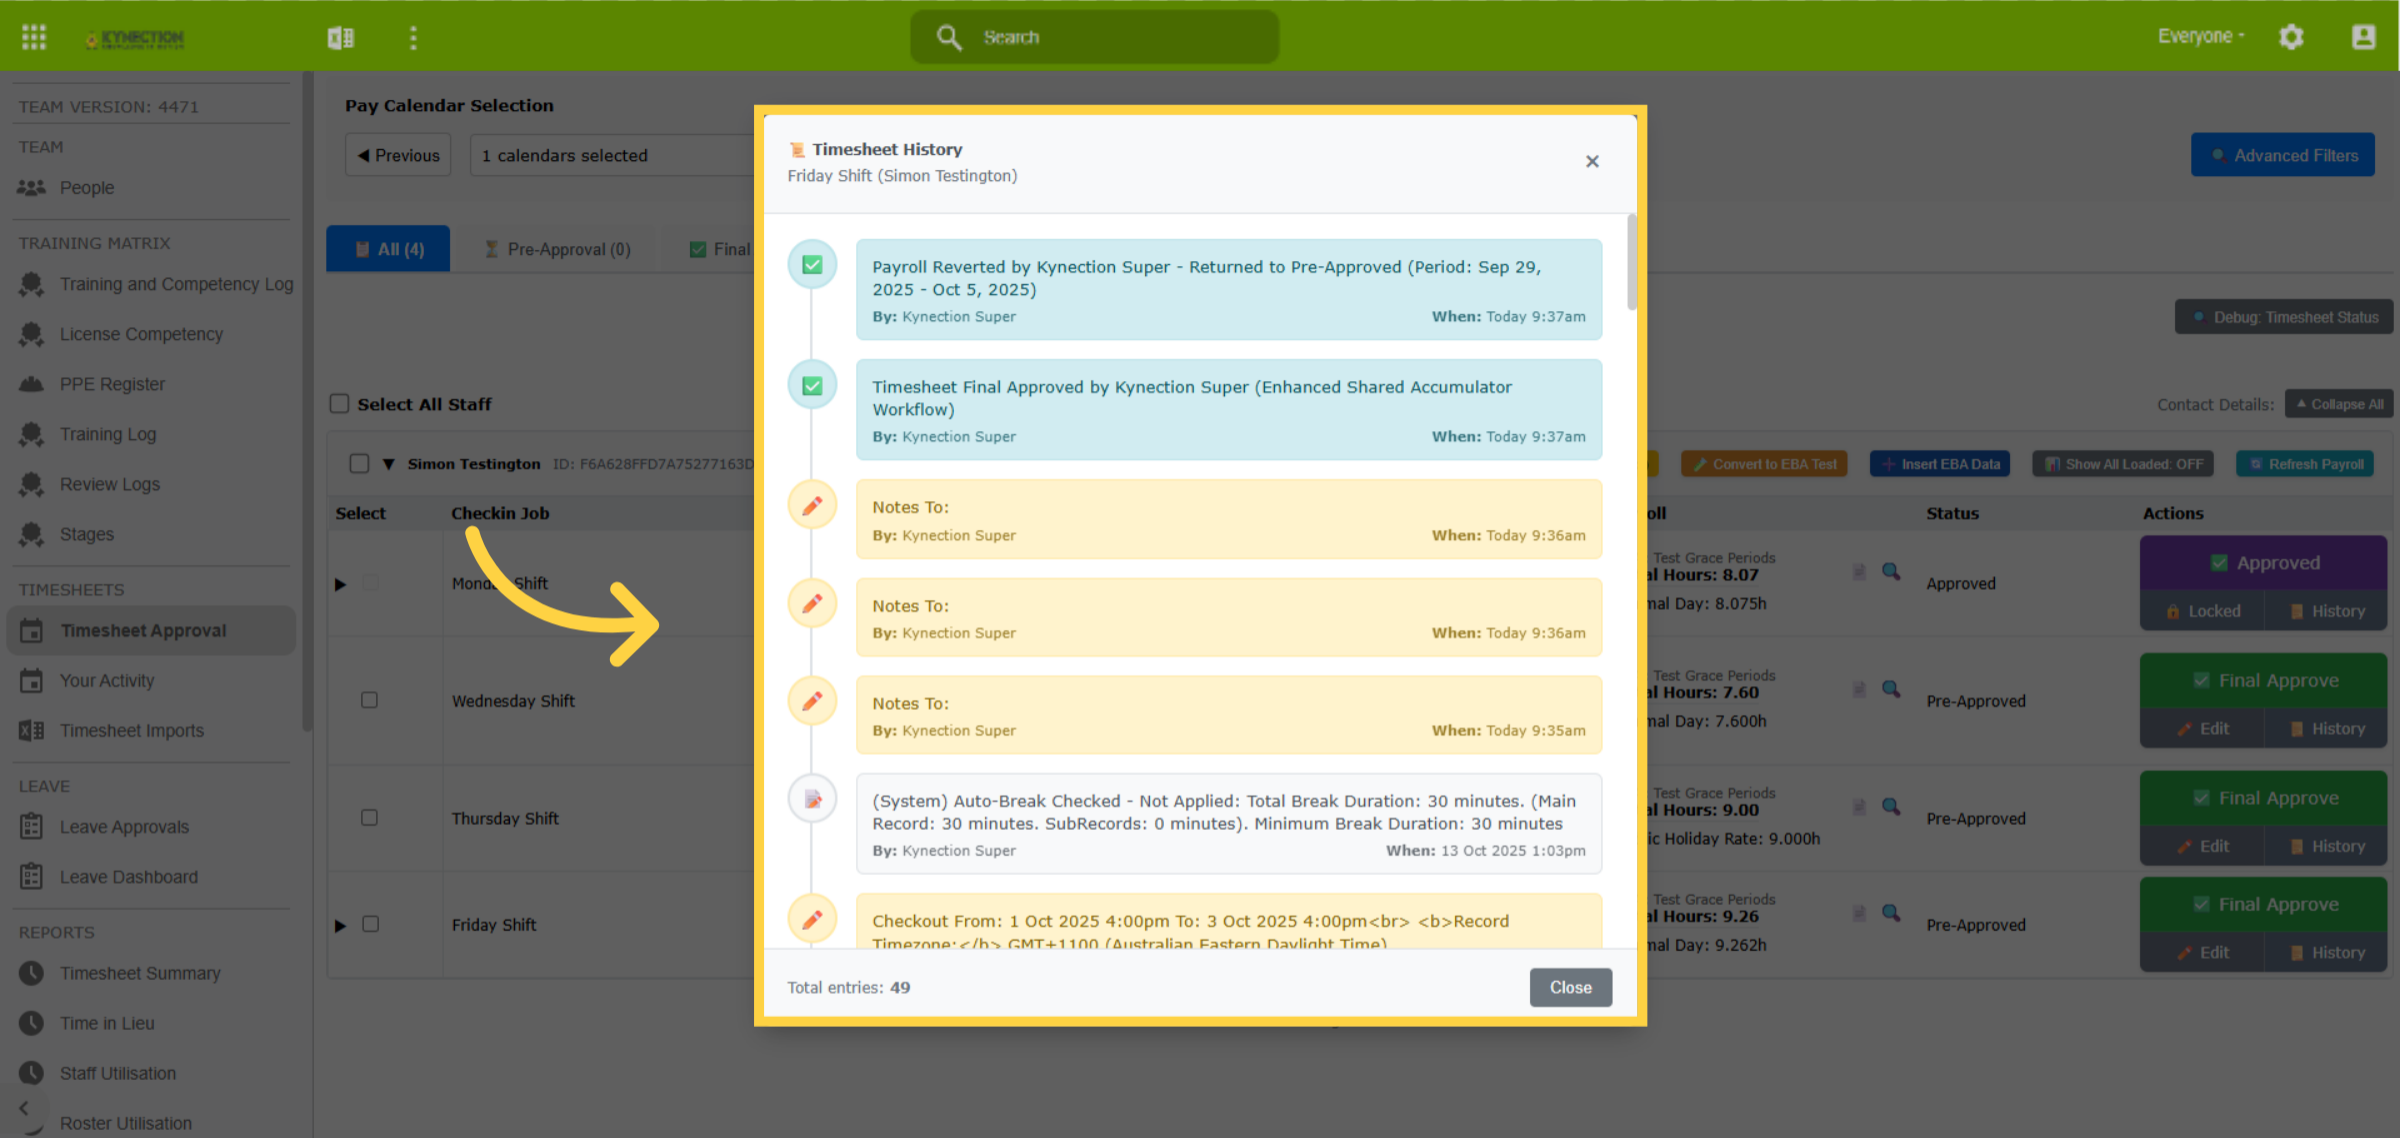
The "history" tab is available from the "Action" column and from the "Edit" screen. "History" provides a log of all actions that have occured, and includes the responsible person and time stamp.
65. Bulk Approval
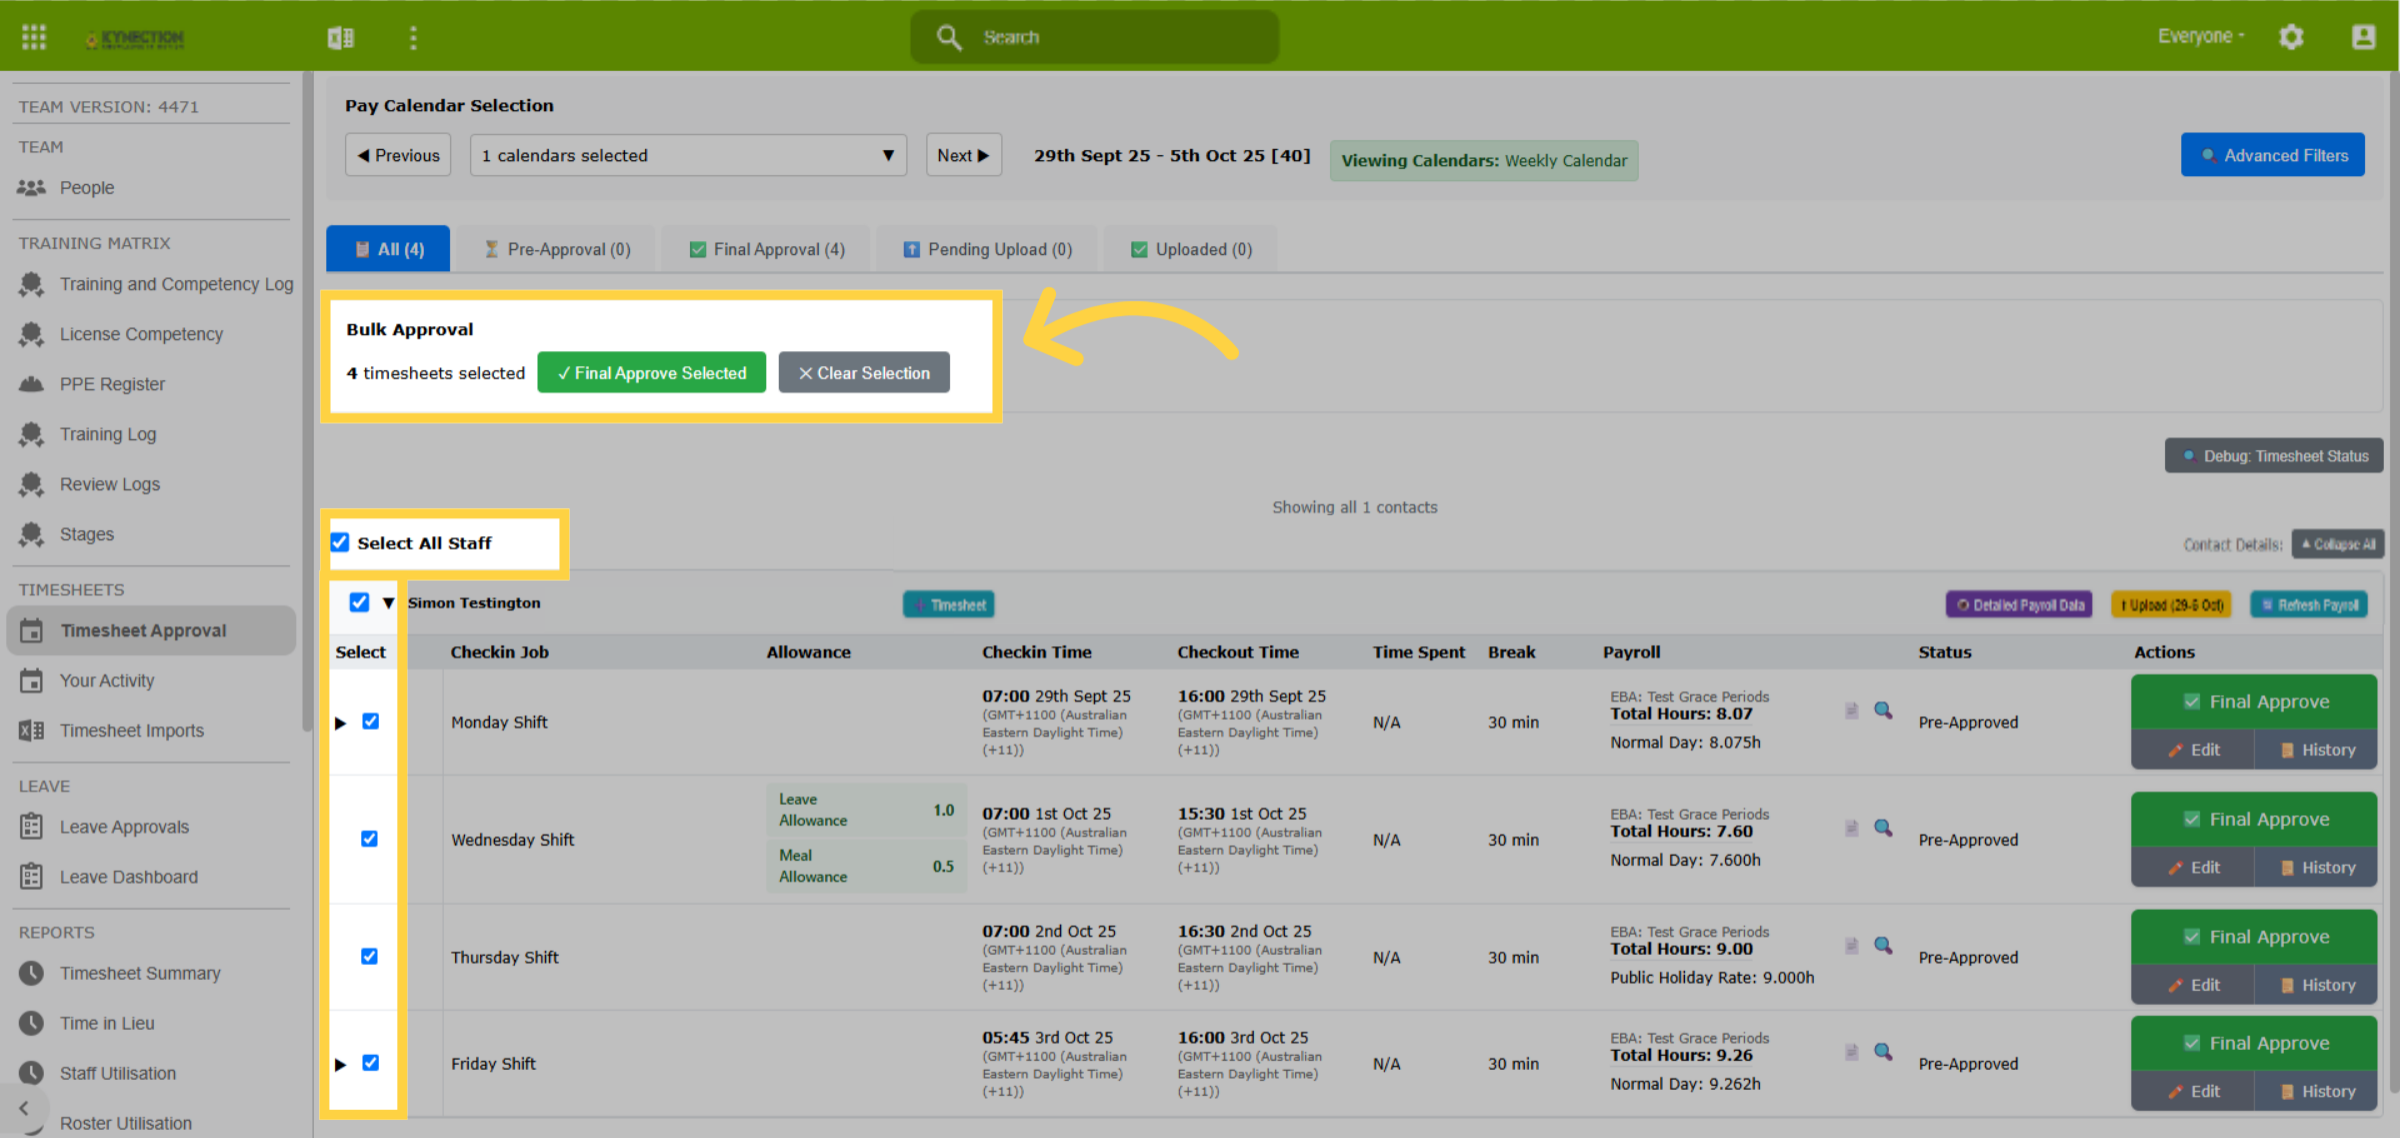
Utilise the checkbox to select all staff, individual employees, or specific records to reveal the bulk approval feature.
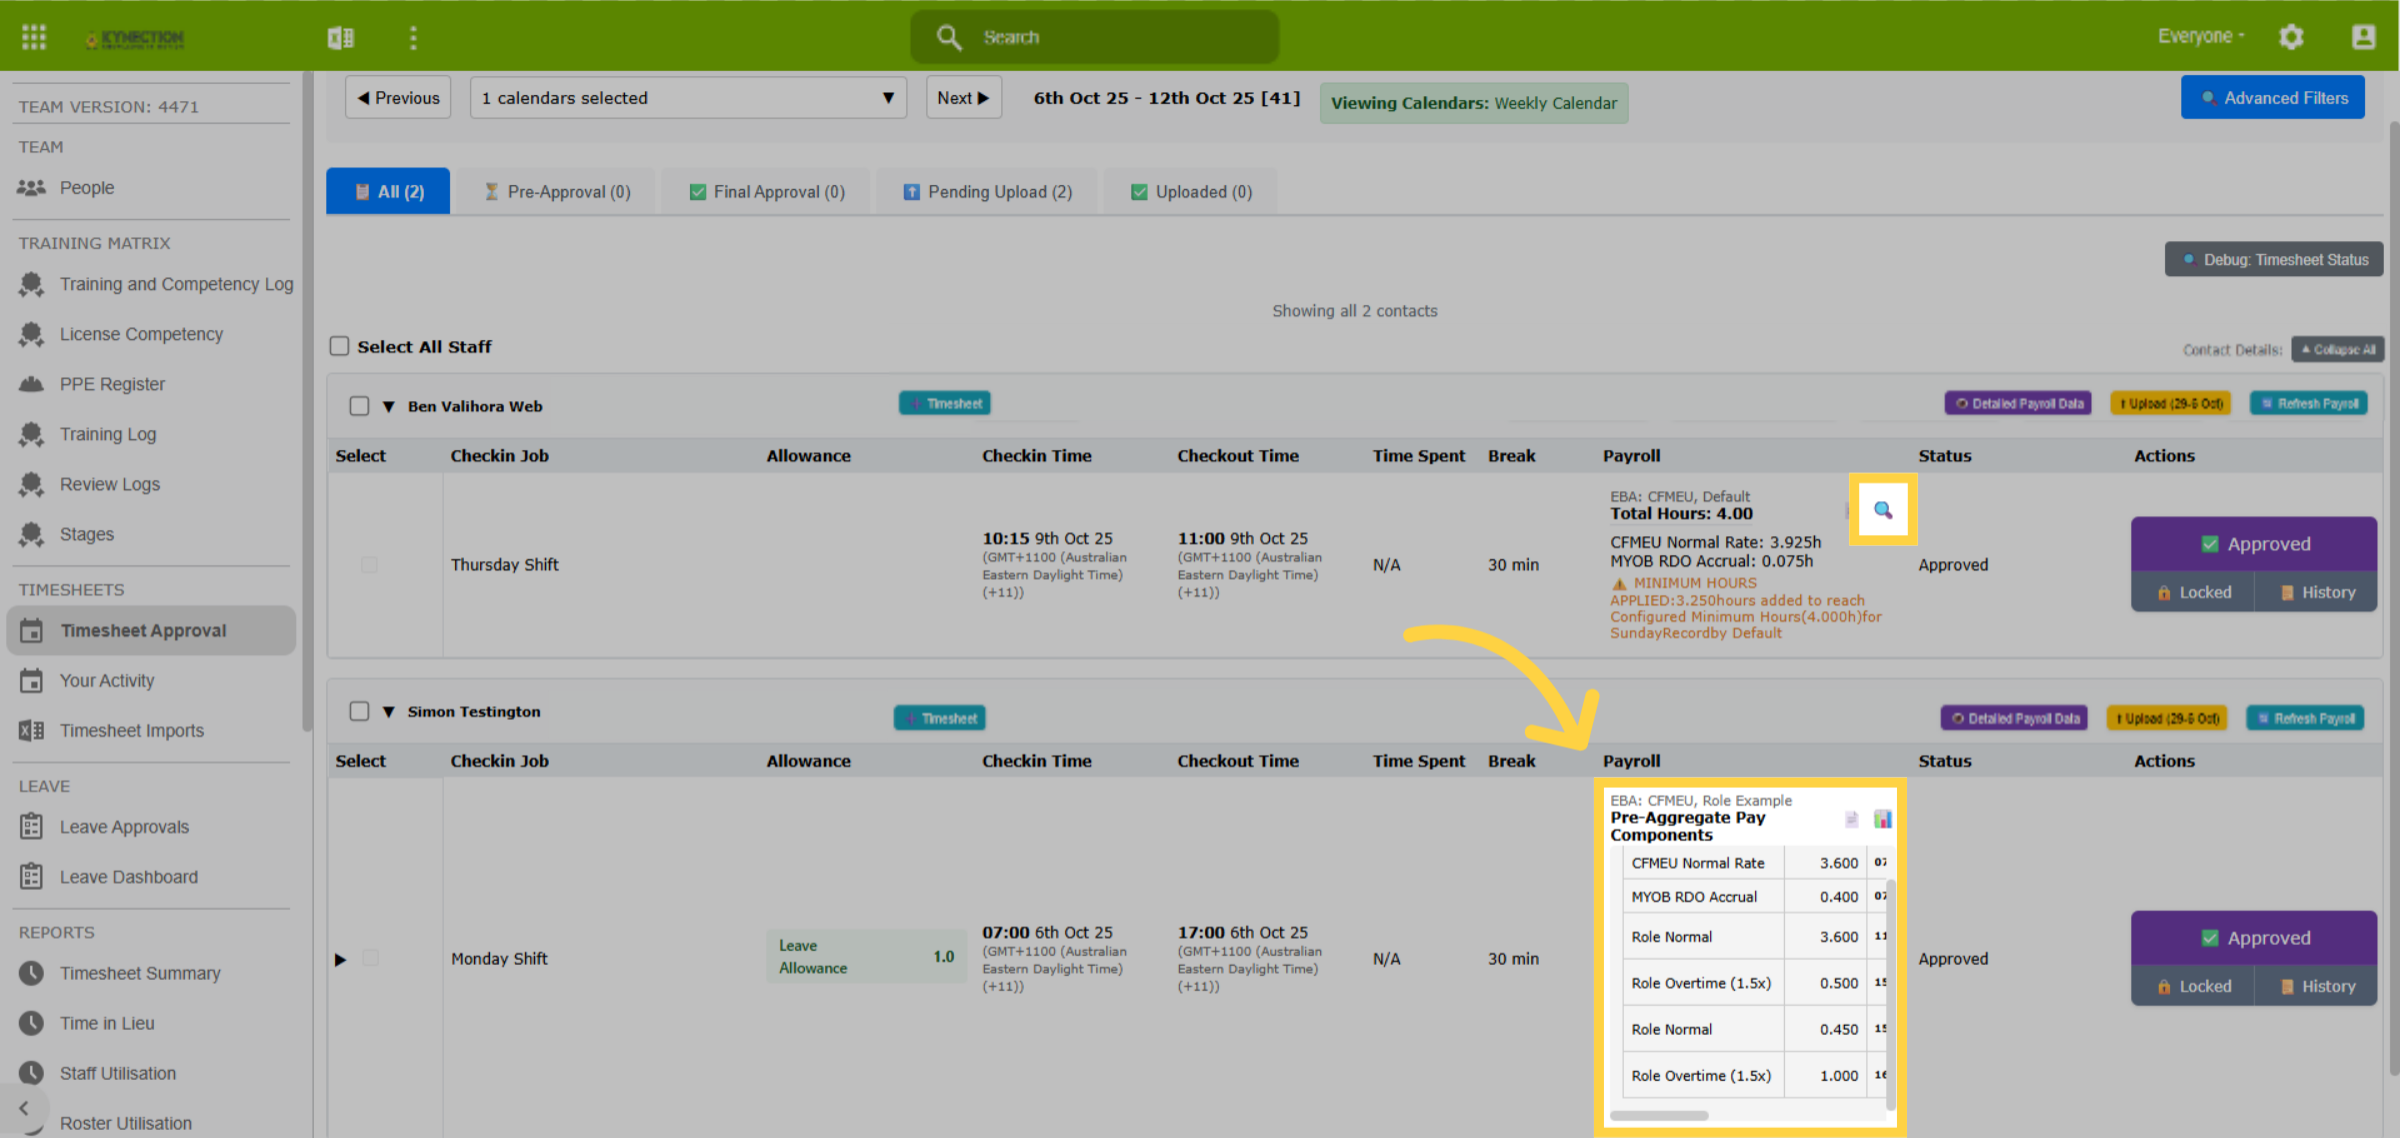
66. Calculation Summary
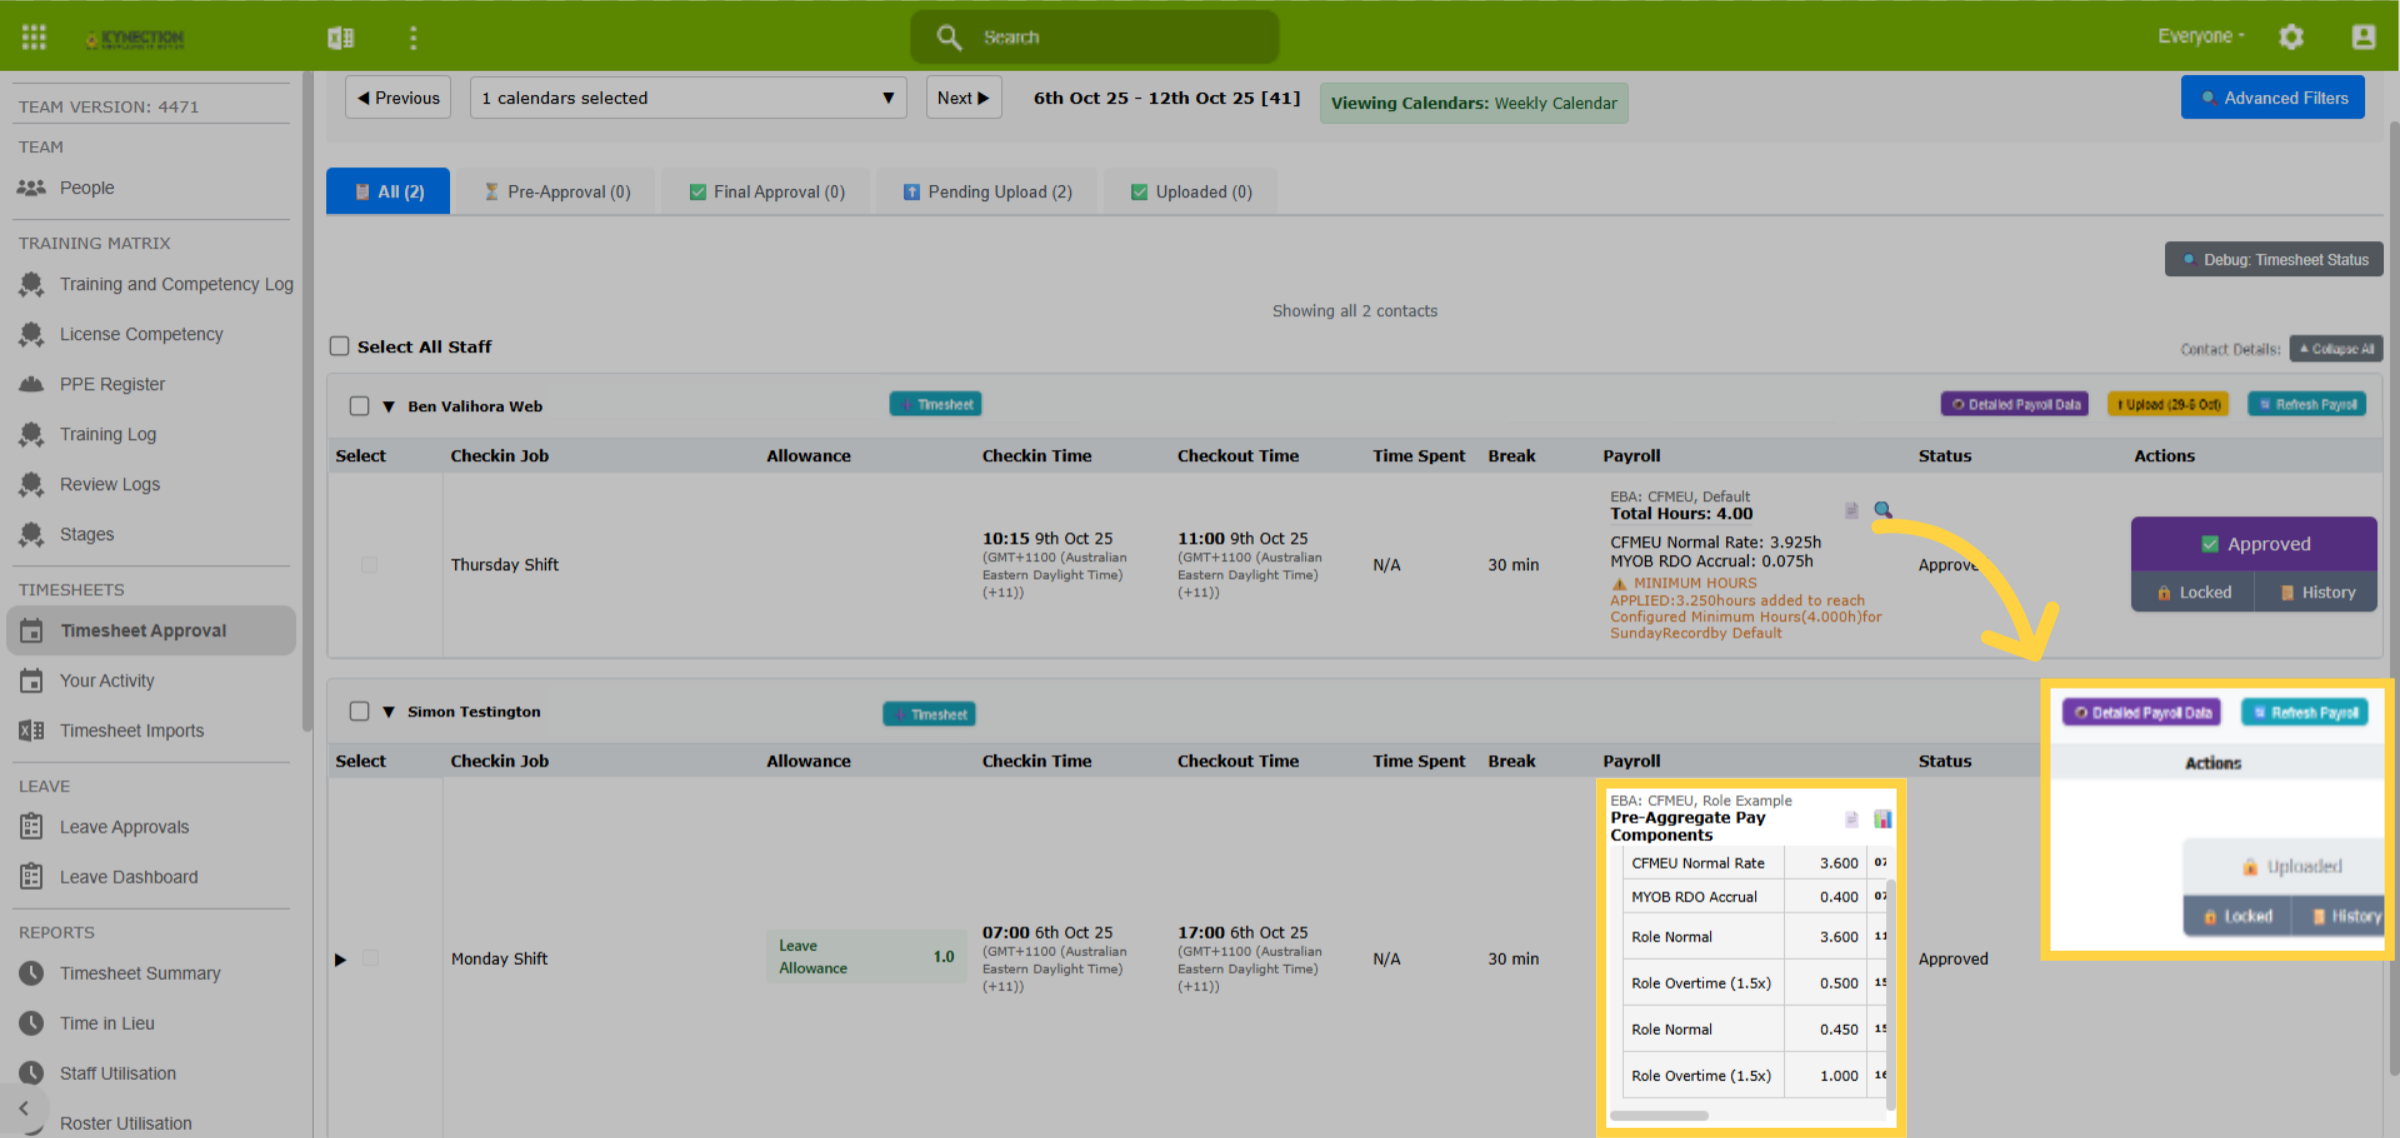
The magnifying glass, found in the "Payroll" column, opens to reveal the pay calculations. Scroll across the table to view hours that apply to each line item.
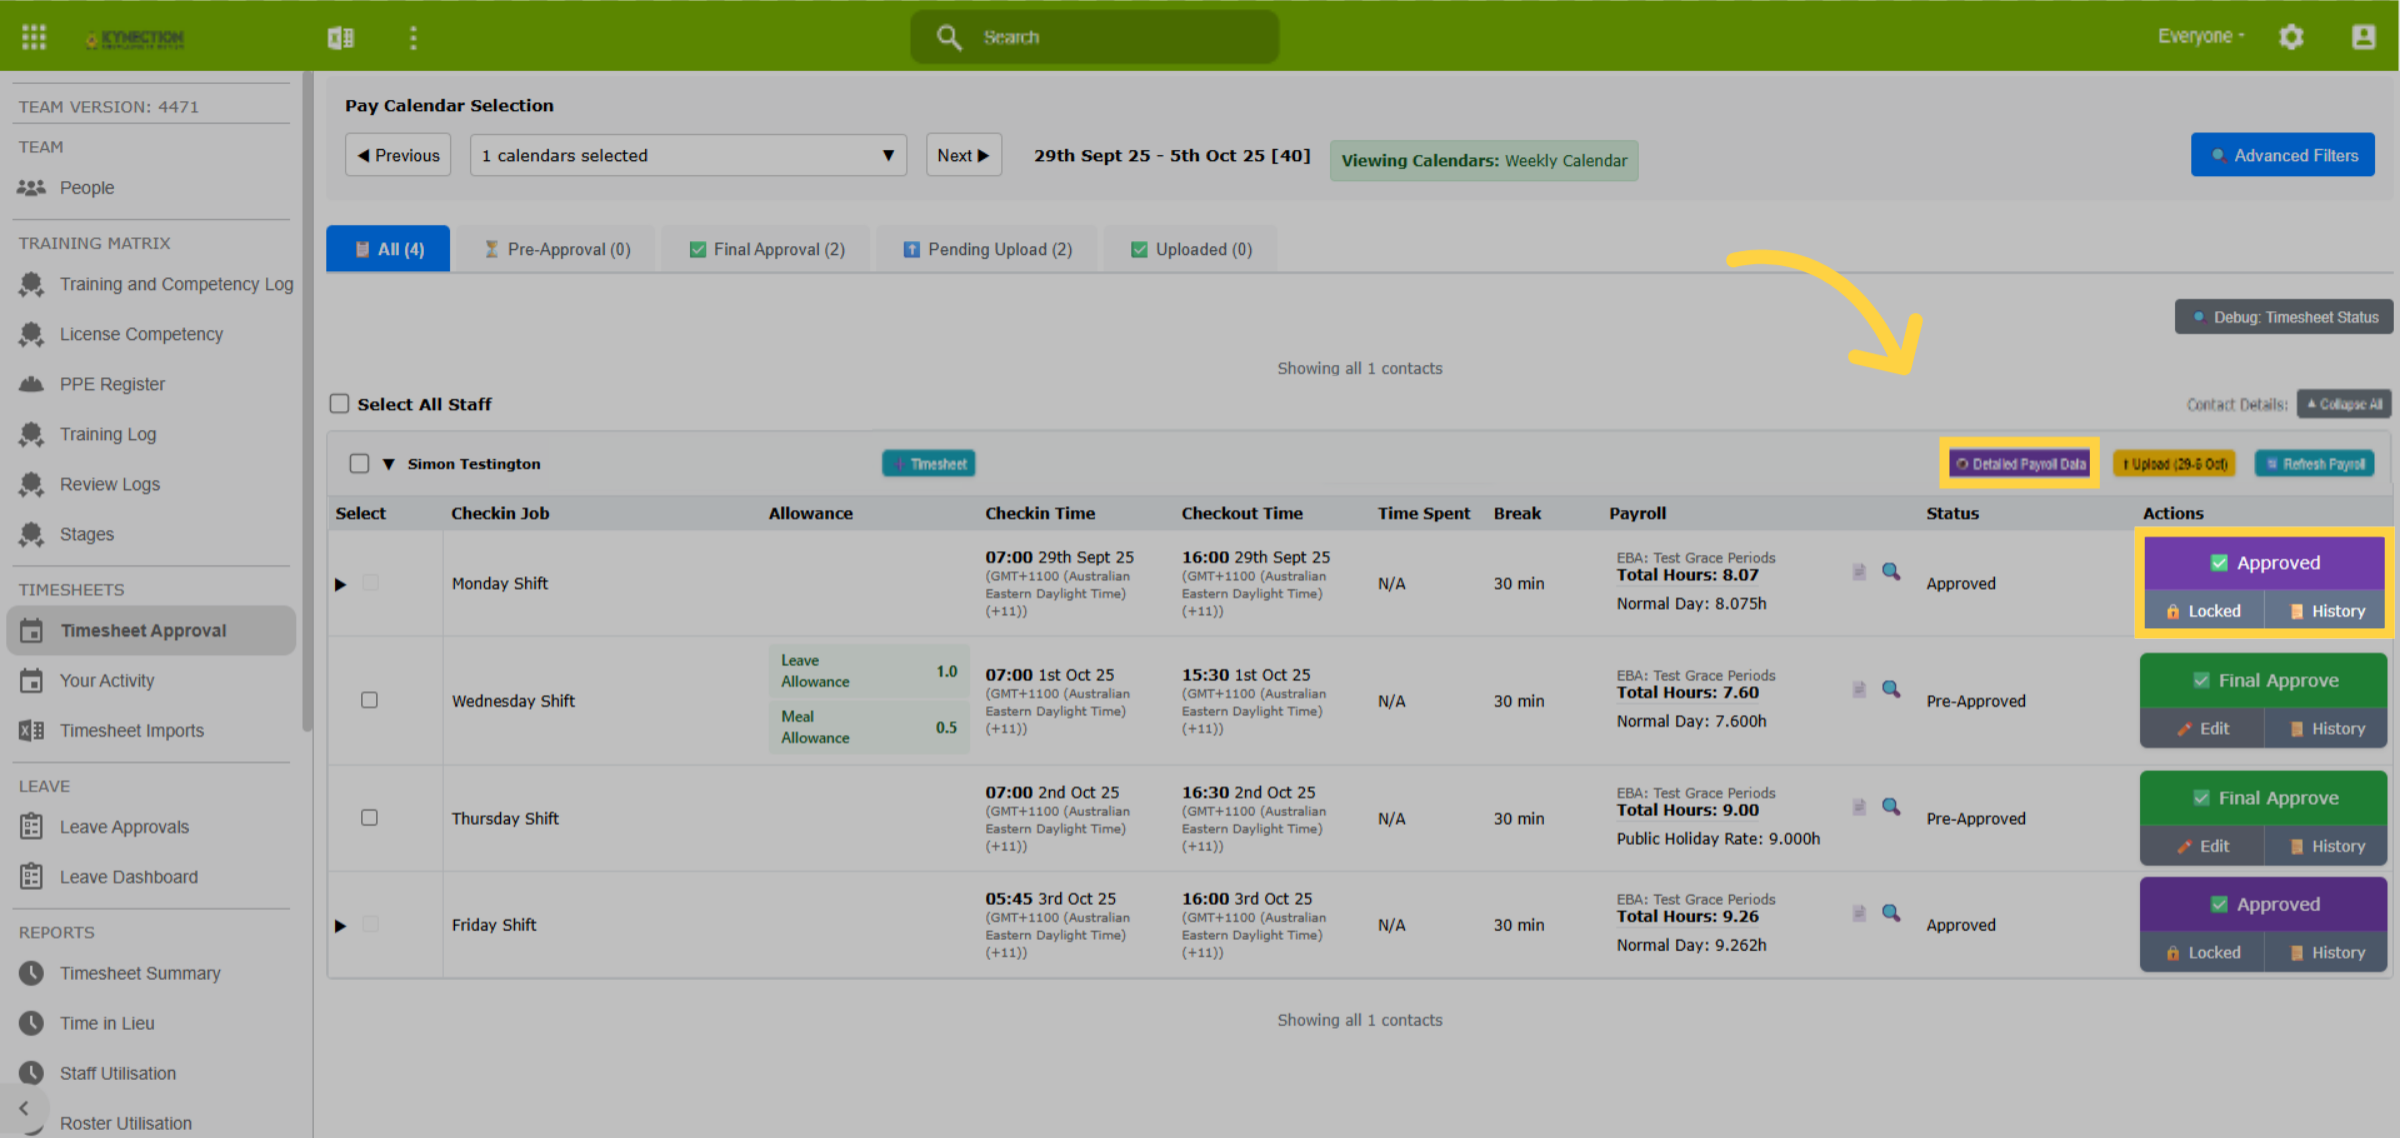
67. Approved but not Uploaded
When a timesheet is approved, the "edit" button is removed. However, if the record has not been uploaded yet, the record can still be modified using the "Detailed Payroll Data" tab, located in the employee section header.
68. Detailed Payroll Data
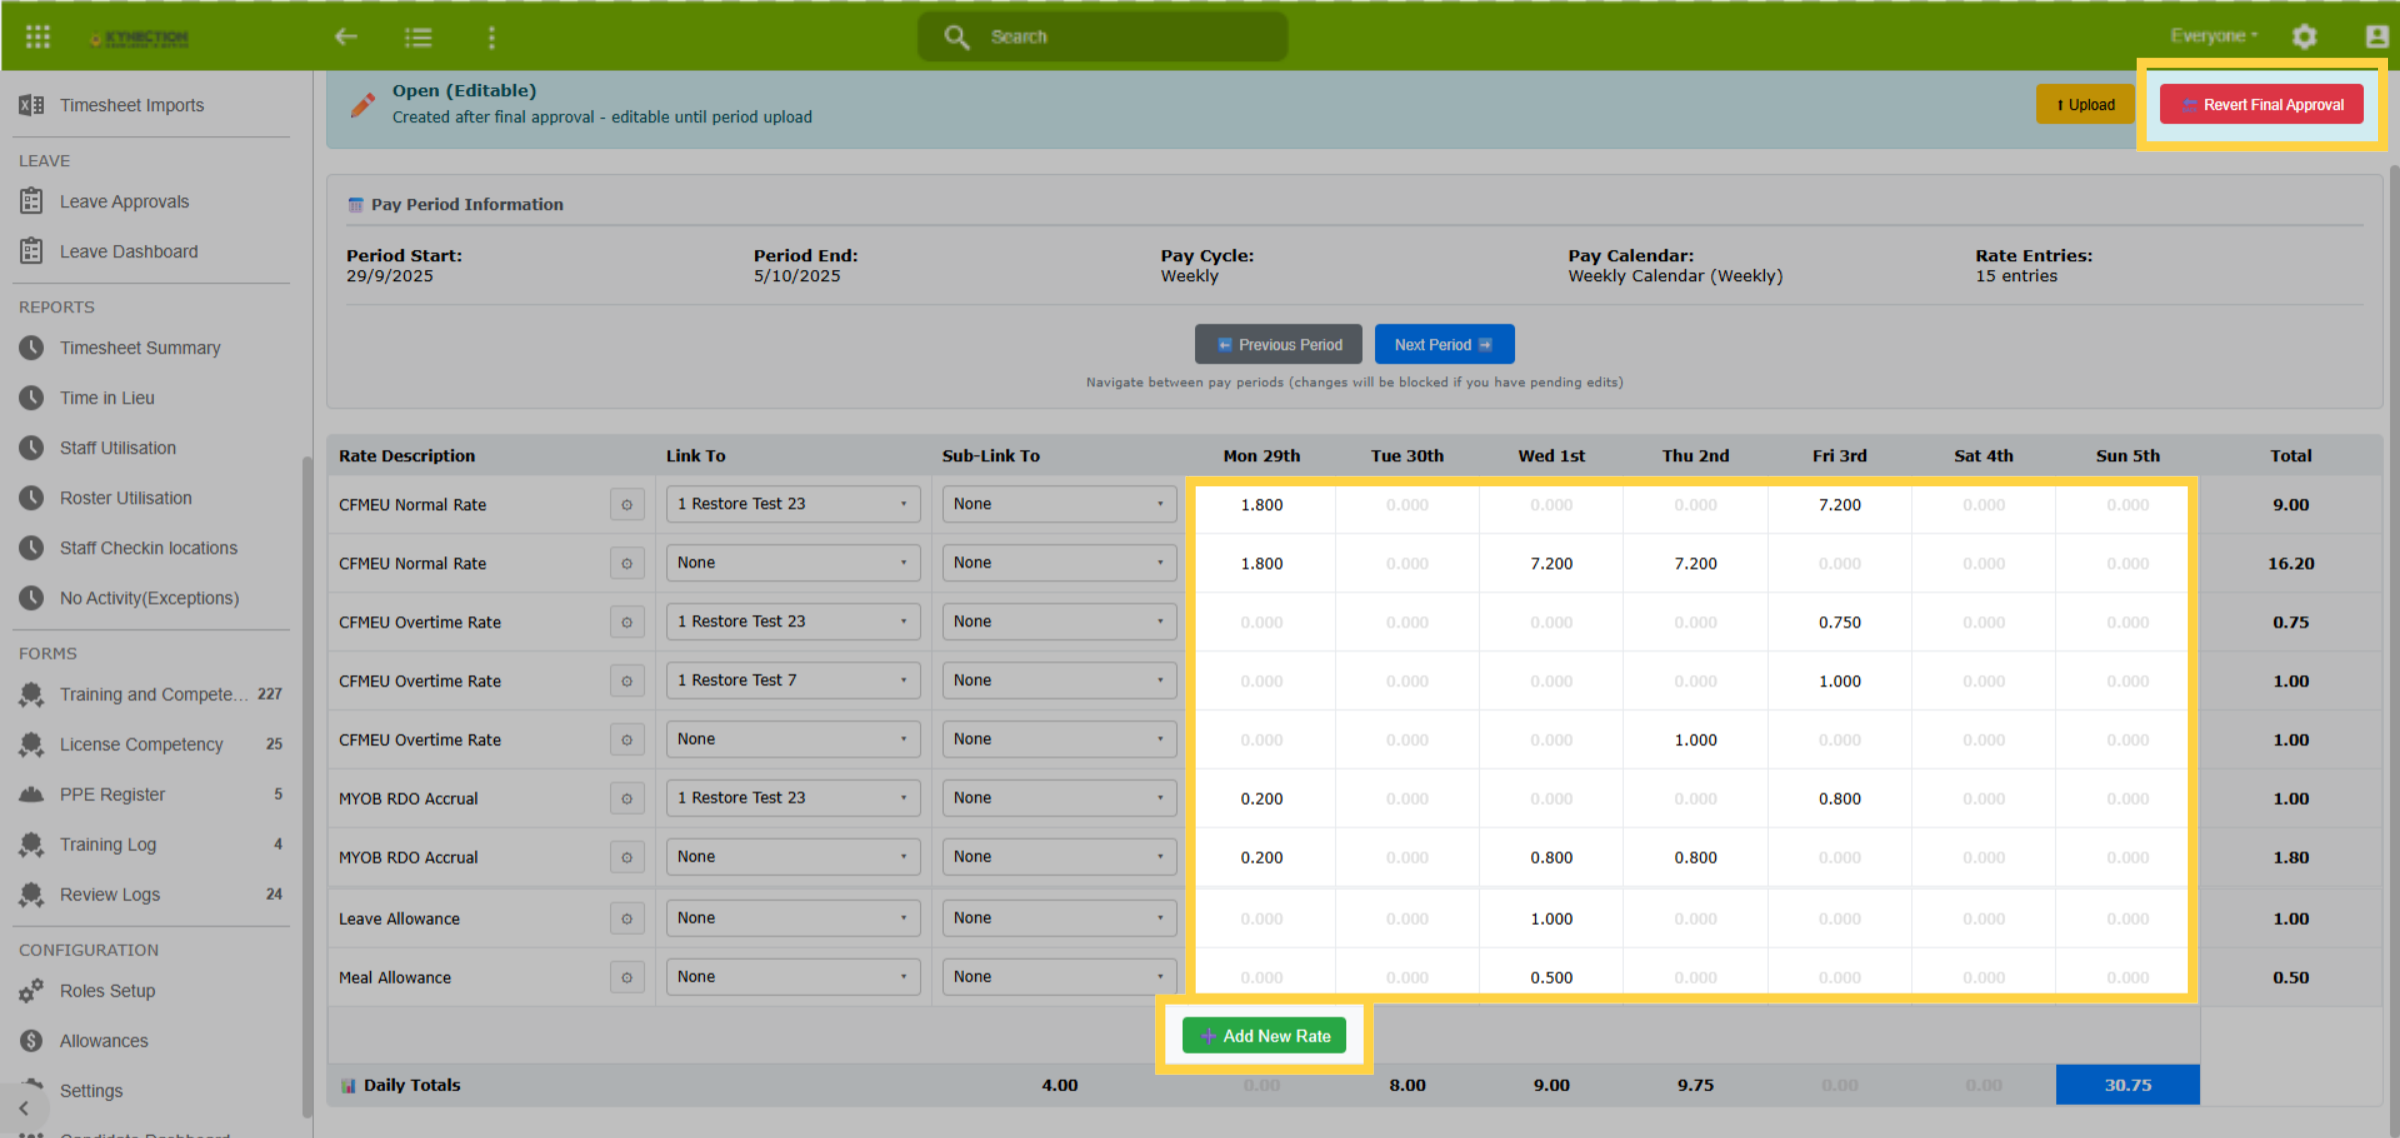
The "Detailed Payroll Data" screen presents calculations for the pay period, showcasing total hours accrued by rate, day, and pay period. Users can choose to revert the final approval, upload data to the accounting package, or edit information directly from this screen.
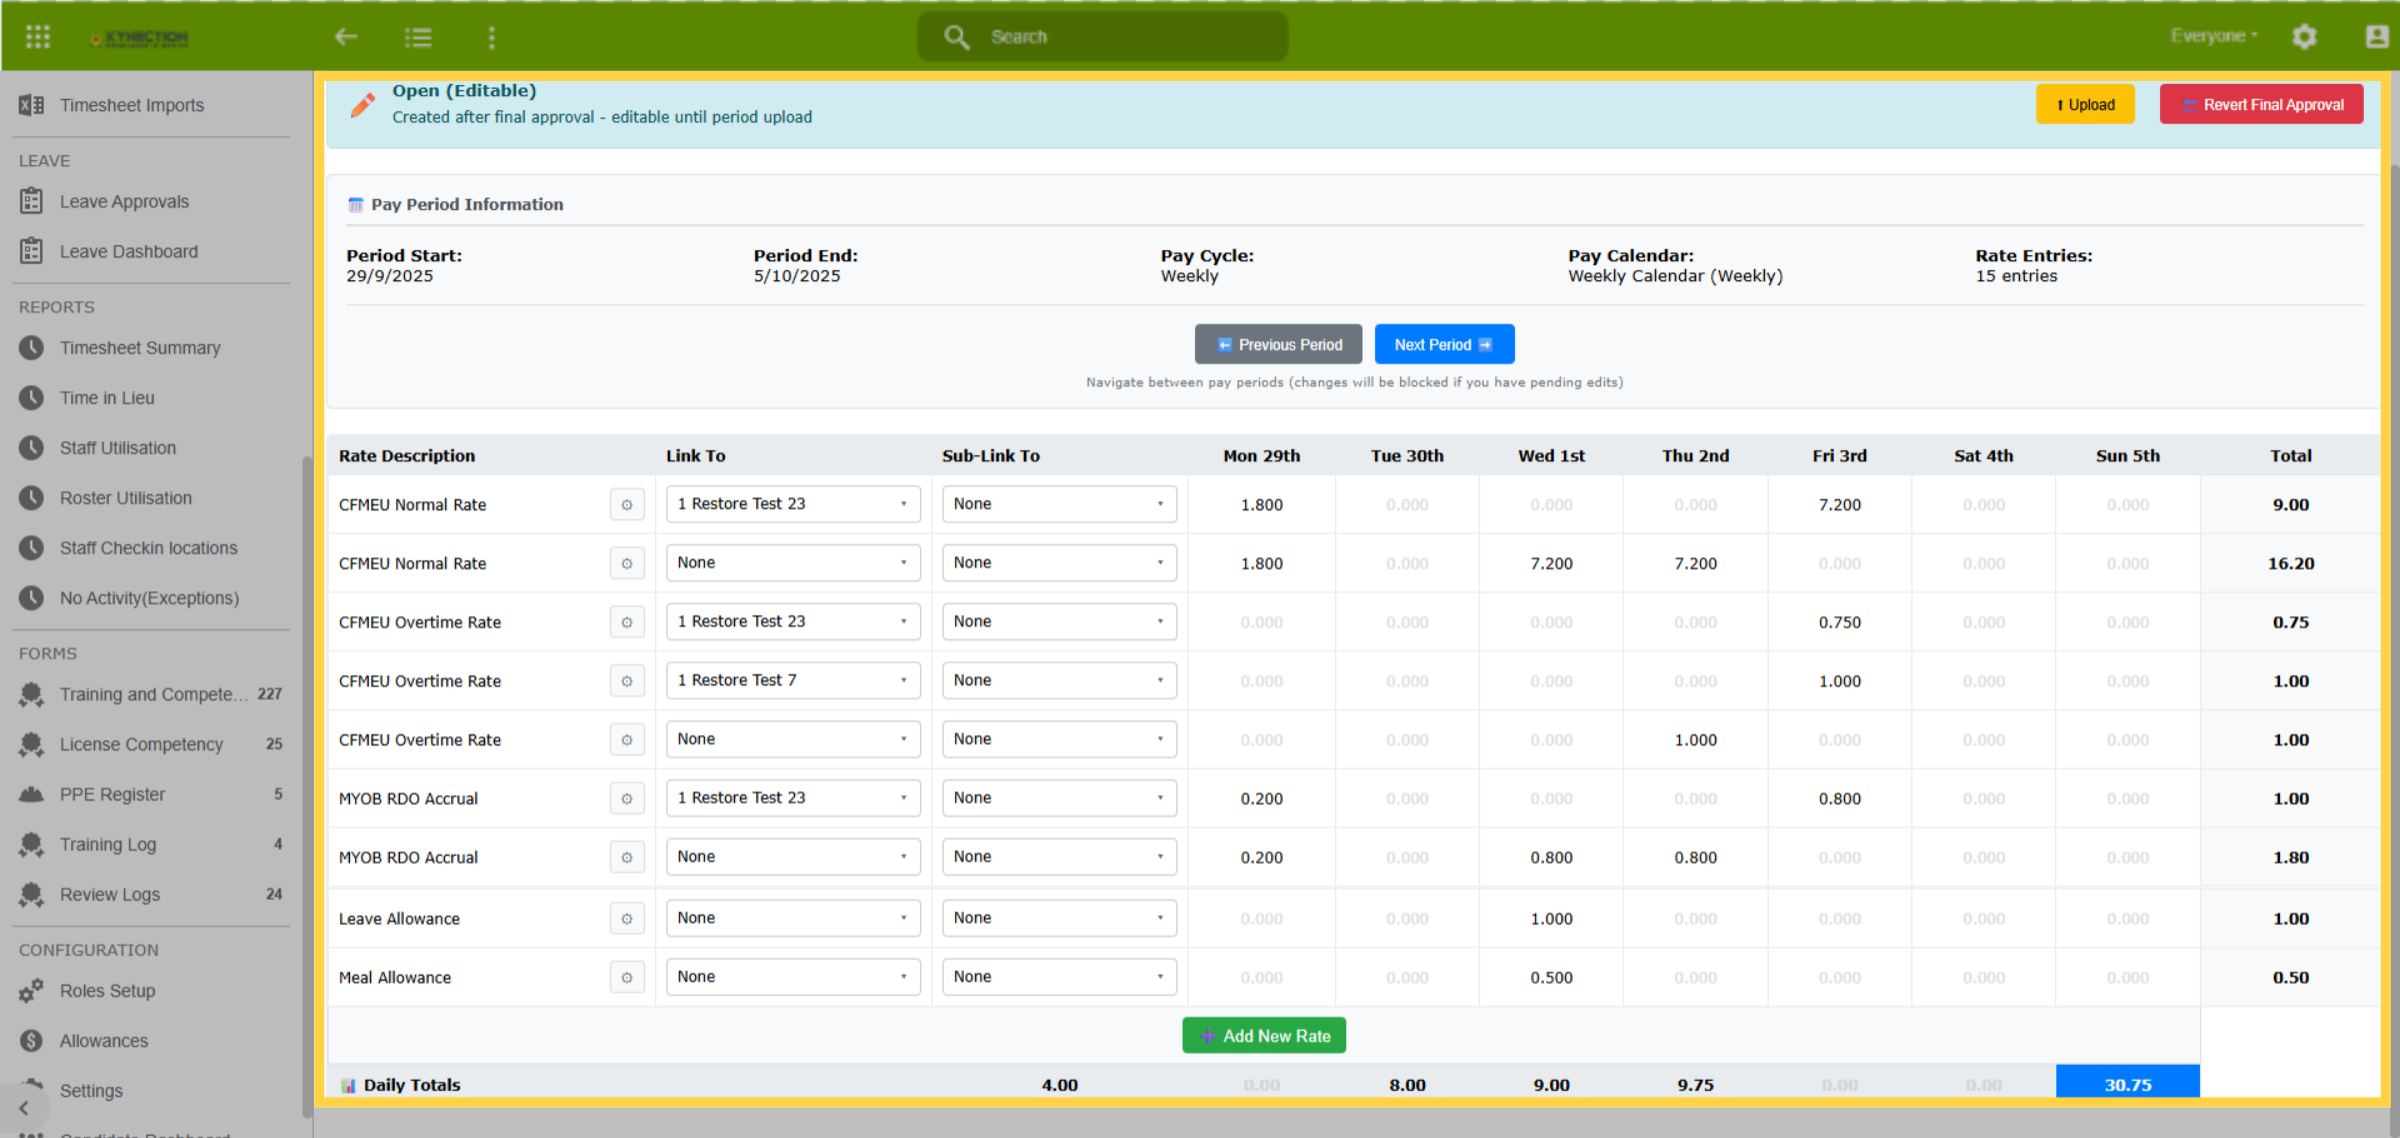
69. Edit Detailed Payroll Data
To modify the "Link To" or "Sub-Link" items, or to recalculate the payroll lines, use the "Revert Final Approval" button and then update the shift. To modify data on this screen, click directly on the fields to adjust hours, and then save the changes, or, use the "Add New Rate" button to include additional payroll lines.
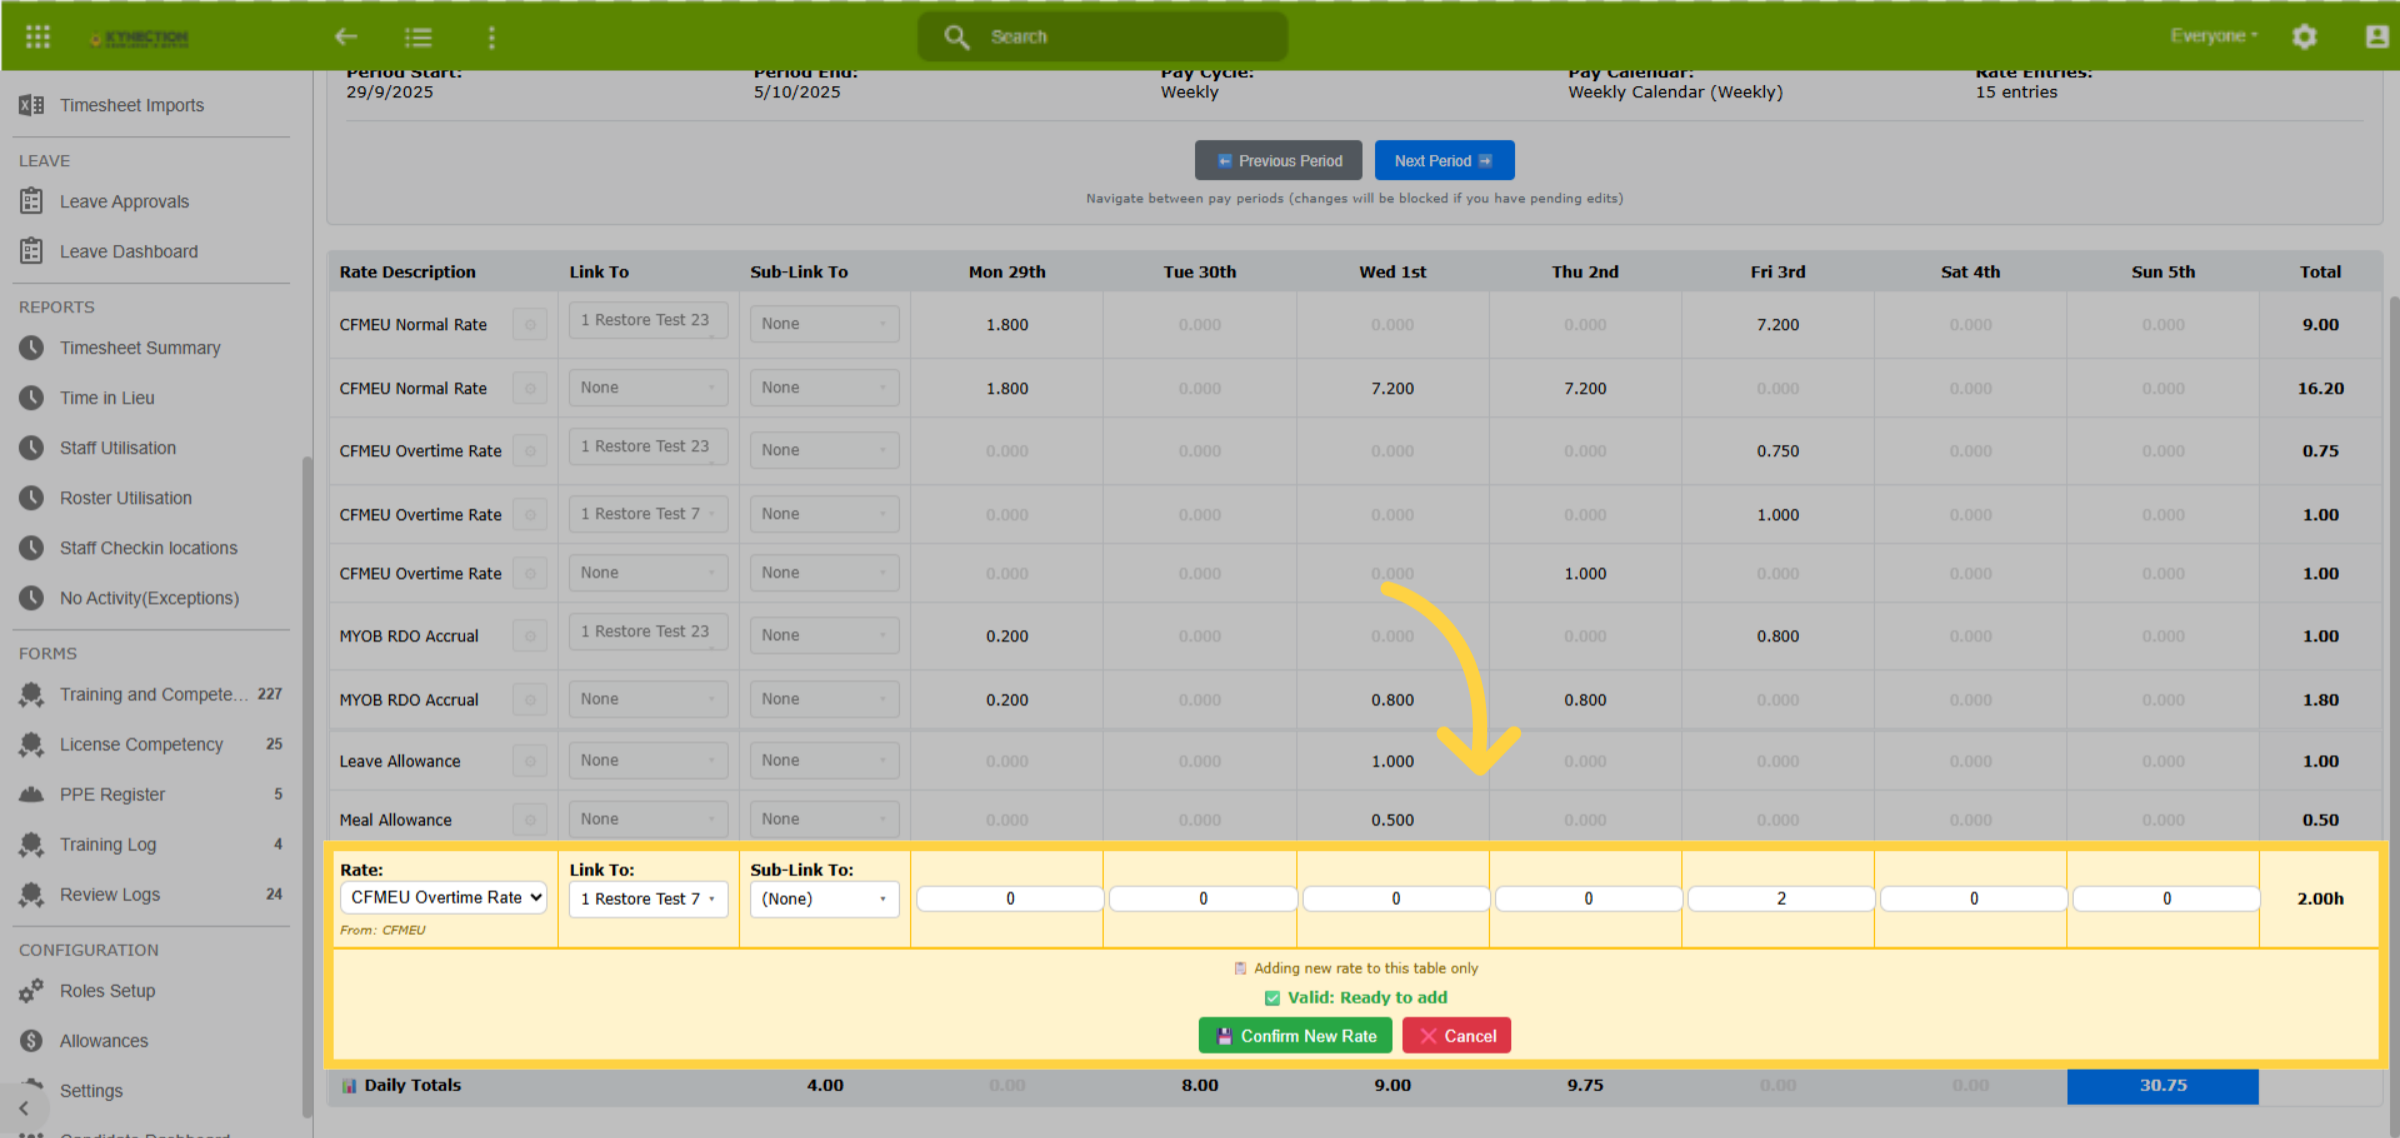
70. Add New Rate
If adding a new rate, enter the details and then save the changes by selecting the "Confirm New Rate" button found underneath the added line.
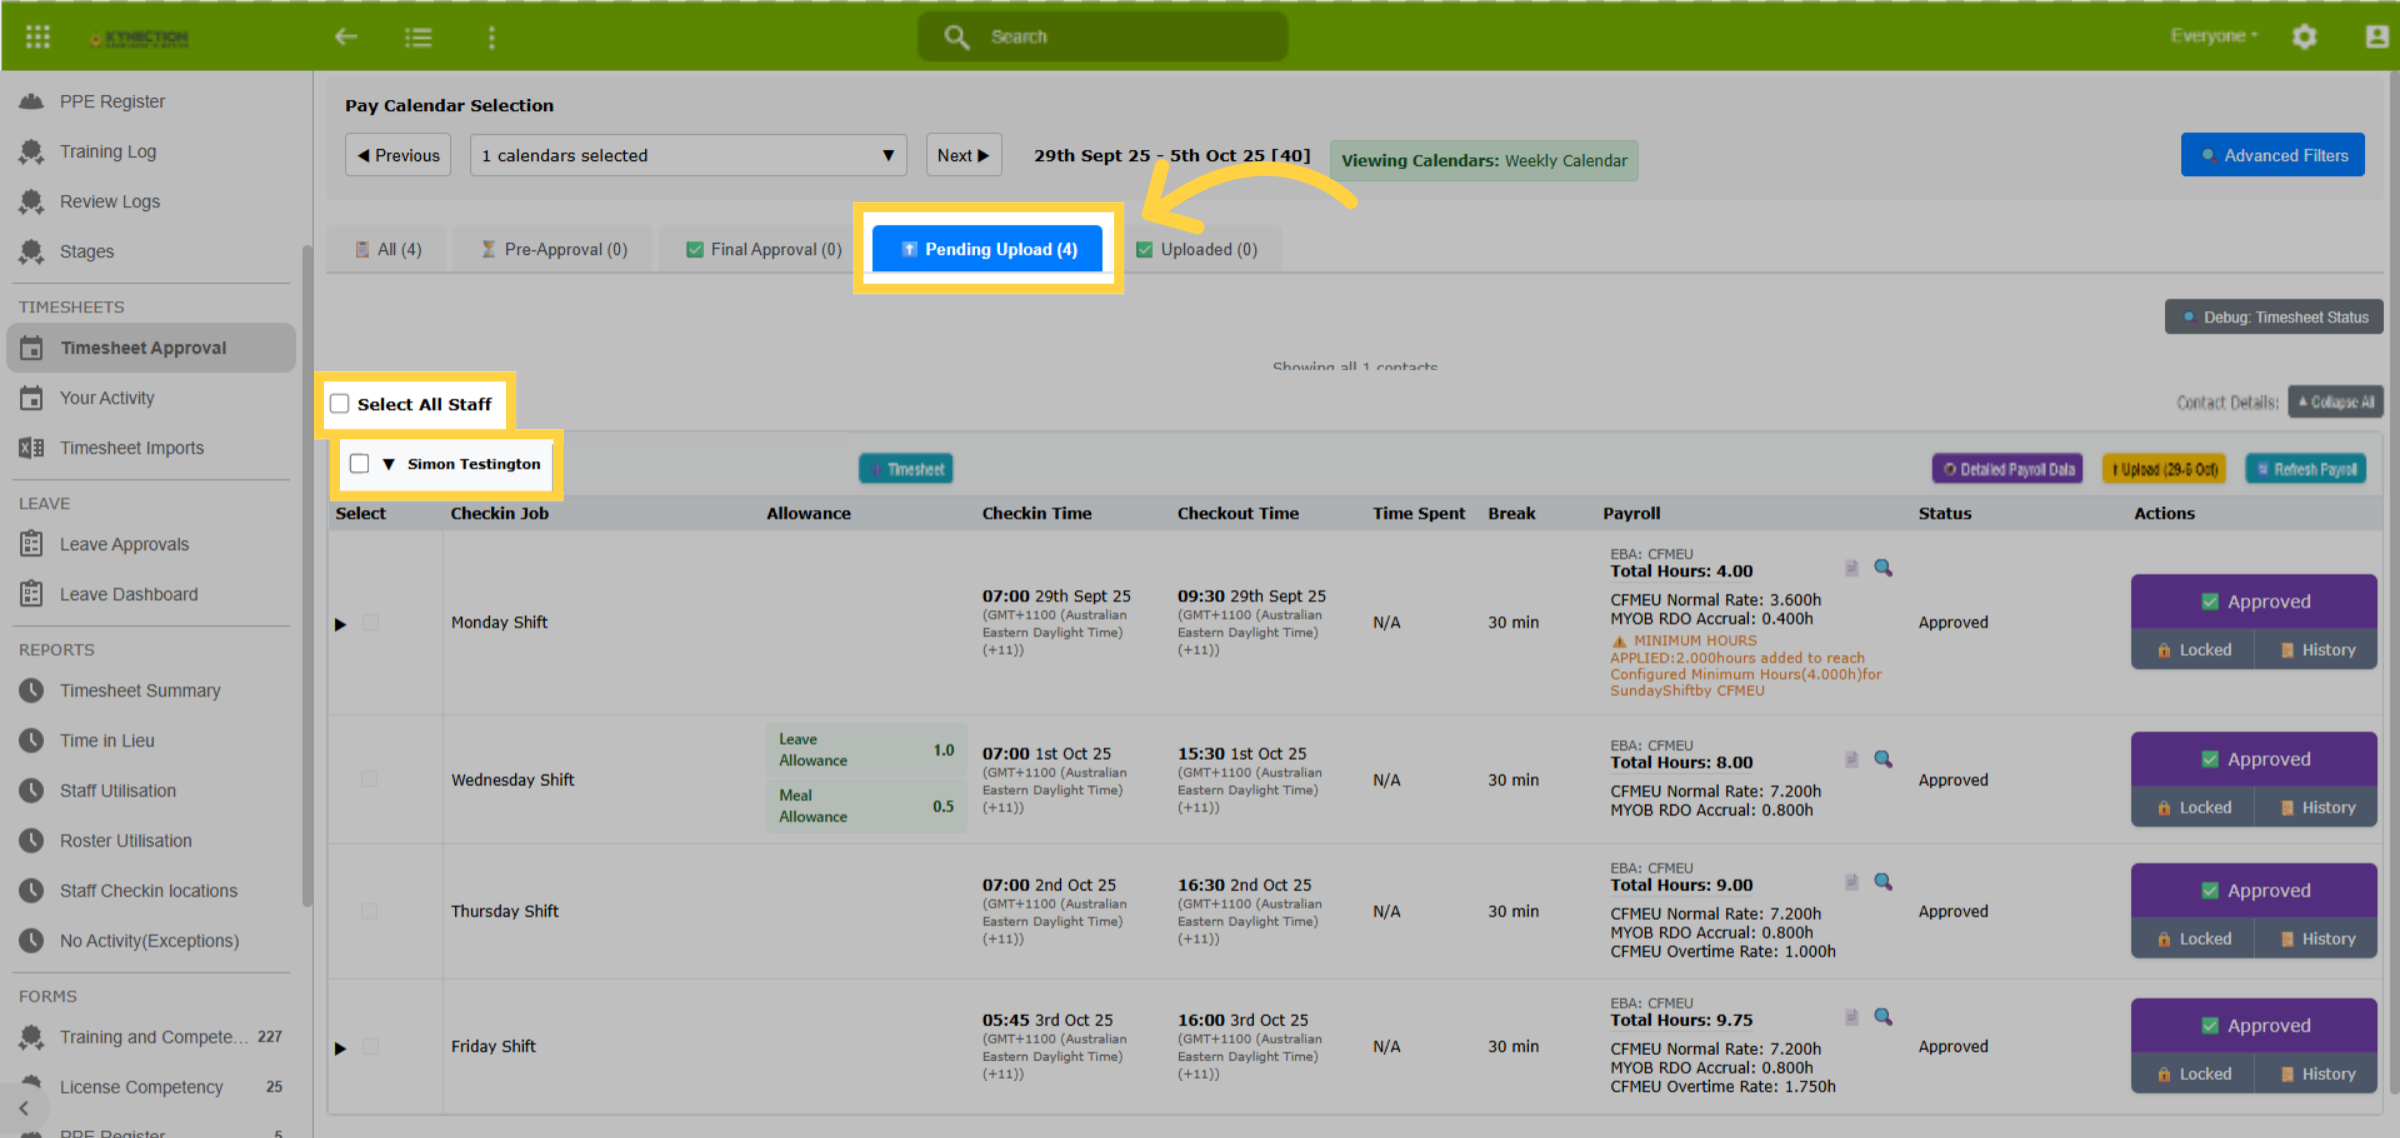
71. Pending Upload
The "Pending Upload" tab lists all records that have received final approval and are ready for upload to the Accounting Package. To begin the upload process, select the desired records using the checkboxes for either All Staff or Individual Staff members.
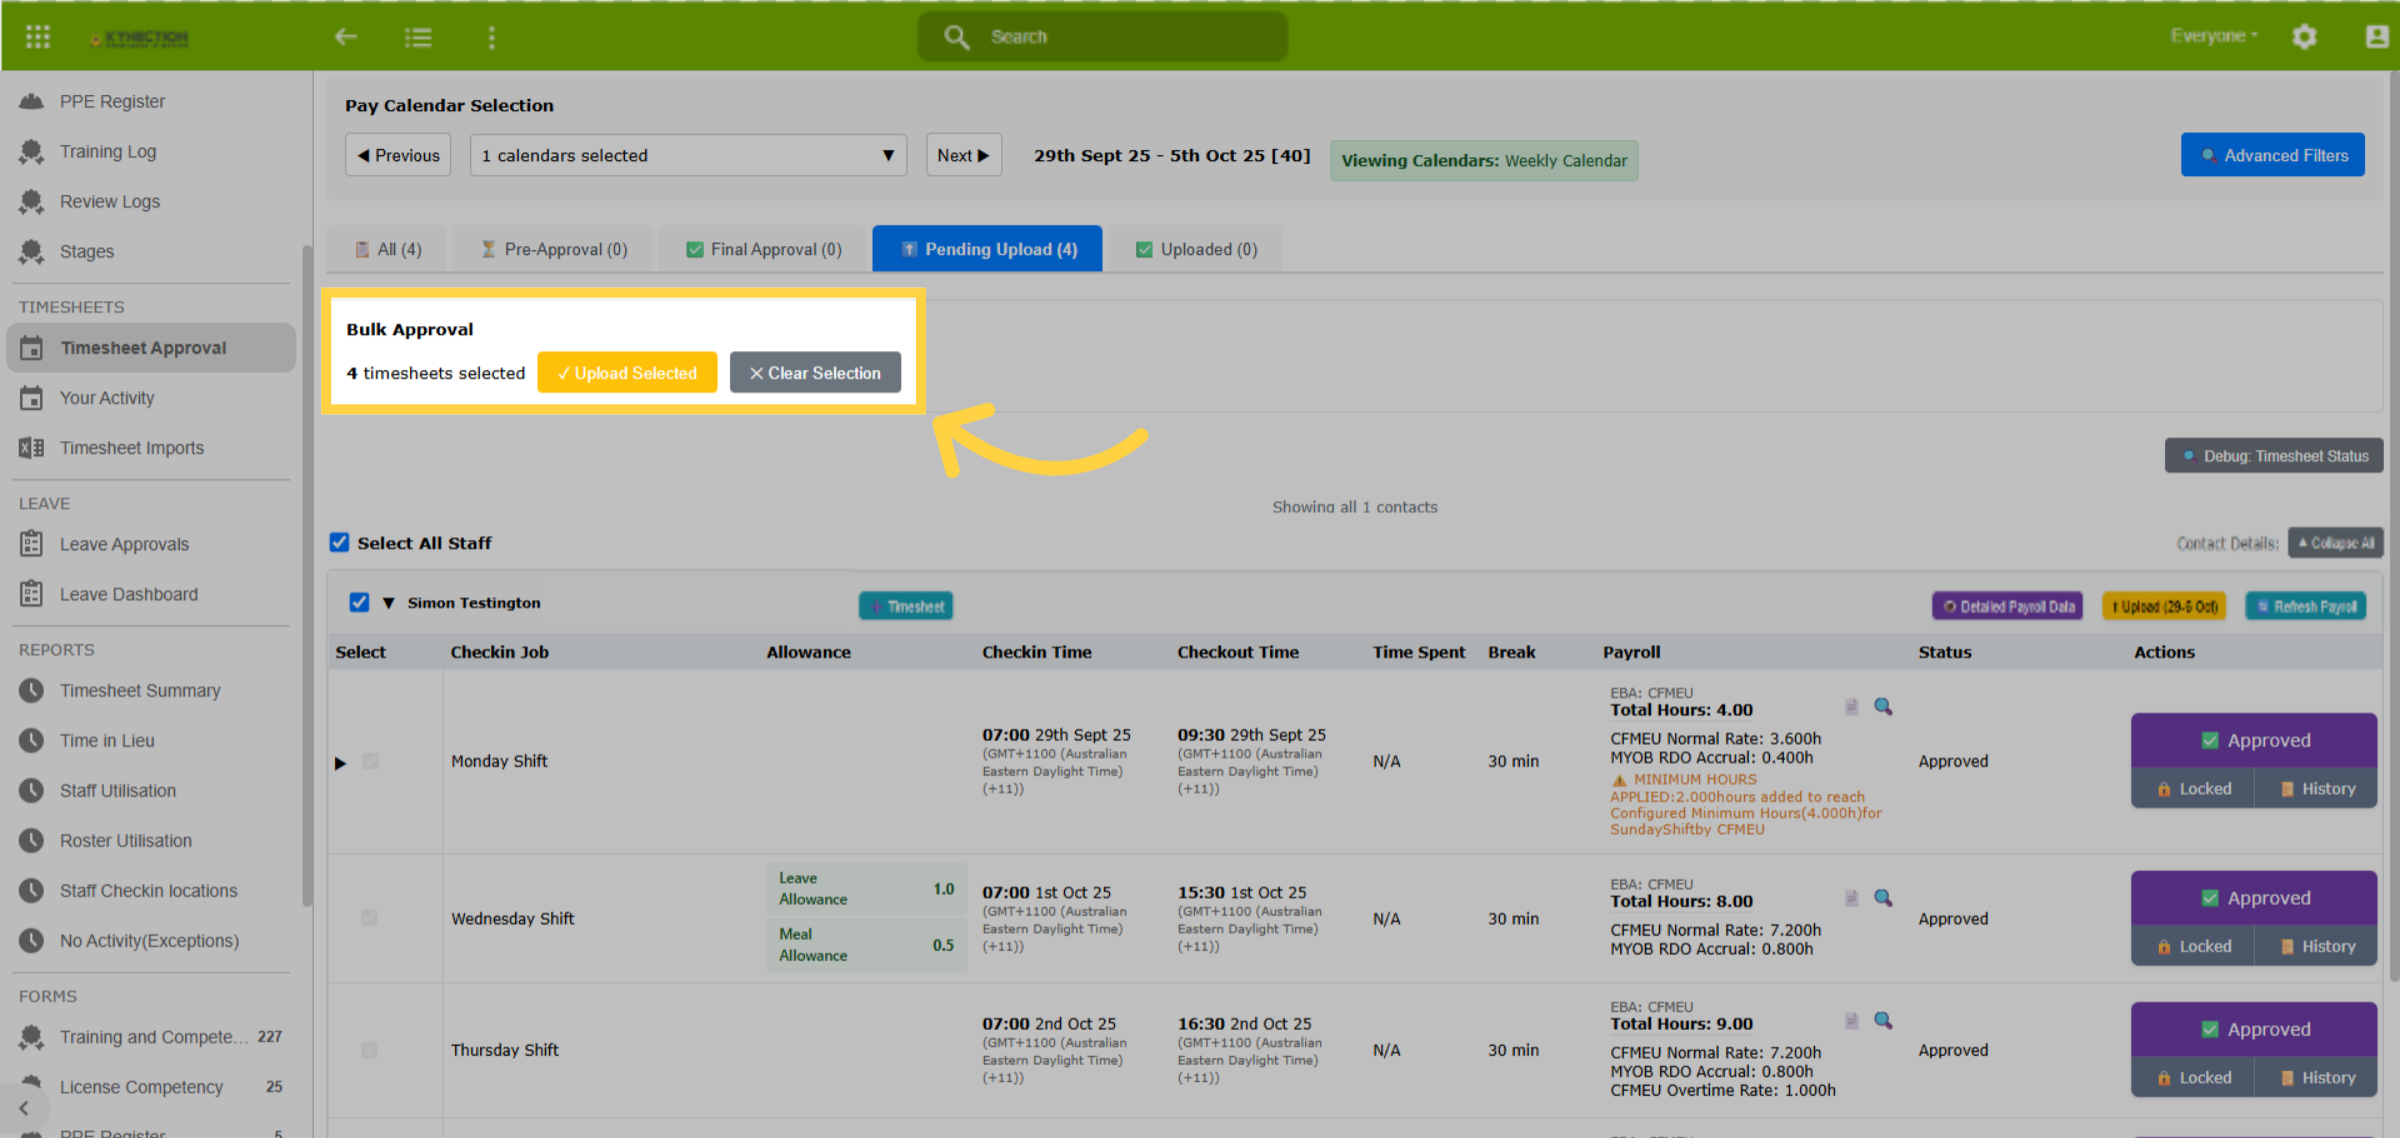
72. Bulk Upload
After records are selected, the "bulk approval" feature displays. Click the button for "Upload Selected" to transfer the timesheet records to the accounting package.
73. Uploaded Timesheets
Records that have been uploaded to the accounting package are no longer editable. This is indicated by the "Uploaded and Locked" status, and the removal of the "Upload" button from the employee section header. To view the details of what has been uploaded, click the "Detailed Payroll Details" button, or, for single shift details, the magnifying glass icon, found in the payroll column.
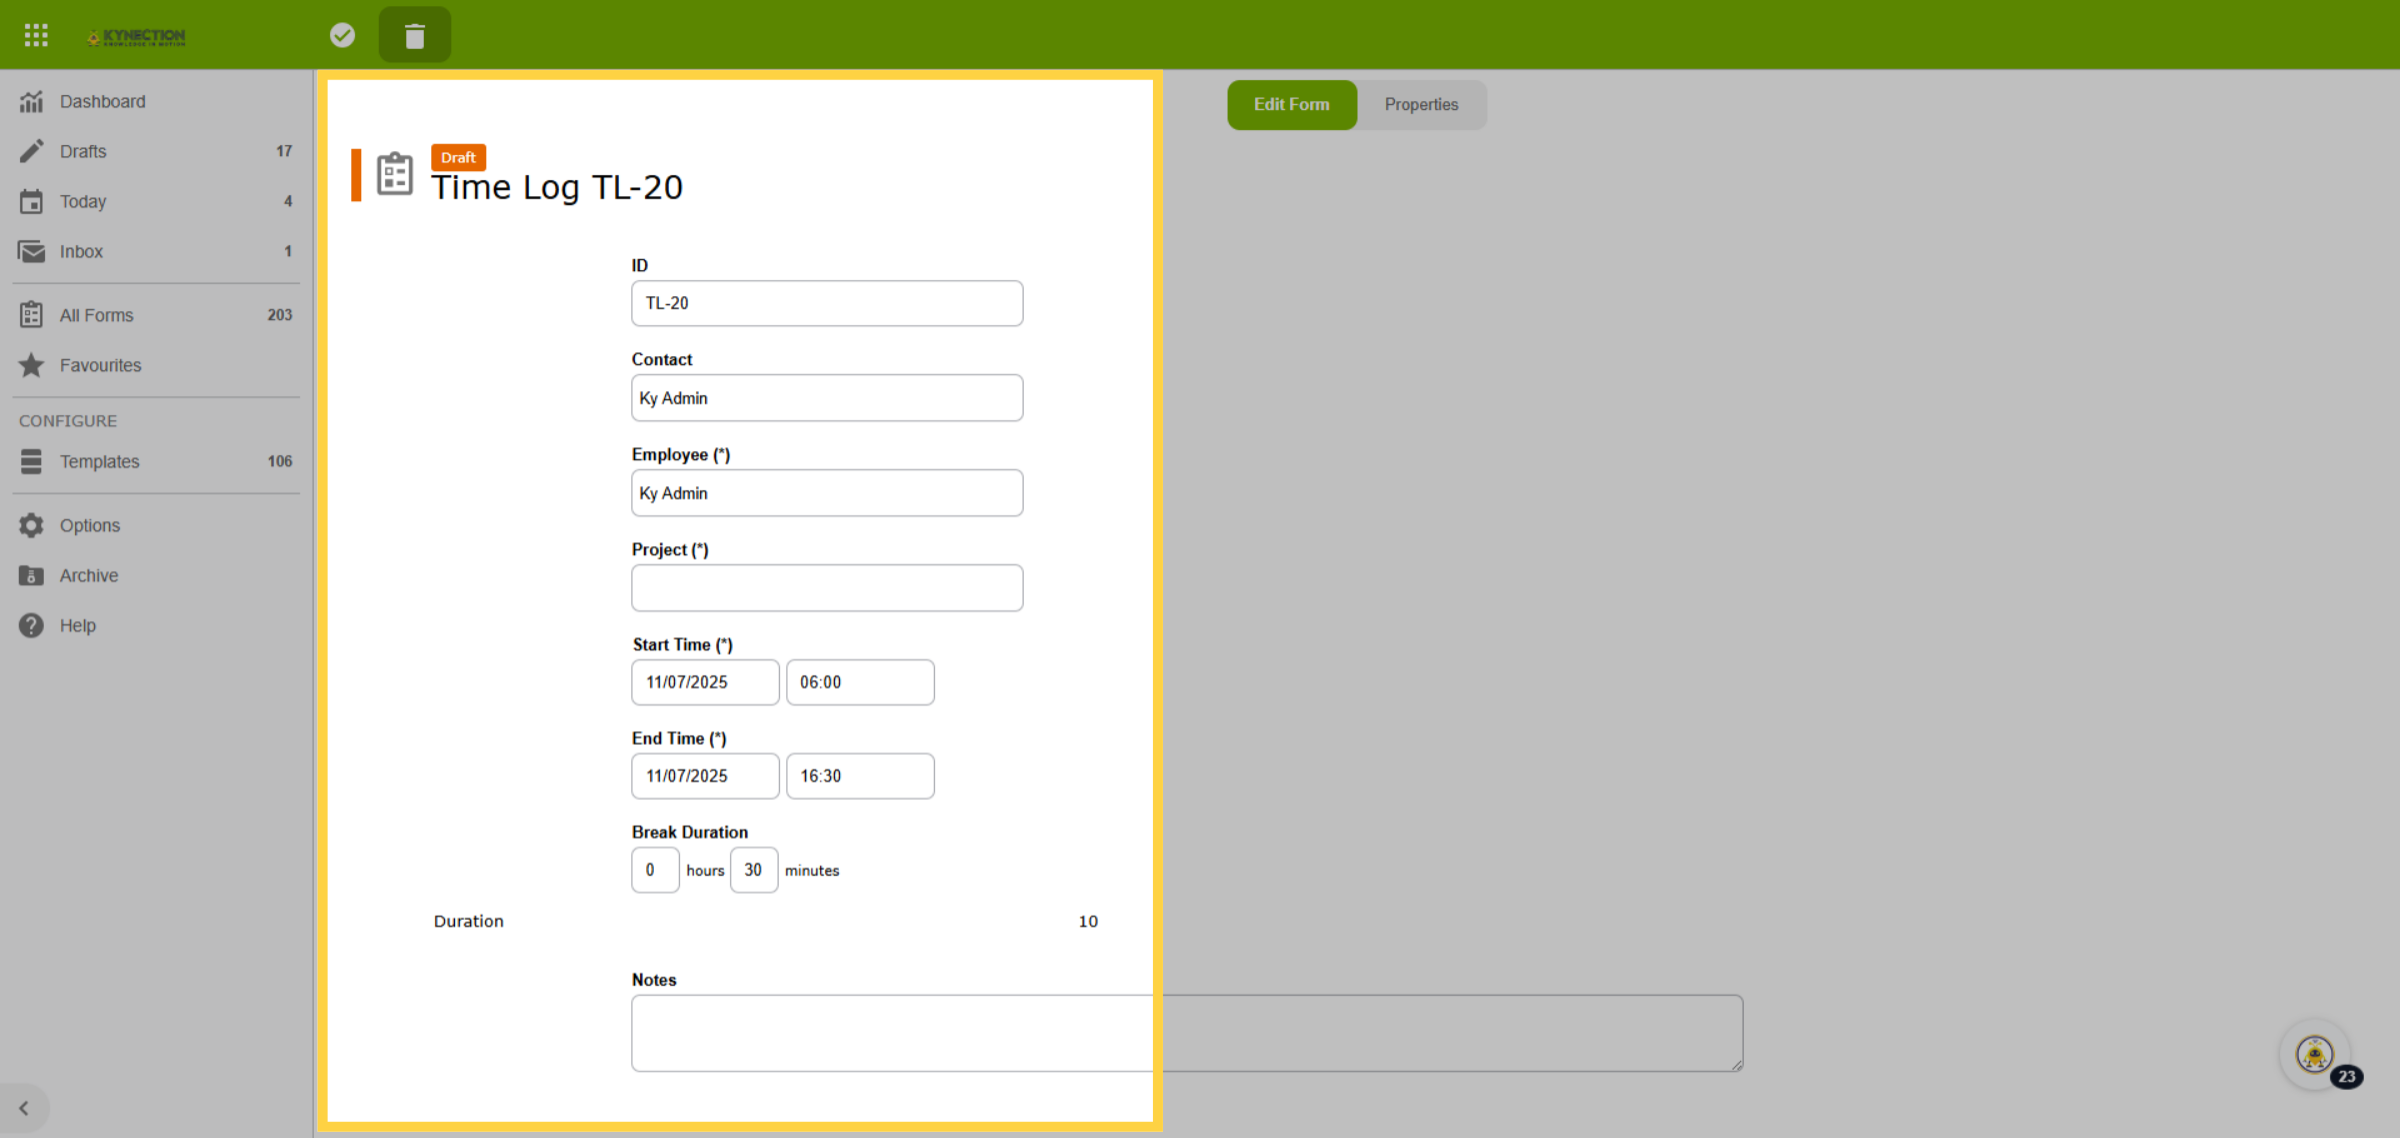
74. Add Timesheet
Quickly add a timesheet entry using the plus icon from the toolbar.
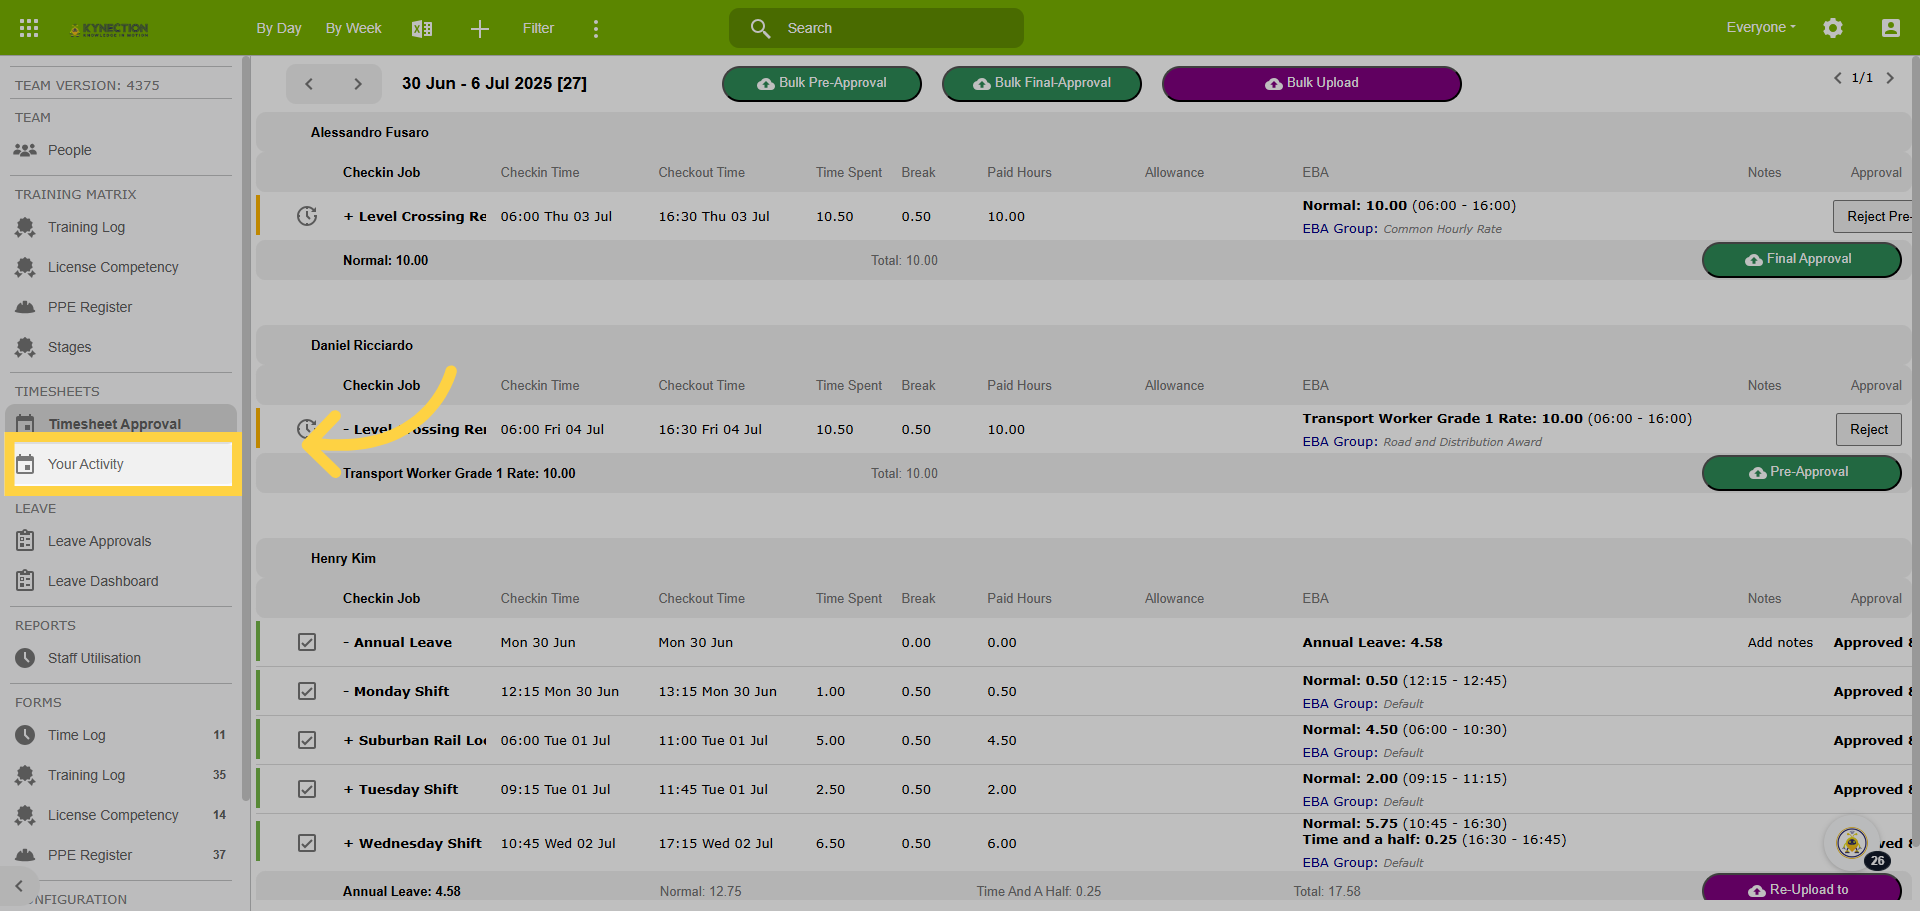
75. Your Activity
Your Activity section is a view your personal timesheets for the day or week.
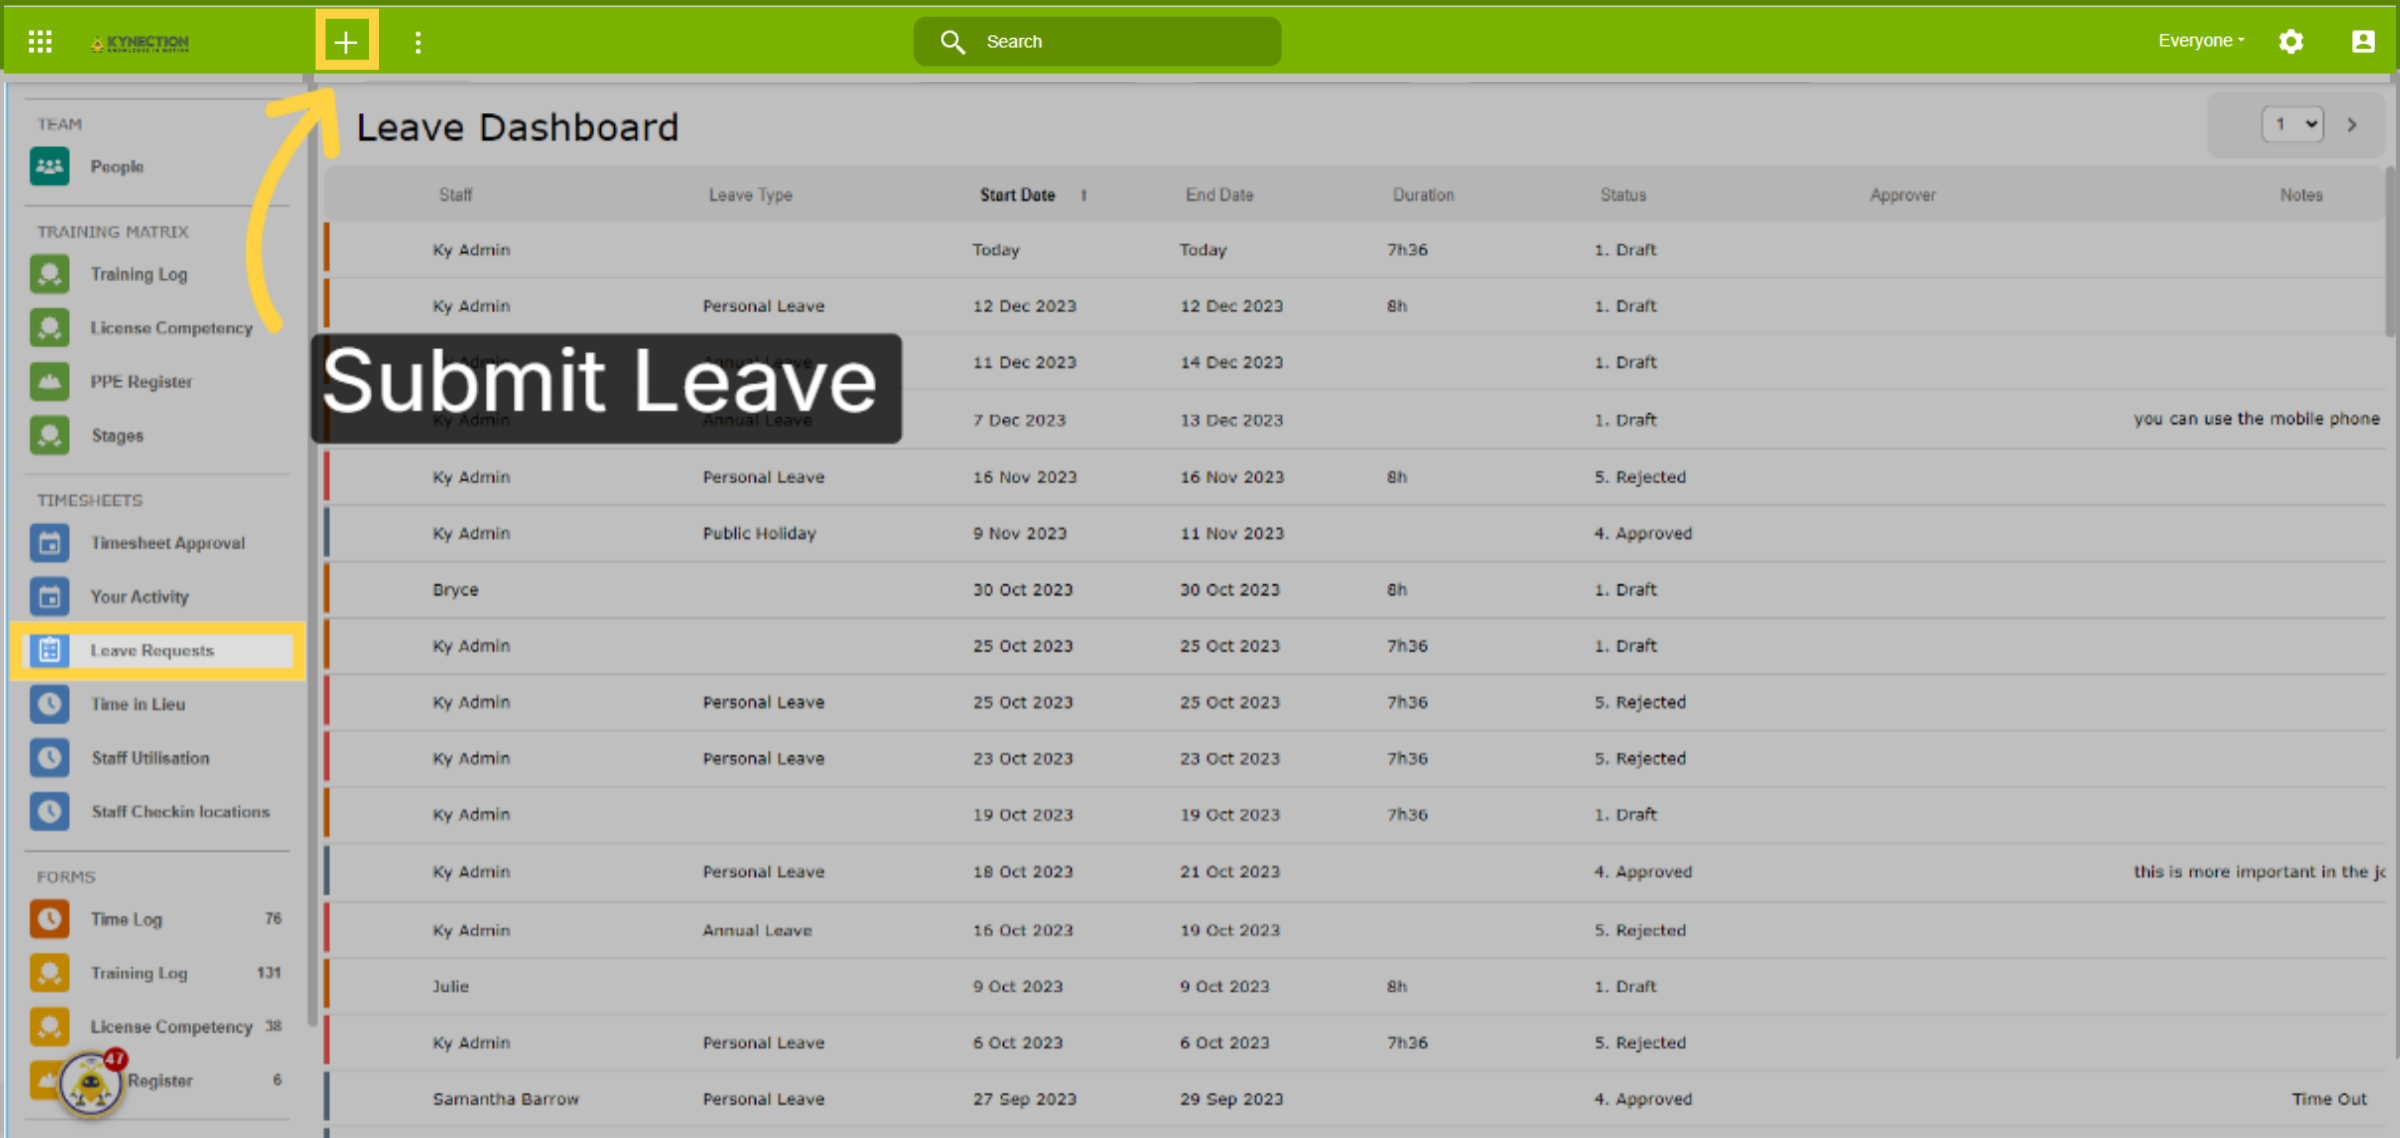
76. Leave Requests
This section provides access to all employee leave requests. Leave can be submitted via mobile, tablet, or browser by clicking the plus icon. To submit leave on behalf of an employee, go to their profile in People to submit.
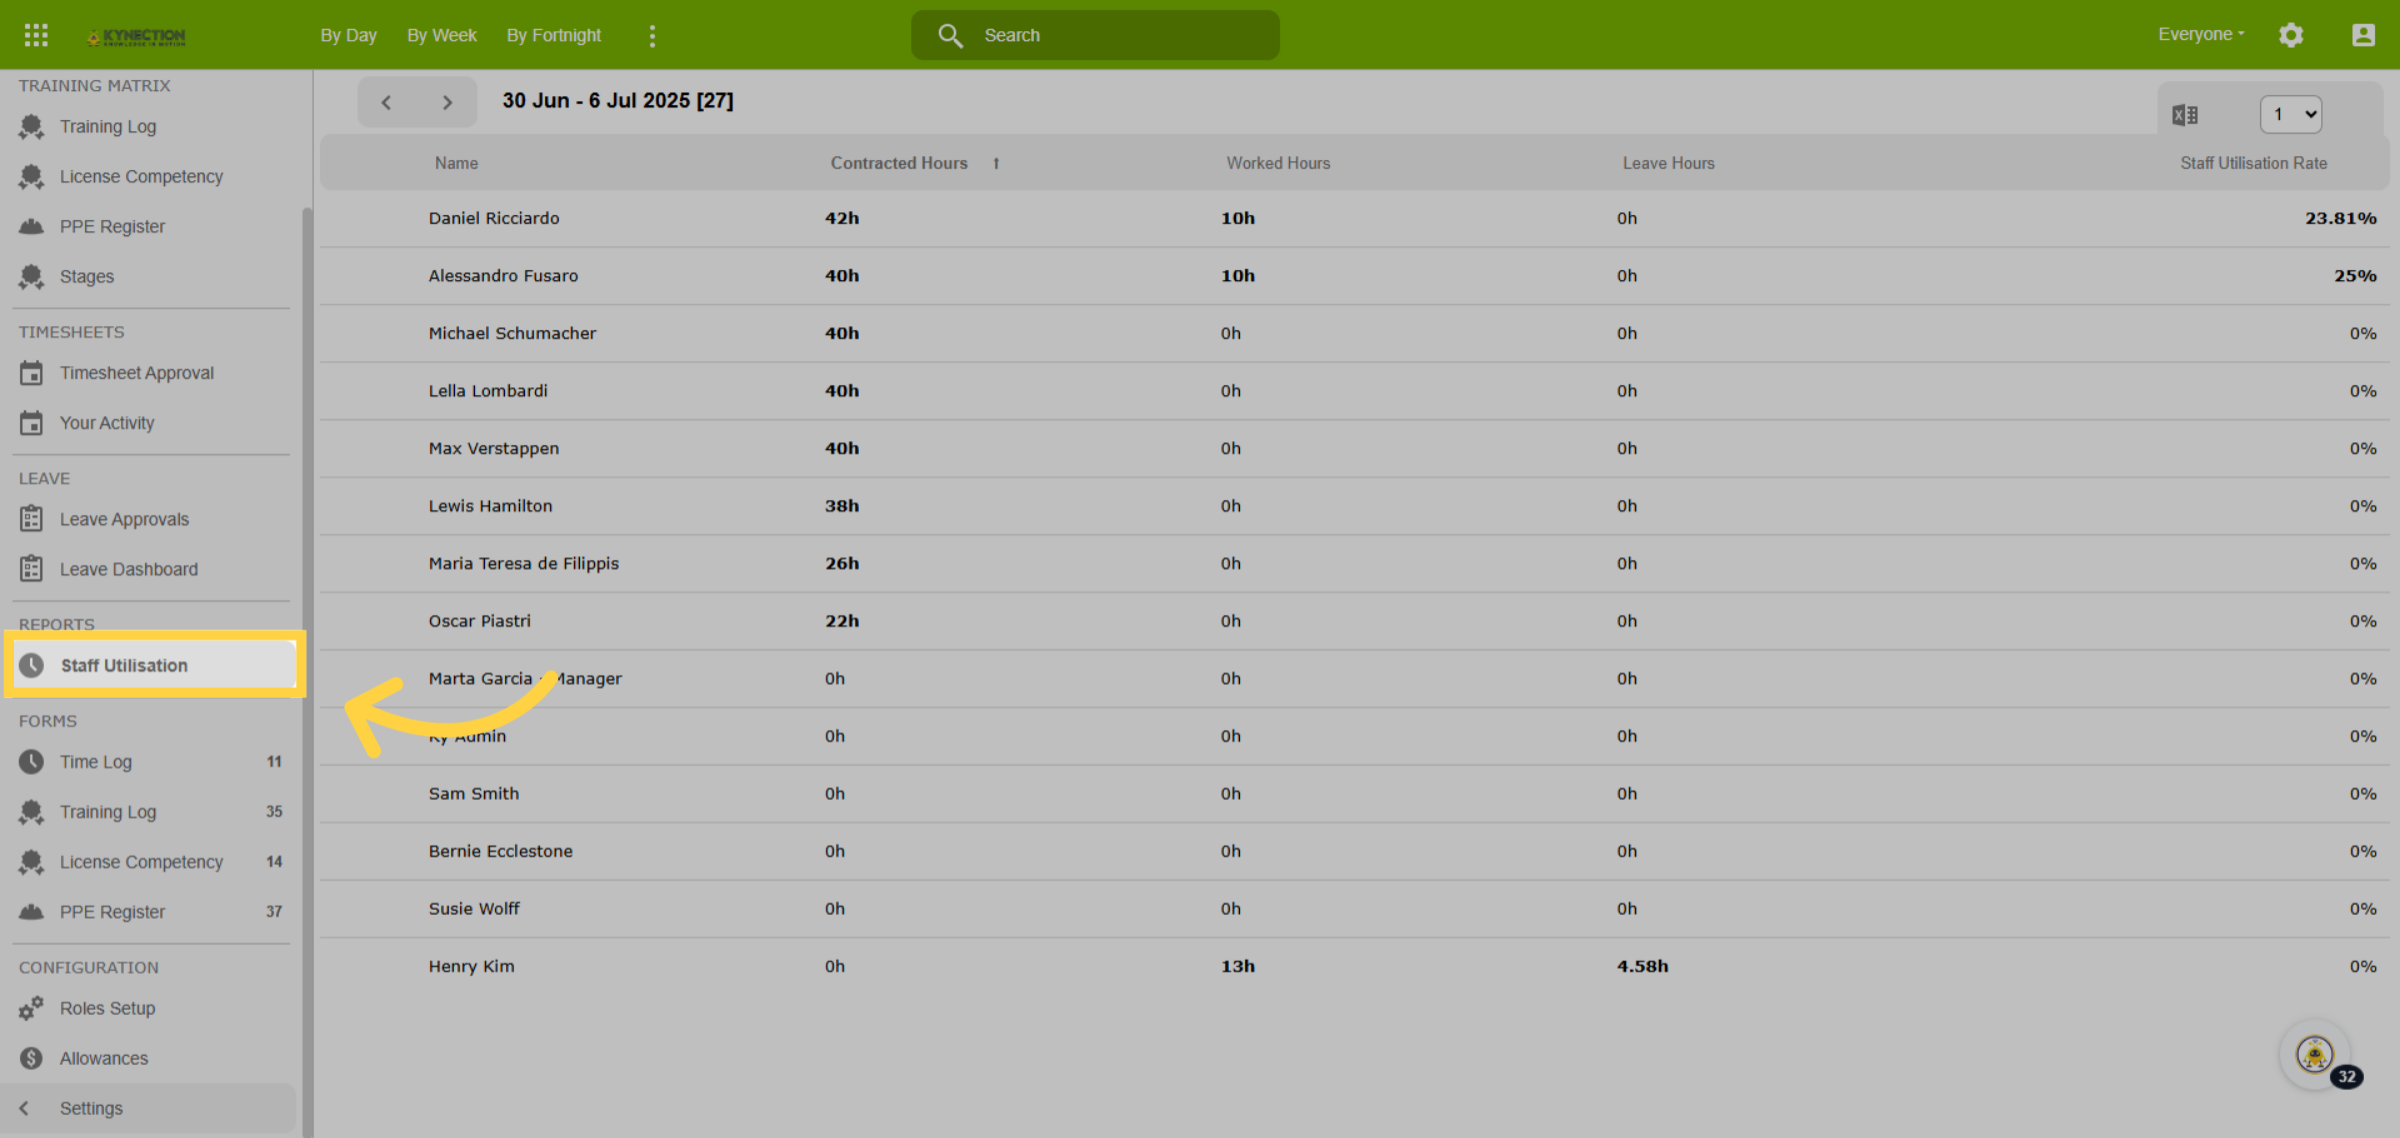
77. Staff Utilisation
This section provides an insightful overview of staff utilisation, displaying contracted hours, worked hours, leave hours, and time in lieu. It serves as a valuable tool for monitoring staff fatigue levels and ensuring their wellbeing.
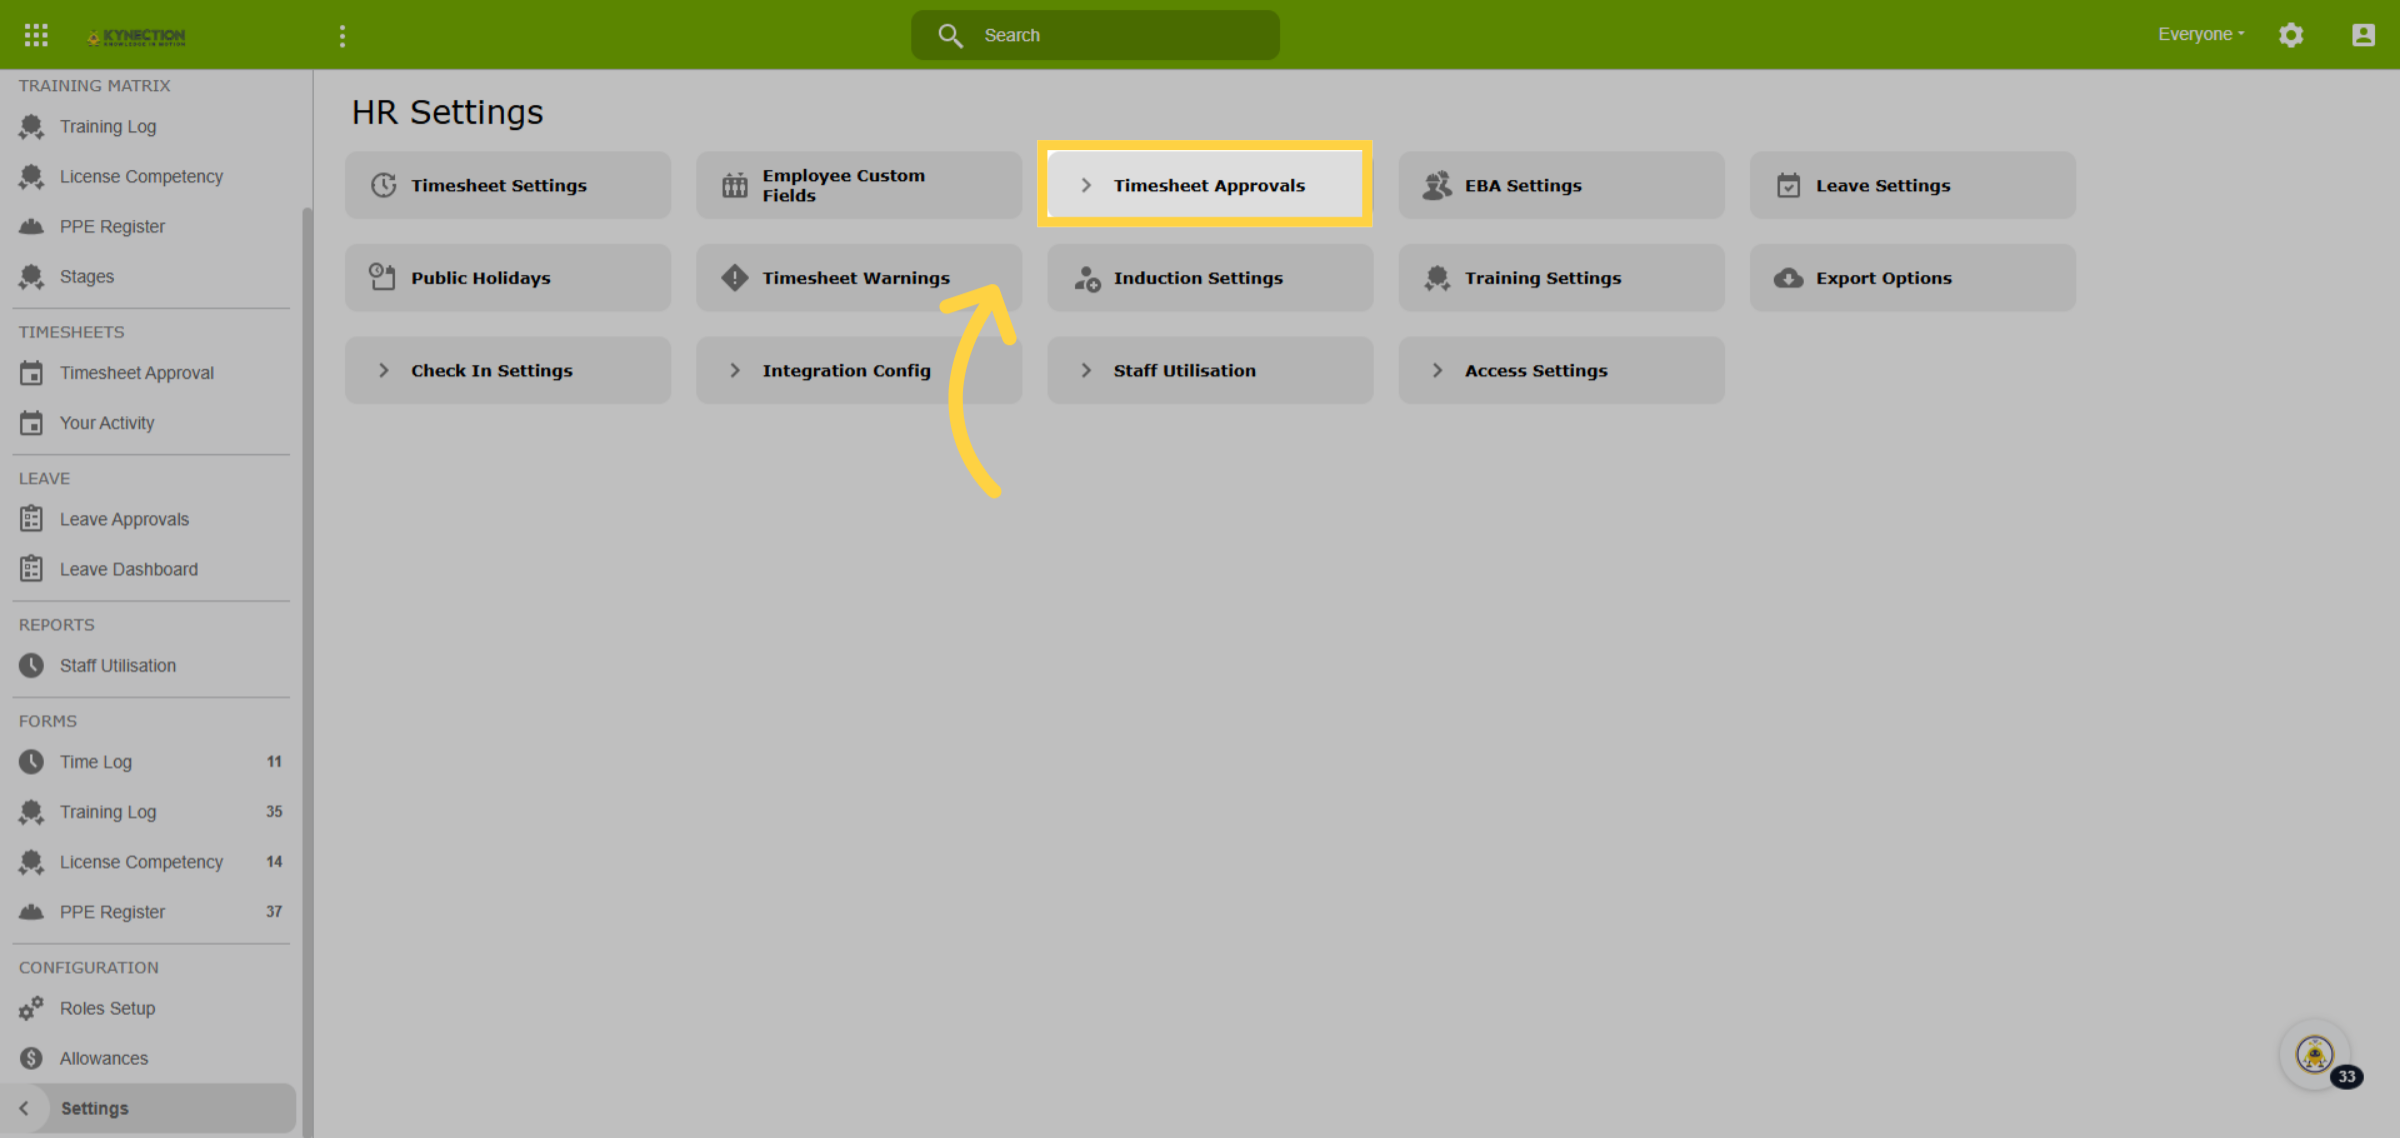
78. Timesheet Approvals
Let's discover how to configure who approves timesheets and leave. Navigate to Settings and select Timesheet Approval.
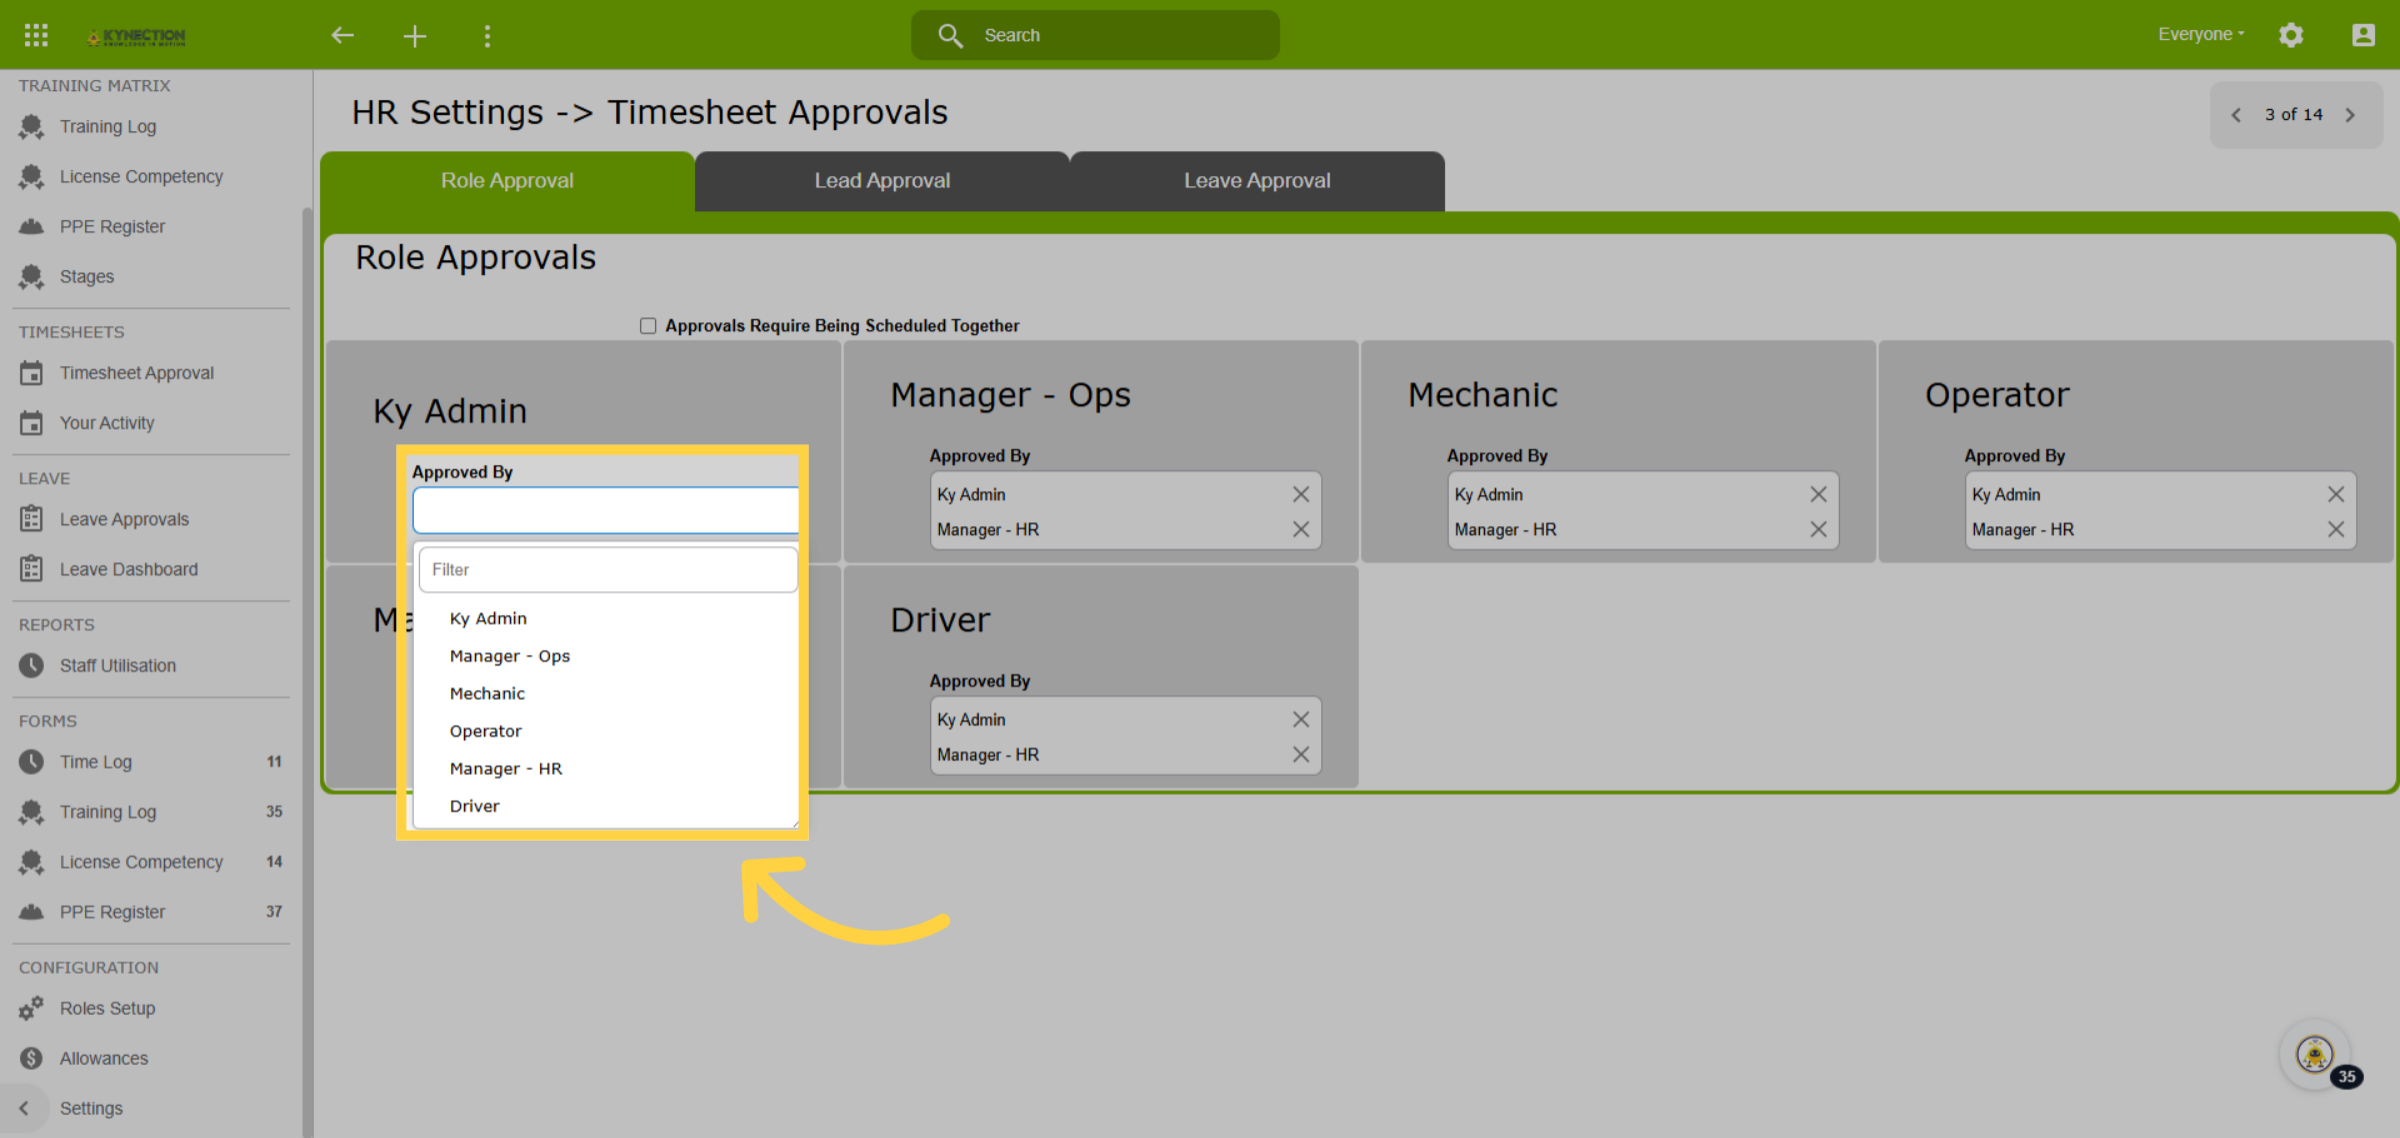
79. Role Approval
To begin, navigate to the Role Approval tab. Here, you'll need to select the role associated with the timesheet submission. Once you've chosen the appropriate role, utilize the drop-down menu to designate the role responsible for approving timesheets for the selected entry.
80. Role of Approver
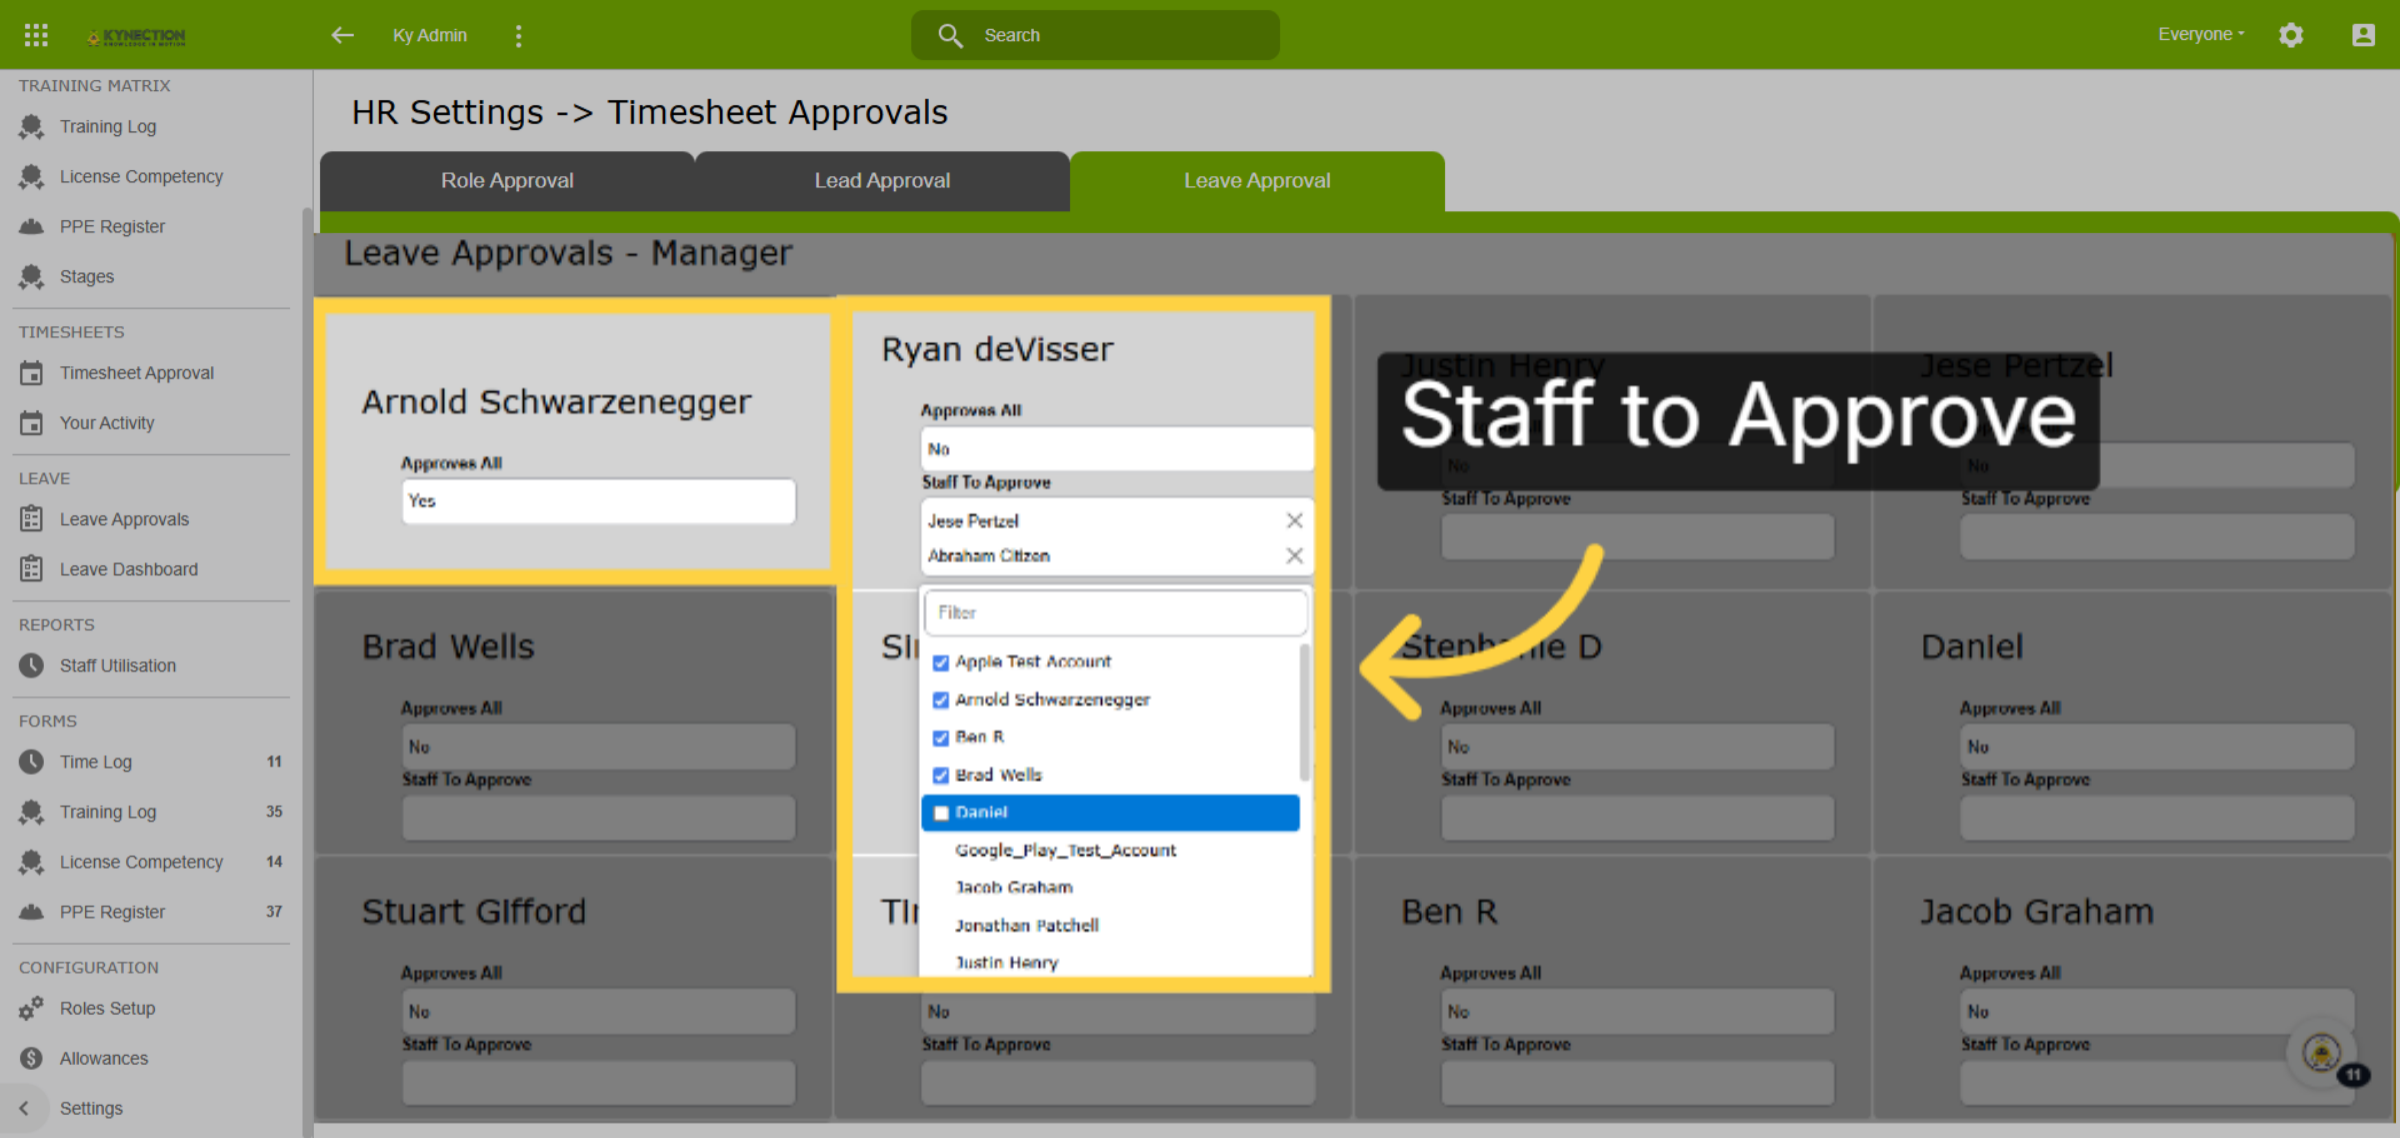
Access the Leave Approval tab. Select the role of the person approving leave.
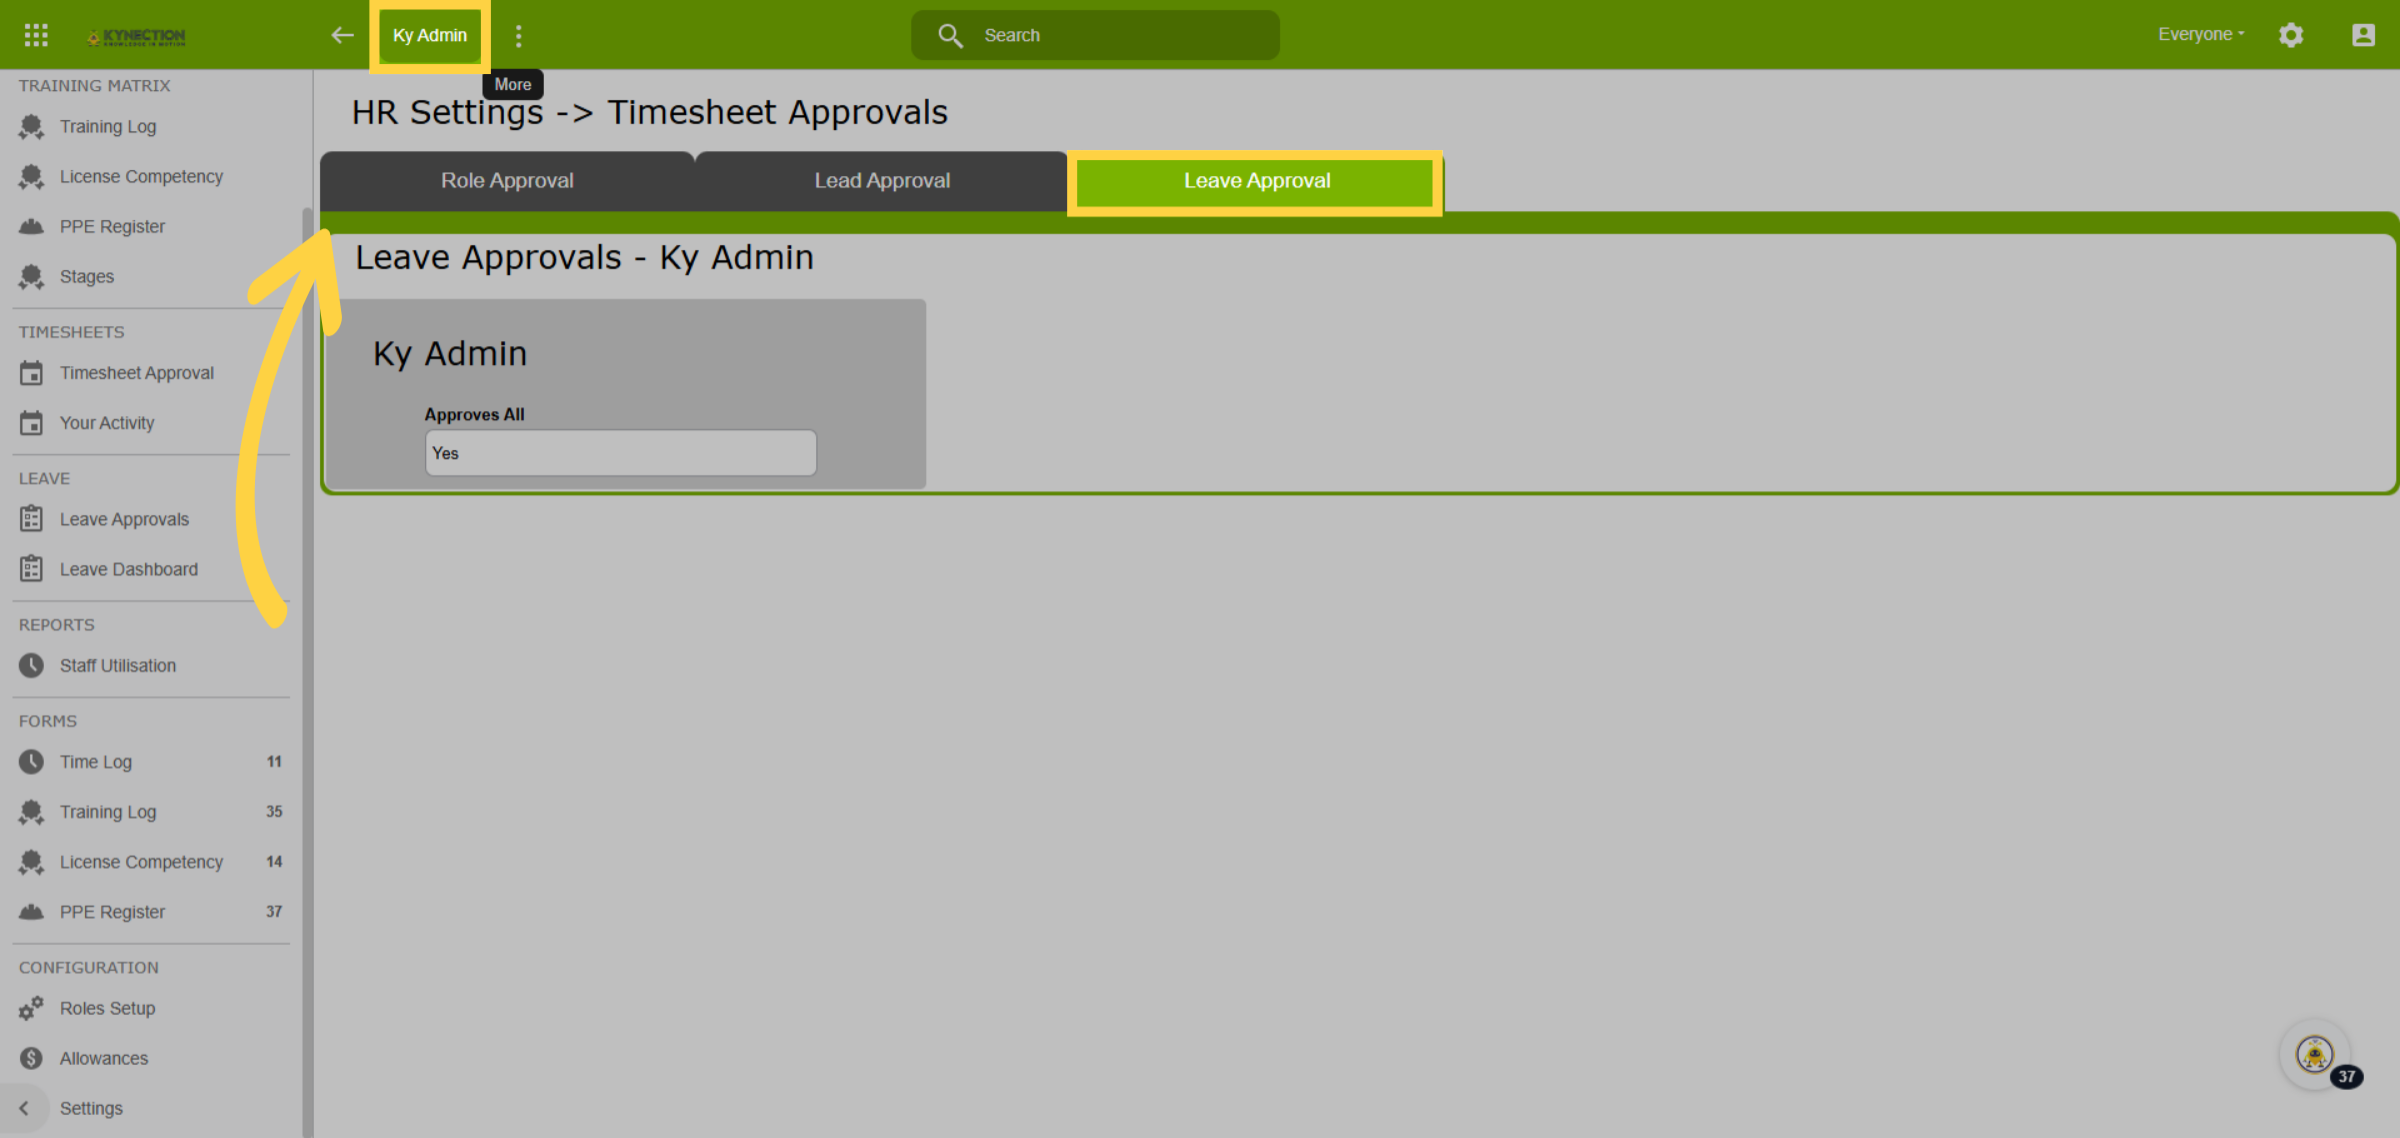
81. Staff to Approve
Multiple employees can be selected to approve leave, with options to approve all staff or select individuals.
By learning how to access different views and configure settings, you now have the tools to efficiently manage tasks like induction, time details, training logs, and leave requests. Feel free to refer back to this guide as needed to make the most of Kynection's HR capabilities.

